Showing posts with label quilted petticoat. Show all posts

Tuesday, December 8, 2020

2020 Costuming Year in Review

It's that time of year --where I take stock of what I accomplished and what I failed to accomplish. Normally I'd wait until the end of the month but since I'm doing Christmas sewing from now until then, I don't anticipate getting anything new made.  Here are my costuming accomplishments for 2020:

1, 2.  Two silk hoods:  One taffeta and one silk velvet.  To be honest, these were started in 2019 and the finishing details were done on New Years Day.  The silk taffeta one is copied from a New England example in the Museum of Fine Arts in Boston.  I created a downloadable pattern for these which is available on the blog post.   Blog post here.


3.  Fur trimmed velvet cloak:  Detailed blog post here.


4,5,6.  Mrs. Russell's outfit:  1760s brown silk gown, antique linen with lace handkerchief, lace trimmed lappet cap.  Detailed blog post here.


7,8.   Yellow Silk Damask gown with petticoat and lace pinner cap.  Blog post here.


Inspiration images


9.  1760s Indienne gown:  Detailed blog post here.


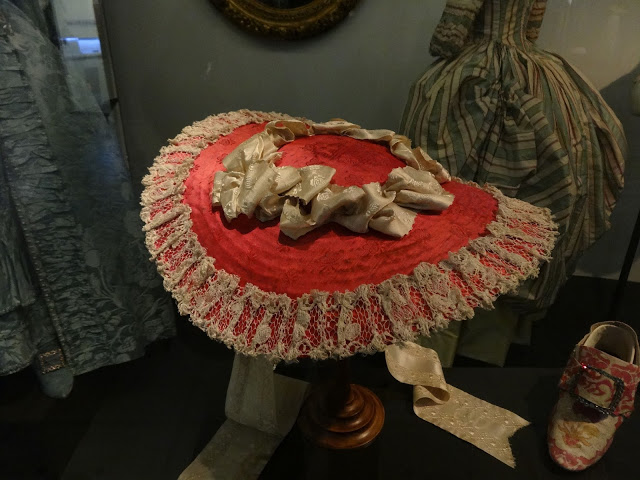
10.  Garnet silk hat.  Blog post here.


Based on this hat in the V&A

11.  Black silk tulle mourning handkerchief trimmed with lace.


12.  Moretti masks.  I almost hesitate to list these but they were quite labor intensive so I figured I would.  They are based on period images and a research piece by Phillipe Halbert.


13, 14.  Lambskin mitts of purple and claret.  Detailed blog post here


15.  Sultana with petticoat and sash.  Detailed blog post here.


16. Sheer linen cap trimmed with lace.


17 .  Long term project carried into next year:  Quilted petticoat.  Series of blog posts here.  I hesitate to list this but the time involved so far exceeds that of making of a number of gowns.  Here are a couple of progress shots.


Reflecting on what I accomplished, it occurred to me that everything was 18th century.  I really focused on studying different decades and what distinguishes them from others which made me feel that I had a good amount of variety.  The past couple of years have also had some Regency and Edwardian projects but not this year!  I'm planning though!   Next year will have more variety!

Friday, September 18, 2020

Quilted Petticoat, pt. 4

More quilting:


Some border pics:


I've also stitched a variety of flowers which I didn't photograph.  I'm about 40% done with the figures/border.


I'm afraid to stop and work on something else as I'm the queen of unfinished projects and I have too much time invested in this one already.  I'm just going to keep on chugging along!

Thursday, September 10, 2020

Quilted Petticoat pt. 3

Let the stitching begin!  I searched and searched and found a lap quilting hoop that I really liked.  As luck would have it, Luna found it before I could use it.  I like this hoop because it sits flat on my lap and has a sturdy 14 inch hoop attached.  I don't have to fudge with adjusting an angle and it has plenty of room to put one hand underneath.


As I started stitching, I found one challenge--my silk twist quilting thread is either too thick or too twisty to successfully thread my tiny betweens needles that I prefer to sew with.  I even have the John James big eye quilting needles but this thread won't go through the eye. I bent one using a wire needle threader.  I went with a size 10 embroidery needle which was nice and thin but longer than I prefer and that worked fine until I broke both of my wire needle threaders threading that.  I switched to a size 7 embroidery needle which has worked fine.  I'm going to have to experiment with some other brand needles and different threaders.  The longer needles are fine for stitching the figures because I'm not loading the needle with multiple stitches.  So many of the stitches change direction every stitch or two so it's a matter of literally sewing one stitch at a time anyway.

Here you can see the structure of the thread itself.  


As luck would have it--I received some new needles today--size 10 betweens by Bohin--along with 2 new Clover wire threaders.  They work perfectly!  The eye on the Bohin needles is wider than my usual John James so problem solved!

Here are a few pics of what I've done so far:

From the border:


Some of the figures in the squares above the border:


I'm really enjoying stitching these little figures.  I think had I gone with my first design plan--a featured braid for a border and diamonds, I would've gotten incredibly bored.  I'm enjoying the fact that each day brings different designs to stitch.  It was more work to plan and mark but much more enjoyable to stitch!