Monday, April 20, 2020

Sewing During a Pandemic: 1760s Print Gown

Being a lady of a certain age, I frequently wear gowns that are a few years behind in style.  Lately many of the events I've been doing date around 1770 so I've been choosing 1760s styles. The 60s aren't too different from the 50s but they are quite different from the 70s.  I'm finding there's a lot to like in mid 18th century fashion.  Let's take a look.

Extant Indienne gown ca. 1760.  Note that there is no matching stomacher.  The robings are folded and look double.  Fairly large cuff.

Wool Damask Gown ca. 1760.  Same features as above gown.  You can see the larger pleats on this gown which is another feature of mid century English gowns. Note the ribbon ties across the center.  I don't know if these are original to the gown but I have noticed period images from the 1750s do not have stomachers.   They tend to have vertical bands, ties or lacing across the center front to secure a handkerchief in place.

1760s portrait by JS Copley.  Note the larger cuff which is typical of an earlier 60s cuff which is more winged.  Also 60s sleeves are shorter and wider.  You see the shift cuff has a ruffle which is visible in the 50s/60s.

Girl with a tray.  1750.  Note the double folded robing, winged  cuff and shift sleeve ruffle as well as the ties across the center front. The sleeves on 50s garments are more full than those on 60s garments.

No date but appears to be 50s/60s.  Same features as above:  double robing, wide shorter sleeve with cuff and shift ruffles.

Girl with a fan ca. 1750.  Same features as above.  The shorter, fuller sleeve is really quite apparent in this one.

The features I've noted above disappear in the 1770s.  The sleeves get slimmer, longer and cuffs disappear.  Eventually the stomacher becomes a center front closing bodice.

Another detail worth noting is that the silhouette in the 50s and 60s showed wider hips which were achieved with panniers or hip pads.  Those seem to disappear in the 70s for English gowns, being replaced by bum rolls or no padding.   In the mid to late 70s we start to see more bum pads.

One detail I should also mention--mid century gowns were longer waisted as were mid century stays.  Also--if you study mid century images, you will see that the front opening isn't as wide and typically forms a "V."  Often the robings almost come together at the waist.  I need to play with my pattern to achieve this silhouette but I will wait until I've made mid century stays.

My research also indicates it was typical for petticoats to match gowns with the exception of quilted petticoats.

One thing to consider if you are using a print --research the date of the original or inspiration textile.  You certainly don't want to make a mid century gown out of print that didn't appear until 1780!  If your fabric is from Colonial Williamsburg, you can find the original swatch or garment in their emuseum which will give you the dates and use of the original textile. The online vendor doesn't typically give the dates.  This will alleviate the possibility of using an inappropriate textile. The print I used for this gown is a replica by Burnley & Trowbridge of a token from the Foundling Museum, dated to 1758.  This makes it perfect for a late 50s/60s gown.

If you are a seamstress that uses patterns, you will find that there aren't patterns for mid 18th century English gowns unless you scale up patterns from books.  My observation has been that many people simply use the available patterns that are geared for the 1770s.  In order to do this, changes should be made to make the gown appropriate for those earlier decades.

As noted in the extants/images above, you will need to shorten the sleeve and make it fuller.  I typically use the Larkin & Smith English gown pattern.  This post discusses how I changed that to have folded robings.


On this gown I added 1 1/2 inches along the front pattern piece to enable me to make the pleat on the robings to create the double robing appearance.

This print worked well for the en forreau back. I didn't particularly make an effort other than making sure the back fold was centered.

You can see how the robing/bodice piece goes to the back.  The robing covered the strap portion of the bodice.  I drafted a back facing (which is easy) as the straps don't seem to end up in the same place every time. 

I had made a mid century sleeve pattern which was about 1 1/2 inches fuller than my later sleeve and about 2 inches shorter.  I also used the same cuff as my brown silk gown.   It's larger than my late 60s cuff.  I'm still debating as to whether or not the cuff needs to be weighted.  Costume in Detail shows a number of cuffs with small self fabric pockets containing lead weights.  I have done this in other gowns using a drapery weight.  This gown will be worn over a mid century shift which also has a shorter, wider sleeve with a ruffle at the cuff. 

Almost done, pinned together.

This gown was made for an event taking place in 1770 where I was to portray a milliner so I do hope to make another cap.  In the meantime, I took a wired cap I made 4 years ago and put new ribbon on it.  1760s featured small hair and small caps.  This cap is quite petite.  I also made a nice 4 loop bow out of some silk taffeta I have to cover a hat.  I'll wear this with tambour work accessories.

I also made a 5 strand pearl choker and a bracelet from 4mm glass pearls.


And here's a pic from the event this gown was created for--worn with a different cap.


Overall, I'm pleased with this gown. It will be a nice summer addition  to my 1760s wardrobe.  My goal is to eventually make earlier stays and reshape the bodice on this pattern to a 1750s silhouette.

Thursday, April 2, 2020

Life During a Pandemic, part 7: When the going gets tough, the tough get cooking!

 What do you do when you can't go anywhere?  You cook.  It's not that I need to bake, I'm home most of the time anyway but in times of crisis, the feeling of needing to bake just kicks in.
I had made a sourdough starter last week using these instructions.  It was alive and well so I took out one cup to make sourdough pretzels and put the rest in the fridge.


One thing about working with sourdough that I'm not used to is that it makes a soft dough that doesn't rise quickly.  It has to ferment for hours, typically being made one day, left to ferment with folding and flipping it every hour for several hours before going in the fridge overnight.  My typical yeast doughs rise rather quickly.  My pizza dough easily doubles in an hour or two.  I wasn't sure if the pretzels were going to come out right.  The dough in the bowl seemed sticky after the 5 hours so I left it out for 2 more hours with more folding.  It started to feel more "lively," pulling away from the sides of the bowl, so I figured it was ready for the fridge  When I took it out in the morning to shape the pretzels with the cold dough, I knew it was right because there were air bubbles in the pretzel ropes!

After shaping the pretzels and leaving them to come to room temperature for an hour, they got placed in a boiling water/soda bath for 10 seconds on each side, brushed with egg white and sprinkled with Trader Joe's Everything But the Bagel topping which is good stuff!

This recipe is a winner!  I wrapped 6 of them and froze them.  We each had one yesterday then I put the others in the fridge.  I quick warm up in the oven on a cookie sheet makes them taste fresh baked.
I think the next sourdough experiment will be cinnamon rolls.

The next cooking task:  freezing celery.  This sounds weird I know but I always find soup recipes that call for celery and I don't keep it on hand.  I had bought a bag with 2 celery bunches at Trader Joe's last time I went (11 days ago) as I needed some for soup.  I didn't want to throw the rest out.  I did some research and found that you can blanch it and freeze it for freezing for soup.  It can't be eaten fresh this way.  Apparently it keeps longer in the freezer and retains more flavor when blanched.  I diced the celery, put it in boiling water for 3 minutes then plunged it in ice water until the water was cool. I let it drain on a paper towel.

I packed it in portion control bags--enough for 3 batches of soup!

Next up--making tortilla bowls for taco salad.  I have a little chili left over but not enough for two full servings so I thought I'd make taco salad.  Normally when I make a batch of 18 tortillas, I use 3 cups of masa and 2 cups of water for tortillas weighing about 1.4 oz. each.  So I figured I'd try 1 cup masa and 2/3 cup water.  Each dough ball was 3.8 oz plus a .2 oz one for Gloria.  I pressed the dough balls in the tortilla press and had to further roll them out as the press is a little small.

The get "cooked" on the griddle for about a minute on each side before going in a tea towel to steam.  This makes them more pliable.

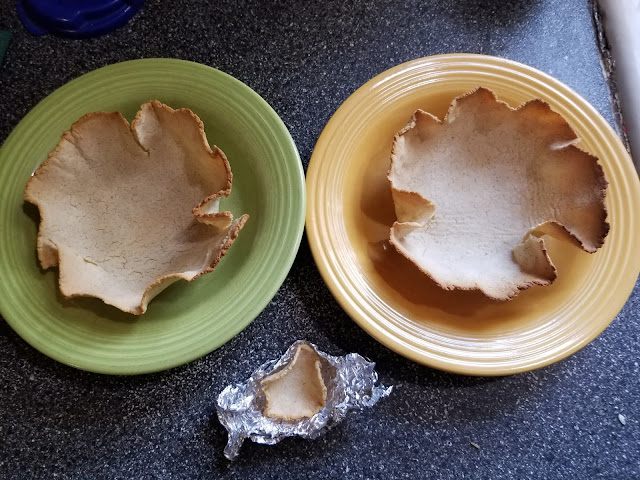
Next I had to figure out how to shape them.  First I draped them over upside down pyrex bowls but that didn't work because they don't flop enough.  I ended up lining the bowls with oiled foil and just sticking them in the bowls.  Then they got baked until they were crisp.  They took longer to bake than I expected.  When they started getting crisp, I lifted the foil from the bowls and they finished cooking much more quickly.  I flipped them over for a minute or two as well.

Here they are waiting to be filled. I'll have to find a better shaped bowl for the next time.  

And here they are filled with baby lettuce, topped with leftover chili, sweet baby red pepper slices, cherry tomatoes, olives, jalepeños, cheese and sour cream.  Gloria's has oil free refried beans, spinach and sweet red peppers.  These were fun.  They would probably be crisper if they were fried but I think the bottom just gets leathery from the moisture of the ingredients in the bowl.  The sides were still crispy.

Food prep always brings about calm and a sense of purpose.  I mean everyone has to eat!  I suppose this is why you can't find a bag of flour anywhere around here.  Tomorrow, food prep will be easy--tomato soup in the Instant pot and grilled cheese.  So looking forward to that!

Today's numbers have hit a milestone.

Over 1 million infected.  They are predicting at least 2 weeks before we hit the apex here.  If you're thinking of going out in the public--don't!