Showing posts with label block printed gown. Show all posts

Tuesday, December 8, 2020

2020 Costuming Year in Review

It's that time of year --where I take stock of what I accomplished and what I failed to accomplish. Normally I'd wait until the end of the month but since I'm doing Christmas sewing from now until then, I don't anticipate getting anything new made.  Here are my costuming accomplishments for 2020:

1, 2.  Two silk hoods:  One taffeta and one silk velvet.  To be honest, these were started in 2019 and the finishing details were done on New Years Day.  The silk taffeta one is copied from a New England example in the Museum of Fine Arts in Boston.  I created a downloadable pattern for these which is available on the blog post.   Blog post here.


3.  Fur trimmed velvet cloak:  Detailed blog post here.


4,5,6.  Mrs. Russell's outfit:  1760s brown silk gown, antique linen with lace handkerchief, lace trimmed lappet cap.  Detailed blog post here.


7,8.   Yellow Silk Damask gown with petticoat and lace pinner cap.  Blog post here.


Inspiration images


9.  1760s Indienne gown:  Detailed blog post here.


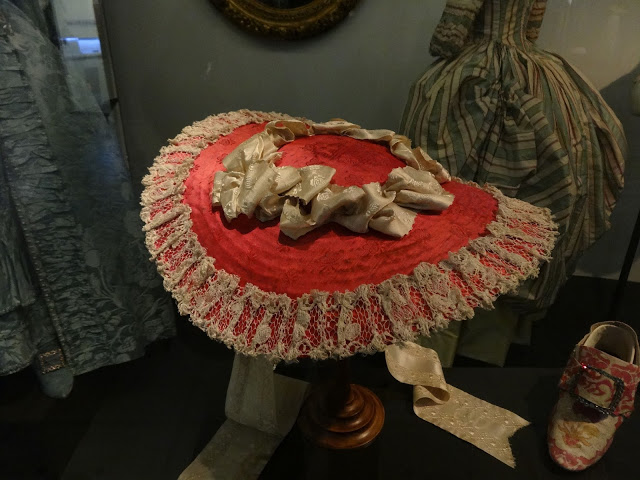
10.  Garnet silk hat.  Blog post here.


Based on this hat in the V&A

11.  Black silk tulle mourning handkerchief trimmed with lace.


12.  Moretti masks.  I almost hesitate to list these but they were quite labor intensive so I figured I would.  They are based on period images and a research piece by Phillipe Halbert.


13, 14.  Lambskin mitts of purple and claret.  Detailed blog post here


15.  Sultana with petticoat and sash.  Detailed blog post here.


16. Sheer linen cap trimmed with lace.


17 .  Long term project carried into next year:  Quilted petticoat.  Series of blog posts here.  I hesitate to list this but the time involved so far exceeds that of making of a number of gowns.  Here are a couple of progress shots.


Reflecting on what I accomplished, it occurred to me that everything was 18th century.  I really focused on studying different decades and what distinguishes them from others which made me feel that I had a good amount of variety.  The past couple of years have also had some Regency and Edwardian projects but not this year!  I'm planning though!   Next year will have more variety!

Wednesday, September 13, 2017

Drawstring Block Print Regency Gown and Spencer.

A little diversion from the 18th century--

I decided that I needed a more common gown for Regency events and I didn't want to invest a lot of money.  I found a small Indian block print on Ebay that I liked and got 5 yards of it.  The width was only 42 inches wide so it took all 5 yards to make a simple drawstring gown.  I used the Sense & Sensibility Elegant Lady's Closet pattern with a few easy changes:  I added 4 inches to the width of the front so that I would have more gathers on the bodice and I lowered the neckline by 2 inches.  I also made the lower drawstring so that it tied at the center front inside the gown and made the sleeve band narrower.  The gown was entirely stitched by hand using tiny French seams on the skirt and flat felled seams on the lined bodice.  This is a really comfy gown for a hot day.  Here is the fitting:


The Spencer was a little more challenging.  I love the sketch of the spotted muslin Spencer in the book Costume in Detail.  I decided that I would make a similar one out of olive green cotton to go with my gown.  Here is what I had to work with.


The bodice front looks just like the bodice of my gown.  I thought it would be easy enough to adapt the same dress pattern for this project. The original is unlined so I decided mine would be as well.  I cut the back pieces the same as the gown.  I used the front lining pieces and raised the neckline so the finished bodice would be 5 inches high.  I also widened the shoulder pieces slightly.   I lengthened the short sleeve to a finished length of 7 inches as indicated in the drawing and cut the long sleeve included in the pattern.  I left the long sleeve plain instead of making one with the gathered cuff described in the book as my fabric is heavier than the sheer muslin the original was made of.  I also made a very narrow band for the short sleeve as the original has a drawstring and I didn't want a white cord with the green fabric.  I drafted a piece with 3 points --the center being 4 1/2 inches long, the side points being 4 inches long.  The width of the piece with the points was 9 inches wide.  I roll hemmed the pointed piece.  

I stitched the bodice together with felled seams then I stitched the sleeve seams. I cut away 1/4 inch of the lower armscye to make it a little roomier.  I had to baste in each layer of the sleeve separately. The pointed piece was first and I eased it to 8 inches.  Then I basted the short sleeve in which you can see below.


I pinned the long sleeve in and backstitched through all the layers.

The neck edge and the bottom edge had the hems pressed in --1/4 inch turned in then 3/8 inch turned in.  The left front edge was turned in half inch before pressing the neck and bottom edges.  The right front was turned in half in twice AFTER pressing the hems.  An eyelet was made on the right front in the hem at the neck and bottom edges.  This created a flap that covered the ties when the Spencer was closed as in the original.  I used 1/4 inch cotton twill tape and threaded it through both casings.  I stitched the tape in place at the side seams on the bottom edge and at the shoulder seam at the top edge so that the gathers would only be in the front.


The final outfit consisted of my chemise and stays with a strapped white petticoat, chemisette, the new gown and the Spencer.  I wore my Regency cap with no bonnet as I hadn't finished it in time.  I was so glad to have the Spencer as it was cool that day and it added just the right amount of warmth for the day.


I was pleased with the way this turned out.  I really love Costume in Detail.  The sketches are really detailed enough that you can reproduce the outfits with patterns you may have or by draping.  I've found a couple of gowns that are on my list to make at some point.  It's a great book to have in your costuming library.

Sunday, May 28, 2017

Odds and Ends

Sometimes I just get lost in making small projects.  Here is a compilation of what I've been up to lately.   The first project wasn't so small as it was a gown but it was completed in 3 days so it wasn't a particularly taxing project.  I purchased the hand block printed fabric from a friend who was destashing and I used the Larkin & Smith English gown pattern that I had adapted into a center front closing gown as explained in this post.  I wanted to wear this during the Printed Fabrics Symposium in Colonial Williamsburg as my goal was to wear a different print each day.  I got the gown almost completed before leaving and ended up doing some finishing in the hotel.

I love this fabric

I added the ties to draw up the skirt and finished the hem in the hotel.  Here it is with just the side seam ties drawn up.  There are also ties to draw it up at the side back seams.


Whole outfit as worn in Colonial Williamsburg


Visiting Philly for the members' preview at the Museum of the American Revolution and wearing different accessories:

And at Mount Vernon for Call to Arms with different accessories.


I love this gown.  It's lightweight and very comfortable.  Because the fabric is so lightweight, I made sure to use a medium weight linen to line it with in order to provide the necessary structure.

The next project which I had been procrastinating doing was a new shift which I'm wearing in the picture immediately above.  My old shift didn't have cuffs which I prefer so I finally made one that did.  I purchased some lovely cuff links from K. Walters At the Sign of the Gray Horse last year and finally can use them. I really dislike making shifts and shirts.  I think it's the gussets and felled seams that bug me so I'm glad that I got that one done.

Next project was a nifty silk work bag using the instructions in the first Lady's Guide to Sewing.  I used some silk taffeta I had bought to line a yellow cloak and lined it with a scrap of yellow linen.  Silk ribbon trim was added to the outside in a lighter yellow.  I need to order more of this ribbon for the ties as I didn't have enough.  I used white China silk ribbon in the meantime.  I love these bags when I don't wish to carry a basket and I carried this one around Philly when we were there (you can see it in the pic above.)  


Next small project:  A green market bonnet!  This green ribbed silk is one of the new ribbed silks that Renaissance Fabrics is carrying.  They are gorgeous!  This one has yellow threads in the weft which makes it somewhat iridescent.  This silk has a lot of body and is very crisp.  I used the Fashions Revisited Market Bonnet pattern which was very easy to follow and the project took one afternoon.  The ribs on the silk ran horizontally on the fabric so I cut the bonnet on the cross grain which ended up only using 1/2 yard!  I have enough left for another project.  I also had some double layer milliner's buckram in my stash so I only needed one layer of that for the brim.  Finished it off with some wide white double face satin ribbon from my stash which was ruched.


Next project was decorating a new pair of American Duchess Dunmores.  The shoes were on sale and since I wanted blue shoes to wear with a number of projects, I figured why not!  I bought the shoe dyes from American Duchess and mixed two colors using the provided swatch to get the color I wanted then I followed the instructions for dying the shoes.  The color was nice but the dyes did not dry evenly for some reason, leaving white areas along some of the seams and looking a bit splotchy.  AD sent me more dyes and I did another coat which helped somewhat.  After searching online, I found that a lot of people used Rit dyes successfully to dye shoes.  One difference with Rit dye though is that it typically needs to be rinsed out which doesn't happen with shoes so you have to Scotchguard the shoes.  The Rit dye worked great to even out the color and I sprayed the shoes with a water proofing spray created for sports gear.  Since I was using fancy buckles on these shoes, I felt they needed a little more trim so I found a narrow braid at Joann's that worked well.  

I haven't worn them yet but I hope to wear them with a gown made from the fabric in the background of the pics.


My last project was a utilitarian one.  I needed a hussif!  I have a lovely 18th century sewing box but it's too big to take with me to events and, quite frankly, I'm tired of hiding zip loc bags in my frail.  I figured out how many pockets I needed and made a hussif that would be able to house all of my basics.  I also made a little leather sleeve for my embroidery scissors so they wouldn't poke through the fabric and I used Pigma pens to create a linen measuring tape.  I have everything I need right at hand!


All in all, it's been a productive few weeks!