Showing posts with label Federal Era. Show all posts

Tuesday, September 10, 2019

1810s Ball Gown from an Antique Sari

I snagged a nice vintage silk sari at a swap and shop we had at our February workshop.  It has a very delicate design and is perfect for a Regency era gown.  I looked at a few images of gowns that appear to be made of saris or have sari trim:


-

I decided to make a gown with an apron front gown because I find them easiest to get in and out of by myself and I don't have to strain the fabric when doing so,   I like the bodice of this gown in the Colonial Williamburg collection and thought I might do something similar with a drawstring at the top of the fashion fabric.

First I had to figure out how to use the various sections of the sari.  It has the one section at the end that is completely embroidered.  I figured I'd save that for a reticule and other small items.

The next section had little tiny flowers embroidered on it.  This was a fairly small part.  I thought I'd use this part for the bodice and sleeves.

The majority of the sari had rows of the tiny embroidered flowers.

Here's a close up. The direction of the flowers dictate that the sari must be cut on the cross grain.  There is also a lot of the border trim that can be used in various parts of the gown.

The biggest challenge was the condition of the sari.  It seems structurally sound but there were stains in various places that I had to cut around.  I decided to use this gown that I made in 2017 as the basis. I had draped that bodice based on a fashion plate and figured that I could just change the apron front bodice piece.

I cut the front lining pieces which will be used as the bodice sides out of linen and the sari silk.  I folded the seam allowance (hem) of the silk over the linen and stitched it in place.  I left the center front without the silk so I could pin it.

I constructed the back the same as the white gown, flat felling the seams to the lining.

I draped the apron front. The band at the top of the front skirt is 18 inches and I decided that the bodice piece needed to have a finished measurement of 14 inches.  The bodice front needed to be 6 inches high at the side edges and 5 1/2 inches high in the center.  I added 1 inch  to get 7 inches  (dipping to 6.5 in the center) by 24  inches in length.    I hemmed the side edges and pleated the lower edge to make the piece measure 14 inches.  I then made a tiny casing  (1/4 inch) with an eyelet in the center on the inside.  I threaded 1/8 inch tape in the casing and through the center eyelet so the casing can be adjusted when worn.

Here's the front before the sleeves.

I used the sleeve piece I drafted for the white gown but decided to adapt the design from the gown in the Shippensburg collection (Fig Leaf pattern).  I used the edge trim and cut strips of it with 1/4 inch seam allowance on each long edge.  I turned in the seam allowance then folded the strip in half. 

Gown ties were added as was done with the white gown in the linked post and a belt was made with the trim.  The belt is secured at the center back and side seams and pins in the front.  It's stitched to the gown across the back on the bottom edge of the belt so that the tape ties can be hidden behind it.


The belt is loos in the front and pins at center front.

Here's what it looks like on!

I found this great little reticule I had bought at a museum gift shop--one of the volunteers makes them.  This will be perfect with this gown!  I also wore an antique silk chiffon duppata shawl, and white leather gloves.   Jewelry is by Dames a la Mode.

I decided to go to Hampton National Historic Site to get some good pics since it's closed today.


I'm really pleased with how this gown turned out.  There were times I had my doubts as it was sort of a study in improvisation but overall, I'm happy with the fit and the appearance. 


Sunday, August 18, 2019

1790s Over Gown, Hat and Half Bodiced Petticoat

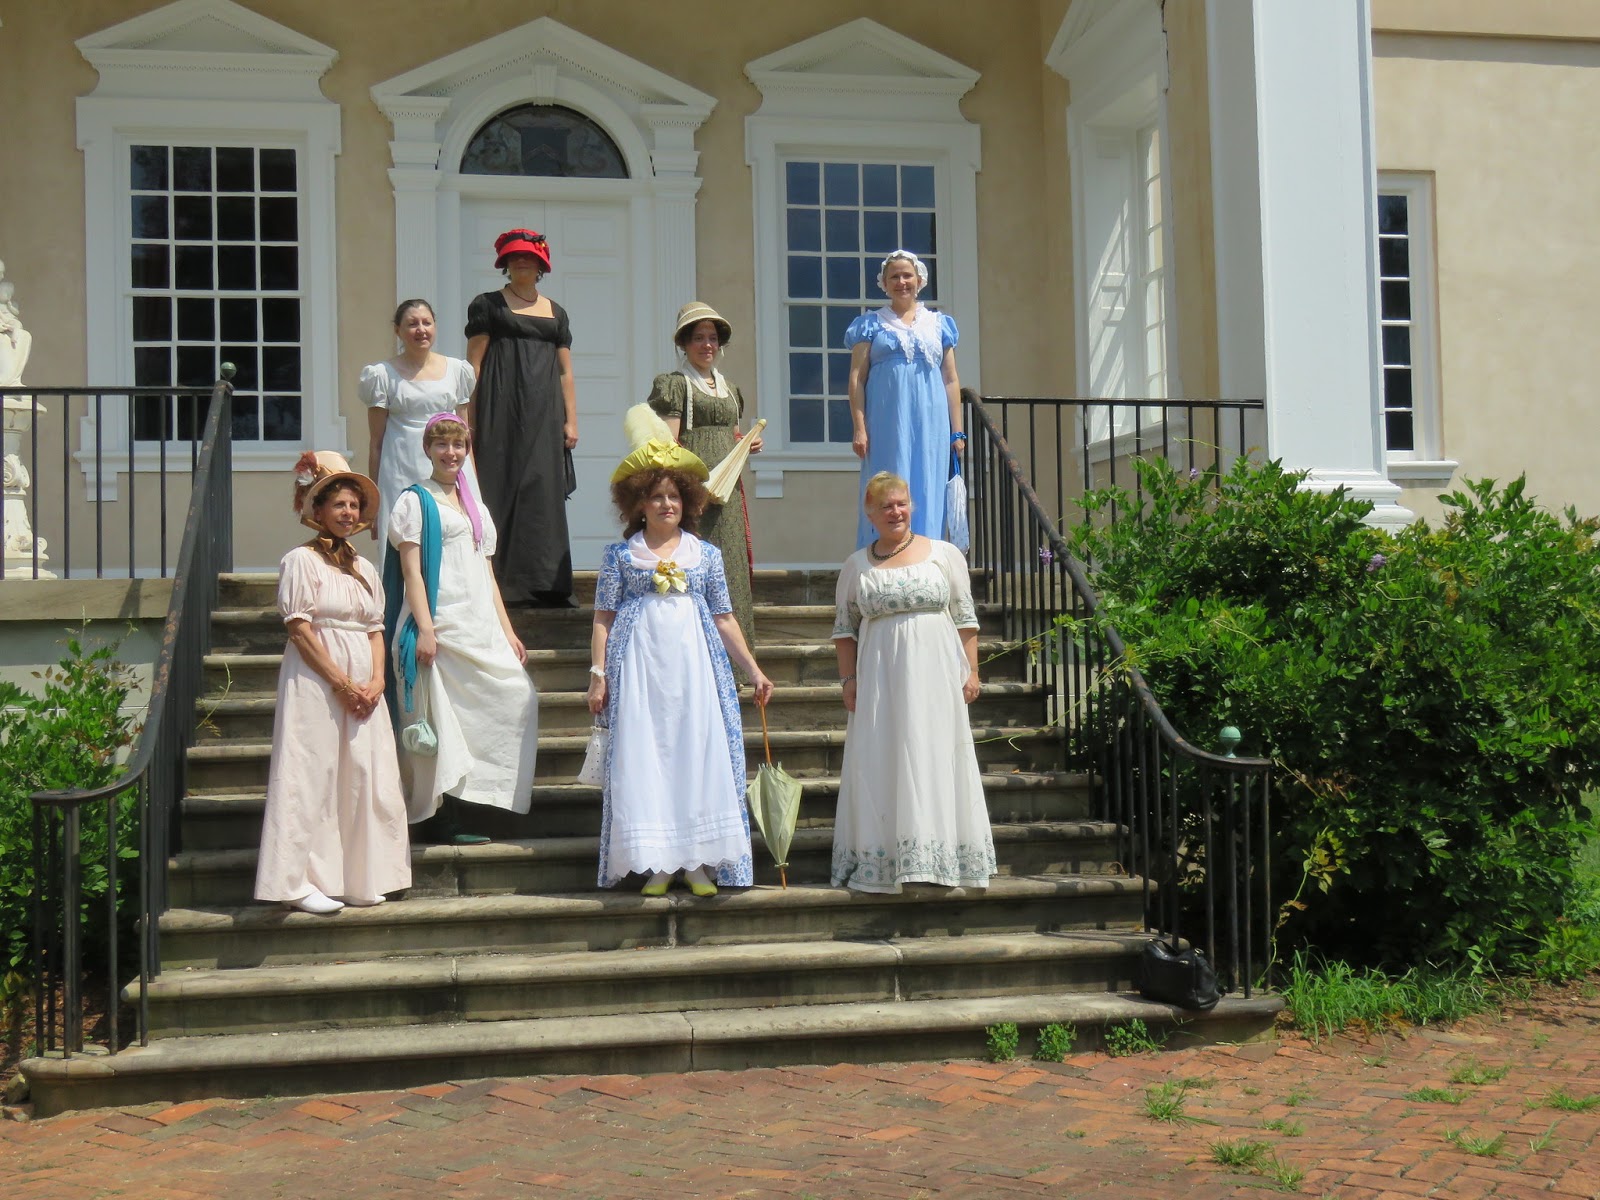
We held our first Federal Era workshop weekend this weekend and I wanted to make sure I had an outfit from each decade to wear.  I planned on wearing my 1805 dotted Swiss ball gown on Friday and my 1810s block print gown on Saturday. I wanted to make a 1790s outfit to wear to Hampton Manor on Sunday since the mansion was completed in 1790.  I had about 4 yards of some bock printed voile left over that I had used for a summer Italian gown so I figured I'd use that to make an over gown to be worn over a half bodiced petticoat.  Here are my inspiration images:


This was my inspiration image for a hat.

I decided to start with the petticoat.  I fell in love with this pattern when hosting a Spencer workshop with Mackenzie Anderson Sholtz of Fig Leaf Patterns.  She showed a number of outfits that were made by using the same petticoat with a variety of Spencers and short gowns making that petticoat suitable for several decades.  I really like that idea.  I have a number of 1 -2 yard pieces of fabric that can be used for the toppers so I decided to make several of these petticoats.  I'm still working on the 2nd one.  The one for this outfit is made out of my favorite voile from Renaissance Fabrics.  I decided to order a Swiss embroidered voile trim.    The fullness of this petticoat was determined by the amount of trim I bought--3 yards.

I really like the way this is constructed.  There is one "bodice" piece plus a shoulder strap which are cut from linen.  The edges are turn in and covered with tape with is stitched on both edges.  The shoulder strap seams are taped in a similar manner.  These pieces are stitched to a waist tape as is the skirt which is split at the upper back.

I completed the bottom treatment by stitching the Swiss trim on using a French seam.  Then I made 3 1-inch tucks.  

I determined the final length and stitched the skirt to the waist band. You can see how wide set the side fronts are.  They sort of sit on the very edge of the shoulder.  This works well as they do not show under the gown or neckline.

The back crosses over. There's an eyelet on one side for one tie to go through.  The ties wrap around and tie at the front, or you can make them longer to wrap all the way to the back.

Next the over gown. I used my usual pattern which is the Sense and Sensibility Elegant Lady's Closet drawstring gown following the same alterations outlined here.  Basically I added more fabric to the center front to have more gathers in the area over the bust and I lowered the neckline 2 inches.  For this gown, I split the front in the center so I could just pull the gown on and tie both drawstrings.  I also eliminated the front lining.  I cut only 2 small skirt fronts about 12 inches wide.  The gown secures by tying both ties and adjusting the gathers.


The last part to be completed was the hat.  I raided my thrift store hat stash and found one I thought would work.  The crown needs to be reblocked to have a flat top and more defined shape.


I pulled off the shelled band and saturated the crown of the hat.

I stretched the crown over a large tin that I use for hats and wrapped bias tape around it to secure it while it dried.

There was something about the natural straw color that just didn't look right to me for this project so I found a spray fabric paint at Joann's. 

I sprayed several light coats on both sides of the hat, making sure to get the paint in the crevices.  I ended up using the entire can.  I was really pleased with the results.  This paint doesn't get stiff and it has a matte finish.

The texture of the straw on the underside of the brim was sort of rough so I decided to cover it with yellow silk.  I measured the depth of the brim and added 2 inches.  I also measured the circumference of the brim.  I added 1 inch to the circumference and cut a strip of silk that length and 7 inches wide then seamed the short ends.  I then ran gathering stitches by machine along one long edge.

I pinned the ungathered edge to the brim edge right sides together and stitched about 3/8 inches from the edge.

I flipped the silk to the underside of the had and drew up the gathering stitches, arranging the gathers to form pleats which I pinned in place.  I then stitched the pleats in place by hand along the crease where the brim meets the crown.

As I was on a time crunch, I left the inside unfinished though I do intend to insert a white linen liner in the crown. I cut a band to wrap around the crown, folded the long edges in to form a hem and pressed a lengthwise pleat in it.  I wrapped it around the brim and just secured it with a few stitches at the center back. I flipped the back brim up and secured it to the crown with a few stitches, hiding the back of the crown band.


I made a six loop bow by cutting 3 strips of fabric, pressing the long edges under to form ahem then stitching them together to make a flat bow.  The front brim was secured to the crown just like the back with the bow tacked on.  The plume is just stuck in behind the bow.

Here is the side view showing the hat band.  This hat is secured to the head with a hat pin.  

So to wear this outfit, I still need another petticoat as the voile is simply too sheer.  I had made a strapped petticoat 3 years ago which I use under all my sheer gowns.  It was made quickly by machine using the skirt from the Sense & Sensibility Regency gown.  I made the skirt as instructed in the pattern and stitched to a waist band fitting my under bust measurement.  I then stitched 1 inch wide cotton tape at the front and back for the straps, setting the straps wide.  The back closes with 2 buttons.


Getting dressed:  Regency shift, short stays then strapped petticoat. 

Then the half bodiced petticoat and the gown.

Add a sheer half handkerchief then tie the 2 gown drawstrings and tuck the handkerchief and the ties from the gown and the petticoat inside the bodice.

Add some flowers with a bow, shoes and hat!

At Hampton Manor


(photo by Jackie Greer)

I'm really delighted with this outfit.  I have some small pieces of fabric to make both the Fig Leaf Patterns short gown and drawstring Spencer to wear with the same petticoat.  The over gown was a super quick project, even when made entirely by hand!  The petticoat was more time intensive due to the tucks. I highly recommend the pattern though.