Showing posts with label day gown. Show all posts

Friday, December 31, 2021

2021 Costuming Year in Review


Another year done, another group of additions to my costuming wardrobe.  For some reason, I feel like I didn't accomplish as much this year.  I think that is because I seemed to make more accessories than large garments this year.  Needless to say, some accessories are every bit as time consuming as an 18th century gown and some are even more so.  I also spend a good portion of the year researching a new era--the 1920s.  So without further ado, here are my costuming accomplishments:

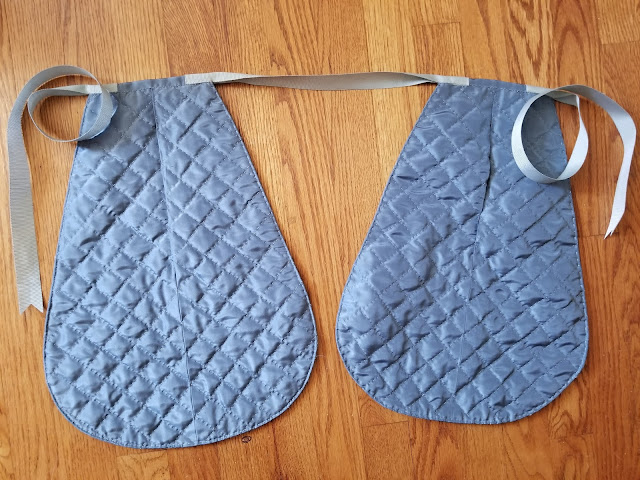
The first projects were samples for our February workshop which had to be moved online.  We had a quilted pockets class.  After studying a number of extants, I decided on 2 techniques for the pocket construction.  Both were quilted.

1.  Quilted linen pockets, bound with linen tape.  The hippogryphs were taken from from a 1740s quilted petticoat.

2.  Quilted silk pockets based on an extant pair.  These pockets are not bound but have the edges turned in and stitched with running stitch.

3. Another sample for our Feb. workshop which was on making muff covers.  The beading /embroidery design was copied from an extant muff in the Boston Museum of Fine Arts.  The image is printed on      silk.   Detailed post of the muff and pockets here.


4.  1920s underpinnings were a big part of this year. As is typical for me, I worked from the skin out--starting with an envelope chemise from a reprinted antique pattern from Silk and Thimbles on Etsy.

5.  1920's Corselette.  I used a pattern as a foundation for this but ended up totally redesigning it.  I don't like how this one works on me.

6.  1920s silk crepe de chine slip.  I used an image from an antique pattern.  The pieces looked like a 1 hour dress so I just drafted my own pattern for this.

7.  1920s Brassiere.  I started with the Wearing History pattern and changed it to match a brassiere in a 1922 store catalog.   Detailed post of these 4 undergarments here.

8.  One hour dress--self drafted.  This was made as a toile.  I will probably not wear it but I'm glad I made it.  It was enough to show me that this particular 20s shape doesn't work on me.  Detailed post here.

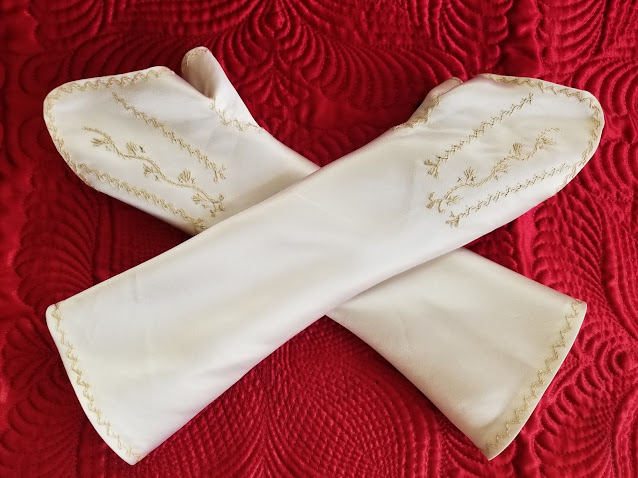
9. 18th century lined silk satin mitts.  These were a copy of a pair in the Bostom Museum of Fine Arts.    Detailed post here.

10.  18th century unlined silk taffeta mitts.  The embroidery was copied from a pair in the Amsterdam Museum.  These were one of 2 pairs I made as class samples for the summer mitts class I taught.

11.  Unlined silk satin fancy mitts.  This was my 2nd sample for the summer mitts class.  

12. 1778 silk taffeta English gown with pleated and ruched trim. Detailed post here.

Here's the gown as worn at the French Occupation at Newport, RI.

13.  2 Masquerades masks for our 18th century masquerade gift swap--paper mache covered with silk velvet, lined with linen and silk taffeta ruffle.

14. Silk mantelette based on Garsault pattern.  Silk taffeta, self lined, interlined with wool, trimmed with rabbit fur.  Detailed post here.

Here's the matelette as worn.

15.   1920s French corset based on several extants.  Detailed post here.

16.  1803 silk workbag with silk embroidery and spangles, copy of extant in the National Trust.  Detailed post here.

17. Annabelle cap: Pattern test for Virgil's Fine Goods new cap pattern!  Be sure to check it out!

19.  French blue lambskin mitts--class sample for leather mitts class.  

I was hoping to have one more outfit to show but it won't be finished today so it will have to be my first completed project for 2022!

It's easy for me to discount my accomplishment because so many of them are small.  Some of the small projects require the same time commitment as a full sized garment though.

Anyway--here's to a productive 2022!  Happy New Year!


Thursday, September 16, 2021

1780 Gown of Changeable Taffeta

 I decided to make a 1780 day gown using some shot silk taffeta I had.  I had originally purchased it to make a round gown but decided to go ahead and do an English gown.  6 yards was enough though I bought  couple more yards to be able to add a ruffle to the petticoat and some trim.

I made my normal center front closing English gown then decided on the trim styles.  We had a gopwn trimming workshop in which the instructor taught a "pleated and puckered" trim which dates from 1775 on so I decided to try that.

I measured the circumference of my sleeve and cut a wide strip twice that measure by 9 inches for each sleeve.  In order to get a scalloped/pinked line good and straight, I drew a chalk line 1/2 inch parallel with each long edge which I cut on using my 7mm scalloping shears.  For the foundation pieces, I traced the bottom of my sleeve pattern piece and extended that 1 inch below the hem and measured up 6 inches.  Basically it was a 6 inch wide piece.  I also added a little to the seam allowance.  I pressed each long edge up 1 inch.


Before working with my pinked/scalloped pieces, I treated the edges with a non fraying agent.  I prefer June Tailor Fray Block but I was out of that so I used another brand I had.  I've discovered that the trick to applying these fray stop agents is to use a very fine artist's brush and apply it thinly to the very edge.  If the liquid is thick, it won't sink into the fabric which is actually an advantage.  The side that gets "painted" is the wrong side.  

So the diagram below shows the stitching/pleating.  I drew a chalk line one inch from each scalloped edge and I used a chalk marking pencil to draw two large zig zags that were parallel. Use basting stitches to stitch on the zig zag lines leaving thread ends loose on each end so you will be able to draw up the thread but don't draw it up yet!  Make small box pleats along the chalk line, pinning that line to the very edge of the linen foundation piece both at the top and the bottom.

You can see the pinned box pleats.  After those were pleated, I had just a big puffy piece in the middle.  As I pulled on the thread ends (holding both together, the puffy zig zags started to take shape.   You will need to fiddle with this to distribute the puffs/gathers evenly.

Once the gathers are to your liking, stitch the pleats in place along the edge.  Then take small tacking stitches across the center of the zig zags--straight across, hiding these stitches in the folds.  Your stitches on the back will be large.  Also turn under one short edge and stitch

You can see the stitching across the center and where the pleats have been stitched.

I ended up stitching 2 more rows of tacking stitches to control some of the folds/gathers in the front.

Line up the hemmed short edge with the sleeve seam and match the sleeve edge with the bottom edge of the linen on the trim.  Pin in place and tuck the unhemmed short edge under the hemmed edge.   Tack the trim in place on the top and bottom (along where you stitched the pleats).

I decided to add a ruffle to the petticoat.  I cut 4 crosswise strips of taffeta that were 9 inches wide.  I marked a chalkline 1/2 inch in parallel to the long edges and pinked just as had done with the sleeve trim strips.  I also used the fray stop agent on those edges. I seamed these strips together on the short edges, making a huge ring that was twice the circumference of my petticoat.  I needed a guideline for pinning my ruffle so I drew a chalkline on the petticoat 6.5 inches from the hem so that the ruffle would hang off the edge by about an inch and a half. I divided the petticoat into 4ths which were not centered and pinned the ruffle strip to the petticoat at those points.  I don't measure my pleats.  I eyeball them so I just pleated as accurately as I could and it all worked out.

I decided to add scalloped pleated trim to the neck. The finished trim is 2 inches wide but I followed the same procedure of cutting the strip wider and drawing a chalkline to scallop on.  I cut strips that were a bit more than twice the neck (2 strips would each be half that.    I start my pleating for neck trim at the center back and work around, pinning pleats on each side alternately.   Here is the finished gown.  I think I will add trim along the gown skirt fronts as well as internal ties to be able to pull the skirts up.  I'll do that at a later time.

Here is the gown as worn.  Accessories:  a silk gauze Dormeuse cap, silk gauze half handkerchief,  sprigged silk gauze apron and yellow accents which include yellow bows, shoes and a French hat.

Hanging with my 1780 lady friends in Newport!


I'm very pleased with this gown.  I wasn't terribly motivated but once I got the sleeve trim done, I started really liking it.  The beige looks so plain but in the light, you can see the gold threads and they really glisten!  


Sunday, April 14, 2019

1912 Day Gown

My friend Jan and I decided to attend a Titanic themed tea.  Jan is new to costuming and she got really involved in doing a lot of research, making all of the underpinnings as well as adapting a period pattern to match a fashion plate using period construction techniques.  I think hers was the most impressive newbie outfit I've seen due to the time spent in research.   I already had the most important pieces of Edwardian underwear and made the rest of what I needed.   I'd been eyeing this one pattern from the Vintage Pattern Lending Library--1912 Dress with Four Gores, size 36. This is a reprint of an actual period pattern.  These patterns do not have detailed instructions so it takes a while to figure out how to do certain things.

I had purchased 1 yard of pleated Swiss cotton from Farmhouse Fabrics when they had it on special.  It's incredible fabric.  The pleats are woven in which shows at the selvedge.  I planned on using that for the center inset but wasn't sure what to do for the rest of the gown.  The pattern suggested silk, linen or pique.  I originally wanted a yellow pique but just didn't find anything that turned me on.  Then I came across this micro striped pique which I liked.  Even better was the fact that I had 3 yards of royal blue silk taffeta on hand for an 18th century petticoat.  I only need 2 1/4 yards for that so I had enough to use for buttons and millinery trim.  Next I experimented with a couple of sizes of self cover buttons to see what I liked.  I decided on the 7/8 inch and ordered a bag of 100 of them on Amazon. 

I really didn't feel like making a fitting muslin of this gown.  It's a pretty straight forward shape so I flat measured quite thoroughly, adding to the hips (as usual) and adding to the side seam allowances to give me a 1 inch seam allowance for fitting purposes.  The original allowance is 3/8 inch.


My next challenge was to piece the pleated fabric as the lower part of the gown.  I used a narrow zig zag to stitch two pieces together under one of the pleats.


I turned it to the wrong side and trimmed really close to the stitching.

Voila! The pleats completely hide the piecing!

Early 20th century garments are constructed quite differently than the last quarter of the century.  They tend to use hems instead of facings and they have unusual closures.  First I had to hem the side pieces.  In a modern garment, this would've been done with a facing.


Then the inset gets stitched to the left side front on the bodice and also on the skirt.  I laid it out together to play with the button spacing when the pieces were pinned together.

Then the inset was stitched to the bodice on the left side and to the skirt on the left side and halfway up the right side.

I pinned the waist seam and the side seams and tried it on over the underpinnings and was pretty happy with the fit.

Then the fun began.  The pattern instructions said to stitch the shoulder seams and either use functional buttons or hooks and eyes on the right side.  The problem with this is that stitching the shoulder would not leave any way to put the gown on as the neck is very small.  I did some research and found out from an antiques dealer that a lot of garments of this period have asymmetrical closures that open at the shoulder and have hidden snaps as closures.  I had planned on using snap tape as I had found some that used old fashioned stitch on metal snaps.  So I hand machine stitched one side of the tape to the white inset and hand stitched it to the blue fabric overlap.   I put a hook and eye at the waist seam since I thought it would get more stress.


I tried the gown on again and decided that I needed to cut about 5/8 inch off of the neck.

Next I got the rest of the buttons covered--48 in all.

I needed a plain white fabric for the collar and I had several on hand.  The pleated fabric is actually quite sheer and I found that the Swiss batiste I had was the best match.  I measured the new neckline and altered the collar to fit.

Because the batiste is sheer, I trimmed the seam allowance to less than 1/8 inch instead of snipping the curves as I knew it would show through.

The tiny evenly cut seam allowance gave it a nice look on the outside.

There are no neck facings in these garments.  Typically the neck is finished with bias or some kind of binding.  I stitched the collar to the closed side of the gown and around the back stopping at the shoulder on the right side.  Then I bound the collar seam and the loose edge of the collar.  I stitched small snaps on the collar seam allowance and inside the front neck edge.


You can see the loose edges in the front, shoulder and neck.

Last was the belt.  I measured around the high waist seam and cut the belt, made 2 buttonholes and buttoned the belt on the gown.  Finished!


Next came the hat.  I love the big flowered garden hats of this era but this gown is fairly simple, having no lace and being cotton so I decided on a simpler style.  I used the bottom right model as my inspiration.  It has one flower cluster with plumes circling the crown.

I found this one that I liked in my thrift store hat stash.  I removed the ribbon.

Then I cut 2 five inch wide crosswise strips of my silk and machine roll hemmed the edges.  I pleated one onto the hat stitching the ends in place.

Then I used the other one to tie a 4 loop bow.

I stitched the bow to the hat at the left front.

I purchased some velvet hydrangeas and leaves so I bunched 2 of them together, added 2 leaves and stitched them over the center of the bow.  

Then I curled my plumes and stuck them behind the bow.


Accessories:

I bought this cheap Edwardian necklace at an auction.  It seems to be made of some kind of pot metal with glass.  I added an extender chain.  Then I found some glass earrings from Dames a la Mode that were a good match.

Here it is all put together.


Jan, me and our new friend Iris, who sat with us at tea.  We had a lovely day.

 I was pleased with the outcome of this project.  I learned a lot.  I did end up getting another period sewing book, dated 1912.  I'm fascinated with the way garment construction constantly changes and I like to learn the period techniques.  Using a period pattern forces one to learn as the instructions are vague and the pattern is clearly not made to use modern techniques.