Some were covered with fabric or lace.
This beautiful example from the Victoria and Albert Museum in London is heavily embroidered on straw.
And this stunning example from the Colonial Williamsburg collection is embroidered silk.
So far, I've only found these hats in straw so I was delighted when browsing Jas. Townsend to find a Bergere hat made out of wool felt. The wheels in my head started turning to design a winter version of my favorite hat. I decided that it should have a more tailored feel to it as I don't see wool felt as being something that should have lace and frills. I also decided that any feathers needed to be removable so that the hat could be worn in inclement weather. So I gathered my supplies and went to work.
What you see is the hat blank, various sizes of Ostrich feathers, a hat pad made of pheasant feathers, a 10 yard spool of black silk ribbon 1 1/2 inches wide, a marking pencil and my ribbon trim book.
I decided to do a shell ruched ribbon trim around the brim with some sort of cockade or rosette in which to stick the feathers. The ribbon trim would be like the one I used on my Regency ball gown which is my absolute favorite ribbon trim.
This trim is quite simple to do though it is somewhat labor intensive. Basically you will be stitching a lot of zig zags. The directions I've seen say to use ribbon twice the length of the finished trim. I've found this not to be enough when working with silk ribbon as it is thinner than the synthetics and the gathers draw up tighter. To know how large to make your zig zags, you will double the width of your ribbon. My ribbon is 1 1/2 inches wide so I need to make marks 3 inches apart along one edge of my ribbon. On the opposite edge, I need to find the point midway between the first set of marks and make a second set, also 3 inches apart. I started the first set of marks about 1 inch from the edge. I marked a length about twice that of my finished measurement to start, knowing that I would have to add more marks as I went along.
Then you will stitch running stitches from one edge to the other creating the zig zags. While this can be done by machine, I find it more reliable to do this by hand with a doubled length of silk thread. There is nothing more frustrating to be pulling up gathers and have them break.
Now the fun begins. Start pulling up the gathers however tightly you like. Check to see how this fits on your hat and mark more of the ribbon if more length is needed.
Once your ribbon is gathered, pin it to the hat. Tack it on firmly using a running stitch along the center gathers.
I decided to make a rosette using the same trim. I marked a couple of feet of ribbon and drew up the gathers to make a circle. I stitched the gathers in place in the center.
I wanted to do a center piece and place a backing. I decided to make a felt backing with a little pocket that I would be able to stick my feathers in. So I cut a circle the desired size and made a wedge for the pocket.
The wedge was stitched on the circle then the backing was stitched on the rosette.
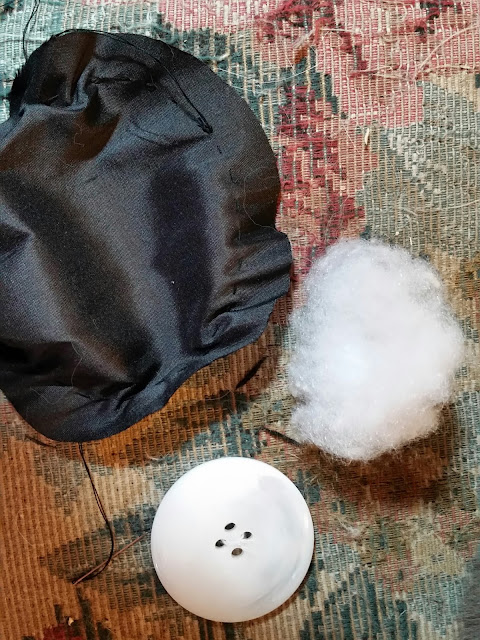
I wanted a large silk covered button for the center but I couldn't find any button forms large enough. I found a 2 inch flat button so I cut a circle of silk a little over twice the diameter of the button and I added a little stuffing to give the button a softer look. I gathered the circle, put the stuffing and button in the middle and stitched it to the center of the rosette.
Then I stitched the rosette on the hat, making sure that the pocket faced toward the back so any feathers would be laying in the right direction.
Voila! Finito! This hat will not have ties. It will be held on with hat pins. The pocket in the rosette gives me some options.
Here it is with just the pheasant feather pad:
Some added small ostrich feathers:
Some added large ostrich feathers:
And finally with just the large ostrich feathers only:
The feathers seem quite secure when stuck in the little pocket and I like that they can be easily removed for storage as I can keep it all in a fairly flat box!


No comments:
Post a Comment