Tuesday, July 2, 2024

"Dolls, dress'd and naked. . ." 18th century wooden dolls

I've alway loved dolls and have a bit of collection of Victorian and early/mid 20th century dolls.  Fashion dolls have always been my favorites.  30 years ago or so, I made porcelain reproduction French and German fashion dolls.  Those are packed away.  About 6 years ago, I got an 18th century wooden doll kit from Larkin and Smith so I finally pulled her out out to make.  I only had images of extant dolls that were dressed or paintings containing dolls.  Let's look at some of them.

Alexander Van Haeck 1730


                                 William Hogarth:  Children at Play:  The Doll's Tea Party

John Wollaston:  Elizabeth Randolph

                                             Johann Zoffany:  Charlotte Augusta Matilda

                          Charles Willson Peale:  Mann Page and Elizabeth Page  1750s

                                            Jean-Etienne Liotard:  Marianne Liotard 1765

Paul Sandby:  Seated Girl with a Doll

Paul Sandby:  Woman and Child Holding a Doll 1758-60

                                                          John Collet:  Peasants Dancing

                        Charles Willson Peale:  Peggy Sanderson Hughes and daughter 1789

                                   John Singleton Copley:  Copley Family Portrait 1776-77

Charles Willson Peale:  Ann Proctor 1770s

                             Joseph Wright of Derby:  Two Girls Dressing a Kitten 1768

                    William Hoare:  Christopher Anstey and his daughter Mary-Ann 1776

Note that there are images with lower/working sort people as well as upper sort.  The dolls all appear to be quite similar which implies that they were enjoyed across the social classes.

Let's look at a few wood dolls.

Letitia Penn doll (William Penn's daughter) 1699.


                                          18th century doll.  Wood, gesso, glass eyes

18th century doll face close up

Early 18th century doll, clothes 1770-80.  Colonial Williamsburg

22 inch wood doll (no date)

9.5 inch dolls--only hips are jointed.  1780
wood, gesso, glass, human hair; 22 inche;  Colonial Williamsburg, 1775

And my favorite:
wood, gesso, glass, 23 inches tall;  Victoria and Albert Museum


Here's what came with the above doll:


I can't help but wonder if some of these dolls were kept by adults given the pristine condition of their clothing.  Most of them are larger than I expected.  All are wood with most also noting gesso which I assume to be mainly on the faces.  Most, if not all, have inset glass eyes.  Most seem to be fully articulated--with jointed knees and elbows.  The small dolls in the plain frocks only have jointed hips.

There's a fascinating account in The Old Bailey: Joseph Phips. Jane Tinsley. Theft; other. 4th April 1733.
" Joseph Phips , and Jane Tinsley , were indicted for stealing a Matted Chair, 14 naked Babies, and 2 Dozen of dress'd Babies, and one jointed Baby , the Goods of William Higgs , March 21."
Joseph Phips was Mr. Higgs' apprentice and Jane Tinsley was his journeywoman.  Mr. Higgs, a turner by trade,  made the wood dolls and his wife dressed them.  The dolls are referred to as babies--a bit of curiosity given the lack of evidence of actual baby dolls.  Dolls of the day seemed to be fashion dolls--18th century Barbies, if you will.  

In 1779, Sarah Bache wrote to her father, Benjamin Franklin asking him to send a doll for her 2 year old Betsy:

"Willy and our little Black ey’d parrot [Betsy] who I am sure you would be fond of if you knew her, (she is just the age Will was when you came from england, and goes down stairs just like him) both join in love to you, she desires you would send her a doll not a fine one, but one that will bear to be pul’d about with a great deal of Nursing, there is no such things to be had here as toys for Children"

A year and a half later,  Sarah wrote to her father  noting that the children had the doll stripped and were bathing it.
You can read about this on John Bell's blog here.  Thanks to Ruth Hodges for giving me that link!

From American Art Vol. 20, No.2
Serious Daughters:  Dolls, Dress, and Female Virtue in the 18th Century by Leslie Reinhardt, 2006
"Because there was no real distinction betweeen the dolls used to display the latest fashion and those used as toys, these objects linked fashion with child's play.  They identified the women who viewed them with the girls who played with them.  Girls could see in these dolls, which were dressed in adult styles, pictures of womanhood and imagine the women they would become.  Conversely, grown women could look to the dolls' apparel for hints on fashionable attire.  Even with dolls clearly intended as toys for little girls in this period, there were constant references to adult interest and involvement in both production and reception.  For example, Thomas Shippen was aware of the wider implications when he sent the English doll to his niece Peggy Livingston, a contemporary of Elizabeth Gilmore, in America.  This doll had been dressed entirely by a workshop of adult professionals, and he knew that women as well as his niece would study it.  Dolls were such important markers of fashion that Shippen joked that he was afraid women would imitate his gift doll's lopsided, badly painted mouth."

From JASNA Persuasions No. 32: "I was tempted by a pretty coloured muslin": Jane Austen and the Art of Being Fashionable by Mary Haftner-Laney

"Consulting with one's dressmaker or mantua-maker, as she was often known, was another way to determine what was fashionable.  It was important that a dressmaker keep up to date with the latest fashion trends.  A dressmaker who could not advise on and construct a stylish garment would soon have no business.  To illustrate current fashion trends, a dressmaker might have in her shop a fashion doll to show to customers.  The use of fashion dolls, commonly known as Pandoras, dates back to the Middle Ages (Fraser 39).  In Jane Austen's time, as now, French fashion was considered cutting edge and the most stylish.French fashion dolls would be sent to England, and in turn English fashion dolls would be sent to America (Fraser 42).  In addition, paper dolls illustrating the latest in wardrobes, headdresses and coiffures began to spread throughout Europe and England starting in the late 1700s (Fraser 43)."

All of this reminds me of the original Barbie dolls which had incredibly detailed, well made fashions.  I still have mine from the 1960s and they are so different than the cheap imported clothing made for play that my daughter played with in the 1980s/90s.

My guess is that few of the 18th century dolls that were really played with didn't survive.  While wood may be durable, the gesso, hair and clothing certainly wouldn't have survived in the condition we see in museum pieces. Some fashion dolls were made of wax or papier mache which I suspect would have been even more fragile.  My plan for my little wood doll kit is to dress her as a fashion doll to use in my millinery/ mantua maker living history work.  She certainly won't be as elaborate as the extants above.  The carving on the doll kit is so much plainer and of course she doesn't have glass eyes.  I don't think those things will matter so much since the focus will be on the clothing.  

The next post will be about the doll project.

Sunday, June 2, 2024

Making do with stash--18th century food storage edition

 I've been meaning to do this little project for some time. I need waxed linen to cover the crocks I have use for food on my petty sutler cart.  I'd read that beeswax was melted and brushed on the linen but that sounded so darn messy. I decided to try something else.

Fortunately, I have a good supply of linen in my cabbage supply.  I also keep a bag of bees wax pellets on hand because I make little fancy bees was cakes for my workshop participants and melting pellets in a can heated in a saucepan of hot water makes quick work.  I can usually measure what I need then just throw out the can after.  Plus pellets melt super quickly.

So here's what I used:


  • Scraps of linen
  • bees wax pellets
  • parchment paper for baking
  • iron
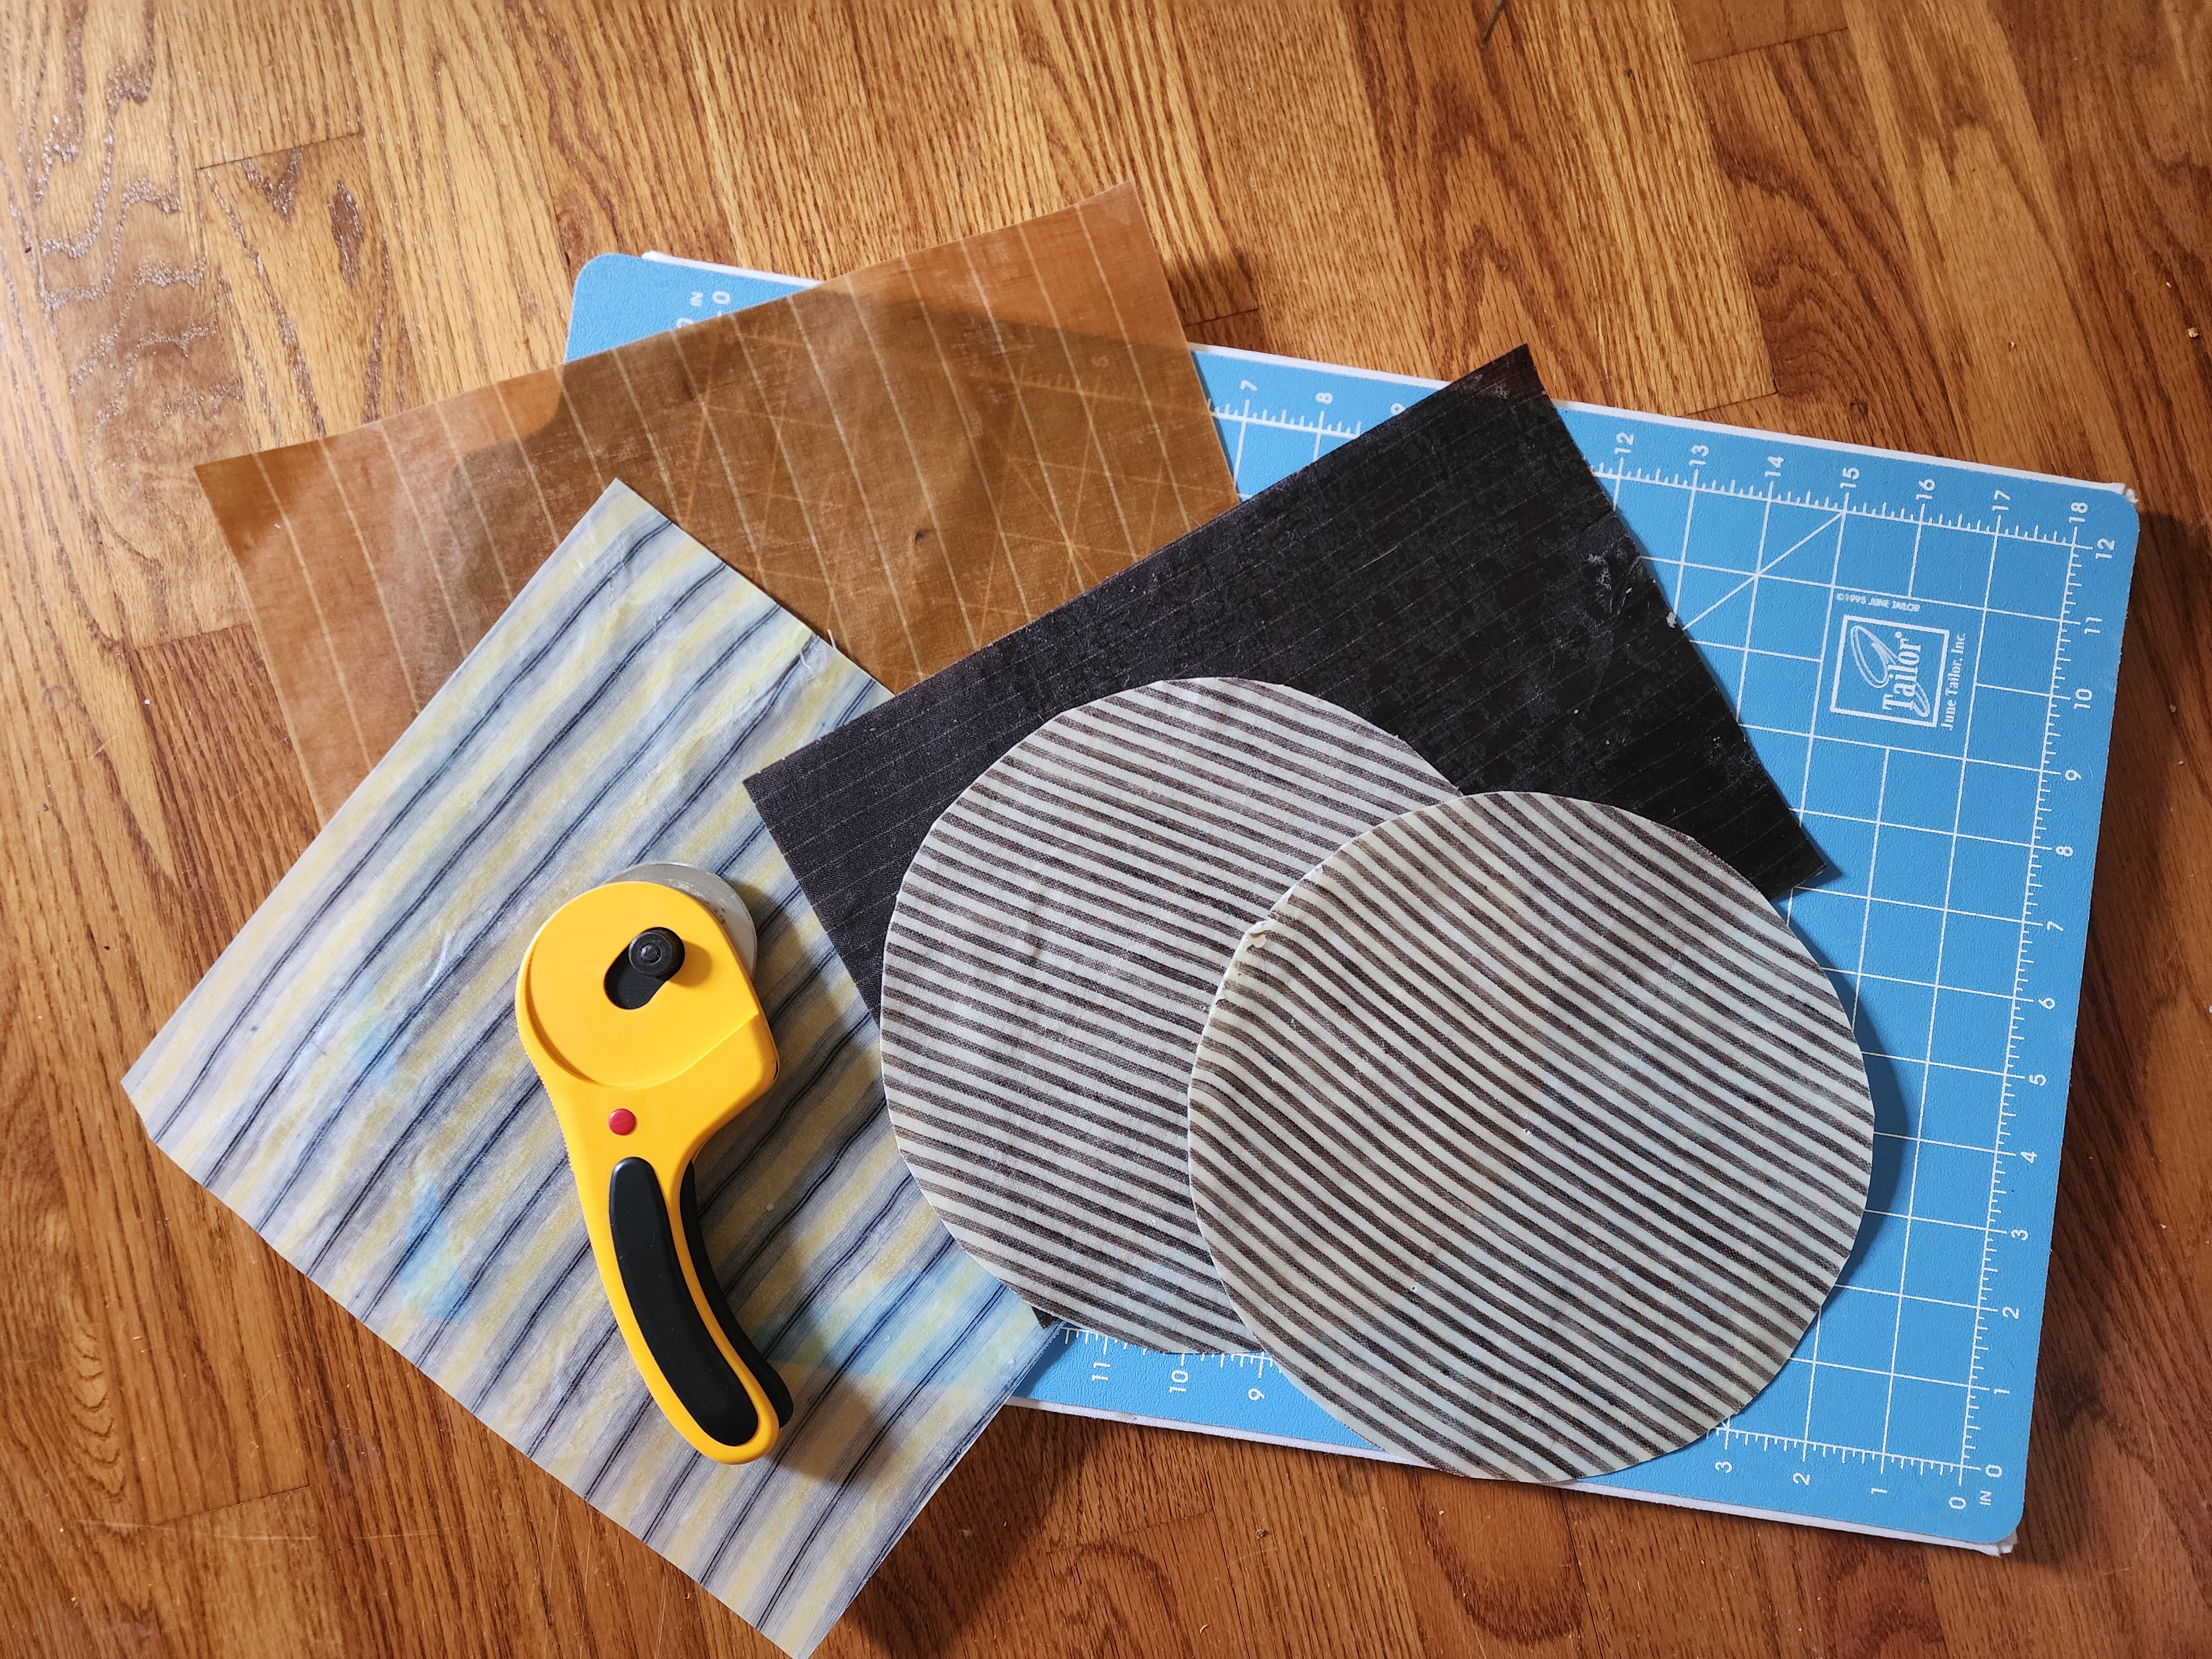
I cut my linen into squares / rectangles.  The two smaller pieces with the tan and white stripes will be cut in circles to tie over my crocks.

Cover your ironing surface with parchment paper and lay a piece of linen in the middle.  Sprinkle some bees wax pellets over the fabric.  I put more than I needed on this first square.  You want them evenly distributed but remember that the wax will liquify!


Lay another piece of parchment on top, making sure that the parchment is large enough to accommodate the wax running.


Starting with your hot iron in the middle of the fabric, iron until the wax melts.  It will run so watch it carefully.  When you start in the middle, you will end up pushing excess wax out to the edges.  Make sure it doesn't run beyond the edge of the parchment!


Note how you can see the wax liquify and penetrate the fabric.

Peel the fabric off of the parchment and set someplace flat.  Since there was a good amount of wax that ran onto the parchment, I decided to just peel it off and use it for the next piece.


Turns out it was enough wax to do the trick!

I decided to use fewer pellets on the next piece since I felt like I put it on too thickly with the first.


This seemed to be the perfect amount.  I completed one more piece and decided to cut an additional one since I had some wax on the parchment and figured I'd use it.


As you can see, there wasn't enough wax so I just sprinkled some pellets in the dry areas and re ironed it.  Which worked.
I decided to give all the pieces one last pressing to even out the wax.  I placed each between two clean pieces of parchment and ironed them.  Then I trimmed the edges with my rotary cutter.  I cut the two smaller ones into circles to use on my crocks.


I'm happy with the way these turned out.  I think they will be more durable for wrapping juicy items than the natural parchment paper I had been using.  The square pieces are large enough to wrap some bread or cheese.   This turned out to be a super fast and satisfying little project.

Thursday, February 8, 2024

Just in time for the cold! Gertie's Swing Coat

First post of the year!  I actually finished this on New Year's Eve.

One of the best things about being a member of Gertie's Charm Patterns Patreon is the fact that you get a full sized exclusive garment pattern every month.  Occasionally you get a bonus pattern or a pattern hack for an existing one.  This pattern is a Patreon exclusive.

I fell in love with this fabric from Fabric Mart, which is 100% wool, a couple of years ago.  I resisted ordering it until there were just a few yards left then I got what was left.  They threw in an extra yard.  This particular fabric posed some challenges in that it is super chunky and loosely woven.  I thought it would be perfect for a design that is as simple as this coat--just a few seams and darts with one buttonhole.

Due to the loose weave, I decided to add a bit of extra warmth by choosing sunback lining.  Other issues to work out were how to mark the darts given the texture of this and how to construct the bound buttonhole.  I decided to do the buttonhole "lips" out of a plain wool flannel that wouldn't ravel.  Fortunately I had some black wool flannel in my stash.  I also used a larger button than called for.  A 1-inch button would've gotten lost in this fabric.  I found a plain, but interesting button almost 2 inches with multiple holes that was funky enough to go with it.

Other than shortening the sleeve pattern piece and the body by 1 inch, no alterations were made.  I used the straight size 8 pattern.

Bound buttonhole


Used some silk embroidery floss to stitch the button on.  I had to ensure that I made a good sturdy shank when doing so due to the bulk of this fabric.

Finished coat front

Finished coat back

Love the way it turned out!


I'm very happy with the way this one turned out.  The pattern is very simple and Gertie designed it to have very little hand sewing.  Even the sleeve lining is completely put in by machine.  I'm considering making a raincoat from this pattern.  One alteration I will need to make next time is the raise the inseam pockets by a couple of inches.  They are just too low on my body.  I'm not sure if that's due to the actual pattern measurements or if the coat just stretched in length due to the weight of it.  Another option would be to make patch pockets.  I'll cross that bridge when I come to it!

I highly recommend this pattern.  If you love vintage styled clothing, you should check out Gertie's Patreon!

Sunday, December 24, 2023

2023 Historic/Vintage clothing year in review


Time to take stock in what I accomplished project wise.  I feel like there should be more but this is it (so far).

1.  Bonnet for a sample for my bonnet workshop.


2.  Another bonnet for a workshop sample.

3.  And a third bonnet sample!


4.  This bonnet was used to show construction during the workshop and made for the next outfit


5. Late 1770s French silk short sack and petticoat.  Details on this project here.


5.  Hat sample for class.

6. Another hat sample for class.

7.  Late 70s/early 80s French short sack and petticoat.  Details on this project here


8. 1950s/early 60s Barbie inspired dress.  Pattern for bodice and skirt from Gertie's Patreon.

9.  Another 1950s inspired outfit:  Picnic top and skirt from Gertie's Patreon

9. 1770s common linen work gown and petticoat.

10.  Upgrade--1780s silk ruffled petticoat for my Indienne Italian gown.  This dresses it up quite a bit over the ruffled linen petticoat that was made for it originally.

11.  Another 1950s inspired set.  Barbara bodice and Brooklyn jacket from Gertie's Patreon.  Vintage buttons and buckle.  Printed linen.


12.  1770s Chintz bedgown with checked linen sleeve lining.  Using remnants!


13.  Mid/late 1770s silk Sack inspired by the portrait of Ralph and Alice Izard by J.S. Copley.


14. Checked silk organza half handkerchief.

I started a black sack at the same time as the one above.  It's possible that I may finish it next week but I'm not gonna sweat it. I do need to get it done before starting something new however.  Now to plan next year's projects.  It's always fun to go back and see if I stuck to my original plan.  Usually I don't.  LOL