There are several different options to considerfor covering a flat hat with silk prior to purchasing your fabric:
- The hat can be covered with one color or it can have a contrasting
color on the underside of the brim.
- The hat can just have the top covered or only the underneath lined with
silk.
- The covering/lining can be flat or pleated.
- The edges of the brim can be bound with ribbon.
These
instructions are for a flat covered hat (one with no pleating) and clean
finished hemmed edges.
I
will be copying the hat in the portrait at the upper left.
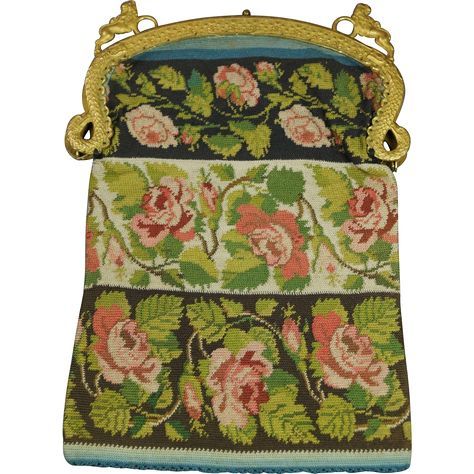
We
will be covering the crown using 2 pieces as shown in the extant example below:

Materials:
½
yard silk taffeta for single color hat
½
yard silk taffeta in two colors for hat with contrasting lining
Silk
thread to match fabrics
1 ½
yards 1 – 2 inch silk ribbon for ties.
Chalk
for marking
If
you use manufactured hat blanks, you can make a pattern as you go. We will be making the cover to custom
fit your hat blank.
For
flat brim cover, lay your hat on the fabric and trace around hat with tailor’s
chalk. Add 5/8 inch for hem and
cut out. Repeat for brim lining.
Press
under the hem on the brim lining piece and set aside.


Measure
the diameter of the hat crown.
Fold your brim crown piece in quarters to find the center and draw a
circle the same radius as the
crown using tailor’s chalk.


Add
5/8 inch seam allowance inside the small circle just marked.
Cut
away the inner circle and snip the seam allowance to the chalk line.


Open
up the circle and place on hat with the crown coming through the center
opening.
Place
hat on ironing board, wrong side up. Fold cover hem allowance to the wrong side
of the hat and press. Stick pins
in to secure.


Lay
lining lining piece on wrong side of brim and pin over the brim cover hem. Appliqué stitch lining and brim cover
together around the perimeter of the brim.


Stick
the point of your scissors into the middle of the lining at the crown and cut
to the crown edge. Make 8 – 10 of
these cuts and smooth your lining as you pin the wedge shapes into place. Thread your large straw needle with
thread that matches the outside of the hat. Stitch a running stitch to secure the inside wedges and the
snipped part of the outside fabric, securing it to the straw base.


Cut
a circle the diameter of the crown.

Measure the height of the crown and the circumference of the crown. Add 1 ½ inches to the crown height and 1 inch to the crown
circumference and cut a strip of fabric to those measurements:
Height
+ 1 ½ inches by circumference + 1 inch.
My
strip is 1 + 1 ½ by 15 ½ + 1. The strip is cut 2 ½ X 16 ½.

Make
a ¼ inch seam in the short ends of your strip. Then mark the quarter points on the strip and on the
circle. Run a gathering stitch ½
inch away from the edge of your strip and pull the gather thread so that the
strip fits the circle, matching the quarter points. Adjust the gathers and pin in place. Sew a ½ inch seam.

Turn
under ½ inch on the straight edge of the strip and stretch the crown cover over
the hat, pinning in place by stabbing pins through the cover and the
straw. This is somewhat fiddly and
you will have to play with it.
Once
you get the cover to fit, stitch in place either with a whip stitch or stitch
the crown cover close to the edge using a running stitch going through the straw.


Once
your crown cover is in place, your hat is ready for ties and trimming.
You
will finish the inside of the crown after it’s trimmed.
[Note: You have the option of making the brim
cover and the crown cover and stitching them in a seam right sides together
before putting them on the hat.
Then adding the lining. ]

I decided to decorate this hat like the one in the upper left at the beginning of the blog post. I cut a crossgrain silk strip to measure twice the diameter of the brim. I scalloped the edged using the instructions in this post, marked the strip in quarters and marked the hat in quarters with pins, then gathered 1/2 inch from each edge of the strip, pinning it to the brim with the outer scallops hanging off the edge.

Using large spaced backstitch, stitch the ruched strip to the hat cover over the gathering lines.


The crown was trimmed using 6 yards of lightweight silk double faced silk satin ribbon 1 1/2 inches in width. I started at the side and stitched the end of the ribbon down then I played with it to see what size loops gave me the desired effect. Then I placed pins at 3 inch intervals the length of the ribbon (marking a couple of yards at a time. I stitched the trim by going through the straw hat--bringing the needle up at the base of the crown, running a gathering stitch across the ribbon at the mark then putting the needle back through the straw in the same place. The next loop was made the same way by bringing the needle up about 3/8 of an inch away. I made one round that way then made a second round of loops above the first spacing the loops a little farther apart so as not to run out of ribbon. I added extra loops at the side as shown in the period illustration.

After trimming is complete, the inside of the crown will be
finished by cutting a circle of the lining silk that is 2 inches larger than
the diameter of the crown. Turn
the edge under ¼ inch then gather the very edge using small running
stitches. Place the circle over
the crown area and adjust the gathers to fit. Whip stitch the circle in place.


To attach the ties, I made a 1/4 inch double hem at the end of each ribbon and whip stitched it to the lining using matching thread. Note about attaching hat ties to silk covered hats: When attaching the ties to the
underside of the brim, you must take a couple of anchoring stitches through the
straw otherwise the lining will be pulled away from the hat form when tying. I decided to make a neat row of running stitches in the black thread that went all the way through the straw and top fabric. The stitches cannot be seen on the top of the hat.

Here is the finished hat along with the inspiration image.


I was pleased with the way this turned out. In retrospect, I would've done a couple of things slightly differently--mainly I would've wrapped the white lining around the brim instead of wrapping the black around as you can see the seam allowance through the white, though it is barely noticeable. Also, I would suggest treating the pinked edges with a fray block as they did start to ravel from handling them during the application. The hat does pull down a little on the sides like the period image which doesn't show unless it's being worn. I think I'll get a lot of wear out of this one!
Edit: Here is the hat being worn with my mourning ensemble: