

The needle case and thimble holders were hand crocheted. The chatelaine is made of scraps of silk, ribbon and velvet and it is embroidered with silk floss and glass beads with silk ribbon trim. It is trimmed with vintage glass and mother of pearl buttons. It has always been one of my favorite things.

A few months ago, I discovered an 18th century pin cushion online that was called a pinball. It was made of silk, embroidered with a cross stitched monogram and trimmed in silk ribbon. It was made to hang from an equipage. I've always loved pin cushions because the sky is really the limit as to what they can look like. Further research found that pinballs were often made with needlepoint or knit. They were made of linen, wool, or silk. Some were banded with silk ribbon and some were banded with sterling silver bands.
Here are some 18th century examples:

Red silk banded with silk ribbon

Linen, embroidered and banded with silk ribbon

Knit from silk
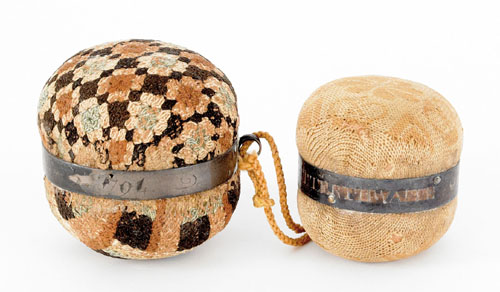
Knit and embroidered, banded with inscribed silver

Knitted and banded in silver

Queenstitch, banded in silver
There are many more of these to be found showing examples of flame stitch, crewel embroidery, cross stitch or simple forms of embroidery. I decided that I wanted to make one of these banded in silver. I found that Colonial Williamsburg sells the silver rings but they are quite expensive so I started looking at Ebay. I found dozens of Christening bracelets made from sterling silver for a very reasonable cost. I purchased one from someone in the UK for around $30 including shipping.

Christening bracelets are adjustable and they are tiny. This one has an inside diameter of approximately 1 3/4 inches. After measuring the bracelet I had to decide on an embroidery design. I thought I'd do cross stitch with my initials. Typically I would use linen and do counted thread embroidery but I didn't think my eyes could handle it so I went with aida cloth. I found an old cross stitch book of letters and I found a new one of coasters which had some blue snowflake like designs reminiscent of the blue patterned china of old.

I settled on navy blue cloth and white, gray and light blue cotton floss. The diameter of the embroidered patterns was about 2 inches. Here are my finished designs.


You will need to cut cardboard circles to use for each design. These should be a little smaller than the inside diameter of the bracelet. My bracelet was about 1 3/4 inches so I cut circles that were 1 5/8 inches. My bracelet was measured with it expanded as far as it could go.

When the embroidery was finished, I had to determine how large to cut the final circles. Upon measuring and playing around by putting the embroidery through the silver bracelet to see how it looked, I decided that three inches would be a good size. This is one of those things you just have to experiment with.

I drew a 3 inch diameter circle around each design and trimmed off the extra fabric 1/2 inch beyond the circle. Next I used a very long doubled piece of upholstery thread and ran a gathering stitch on the drawn circle.

Here is the fiddly part. As you draw up the gathers, begin stuffing the circle with filling--either fiberfill or wool batting. Stuff it as full as you can--literally until you can't get any more filling in it. Place your cardboard disk over the stuffing and pull the gathers, knotting the thread firmly. You will then need to take stitches across the cardboard all around the circle, catching as many of the gathers as you can.

Place the two cushions together, making sure the designs are lined up and stitch them together using matching thread. I used a doubled strand of navy blue silk. Make sure you pull your stitching tightly and knot it securely when finished.

Before putting the finished cushion in my ring, I needed to add a hanging loop. You could use a purchased jump ring but I chose to make my own. I had some 17 ga. twisted silver wire so I bent a short piece into a half circle, bending under the ends.

I put the ring around the bracelet between the two little slider bars.

You're almost finished! Now you need to push your pin cushion through the bracelet. It should be very tight keep pushing until the ring is around the center covering the stitching. It should be a good tight fit! You are finished!
Here is my finished pinball:


Attach your pinball to a chain, ribbon or equipage. I attached mine to an equipage along with several other necessities. Equipage is by Kimberly Walters (At the Sign of the Gray Horse).


This was such an enjoyable little project. I think I'll make a silk one next!
LOVE this!
ReplyDeleteA brilliant idea with the bracelet and an inspiring tutorial. Loved it thankyou x
ReplyDeleteThank you. I LOVE THIS SO MUCH!!
ReplyDeleteI LOVE THIS!! Beautiful job!
ReplyDeleteBrilliant idea!
ReplyDeleteVery inspiring embroidery work.
ReplyDelete