Sunday, December 17, 2017

Gallerie des Modes Pink "Italian" gown, Part 1

 What does one do with 9 yards of pink silk in their stash?  I had been pondering this question for a while.  There are a number of fashion plates in the Gallerie des Modes 1784 that I found appealing and the one pictured below stood out.


This looked like an easy gown to make.  The trim stood out as being the most labor intensive part.  After studying this illustration, I concluded this to be made like an Italian gown.  While I was unable to see the back of the gown to determine whether or not it has the quarter back which is a feature of the Italian gown, the shape appeared to be the same--the extra full skirt which large hip pads.The sleeves are not really visible so I was unable to determine their style other than the fact that they are trimmed with sheer trimming. Italian gowns have a two-piece sleeve.

So to make this gown, I decided to make the gown with a quarter back based on this extant:

I decided to create this gown using the bodice lining and basic sleeve from my favorite gown pattern.
I used the lining to draft a new bodice.  I had previously converted this pattern to a center front closing gown (profiled in this post.)  You could really use any English gown pattern for this. The gown in the above photo appears to have no side seam.  The shoulder strap also lines up with the side back seams.

I laid my bodice pattern pieces out--back and fronts--pinning them together at the side seams then I traced them onto Swedish tracing paper to have one bodice pattern piece.

Then I drew lines where I wanted the two side back seams.  I laid the shoulder strap on top to make sure that the side back seams would line up with the shoulder strap.


Then I traced the side back pieces, adding the seam allowances.  I pinned the pieces back together to check that they were cut correctly.

Fitting time!  I sewed the bodice pieces together including the shoulder straps.  I turned up the bottom seam allowance and turned in the neck hem.

The bodice fit the way I expected it to so I cut it out in the fashion fabric (silk taffeta) and the lining.
The center back seam and the adjacent side back seams were stitched together using the English Stitch --also known as the "Stitch with No Name."  The outermost side back seams were stitched with spaced back stitches (Prick Stitch) as that appears how the extant in the picture above is sewn.  The lining shoulder straps were also stitched on.

I folded the top edge in by 3/8 inch and made a facing strip out of the fashion fabric which was whip stitched to the lining.

Then the sleeves and shoulder straps were applied.  The sleeves were sewn to the pattern instructions.  The straps and the sleeve linings were stitched on using the Point a Rabbetre Sous la Main stitch.  

I decided to trim the sleeves before adding the skirts so I wouldn't have to handle such a large volume of fabric. I wanted the trim to be extra full.  The sleeve diameter is 12 inches so I cut two 48 inch long strips that were 5 inches wide.  I stitched each strip into a loop using a tiny mantua maker's seam and roll hemmed the edges.

I ran gathering stitches down the center of each loop and 1/2 inch from each edge.  Before drawing up the gathers, I marked the halfway points of each piece.  I matched the seam in the trim withe the sleeve seam, drew up the gathers to fit.  

Then after evenly distributing the gathers, I used a large spaced back stitch along the gathering lines to stitch the trim to the sleeve.  The lowest gathering line was right at the edge of the sleeve.

Before proceeding to the skirt, I needed to make the bum pads.  I followed the instructions in the new American Duchess Book for that.  I bought feathers on Amazon for the stuffing.  I used 1/4 pound for each pillow.  I also went ahead and made a petticoat to fit over the bum pads.  The petticoat is ankle length.


I used 2 and 1/2 fabric widths (fabric width was 56 inches) for the skirt.  I had a 28 inch panel in the middle with a 56 inch panel on each side.  The panels were stitched together using a narrow mantua maker's seam and the front edges were turned in and stitched. Then I pleated them.  I started with a large inverted back pleat in the center back (4 inches total width) followed by 1/2 inch pleats all facing toward the back.  The first few pleats overlap the inverted box pleat.  The pleats were pinned in place.


I checked the measurements to make sure that the skirt was pleated to the measurement I wanted.  Then the skirt was pinned to my blocking board.
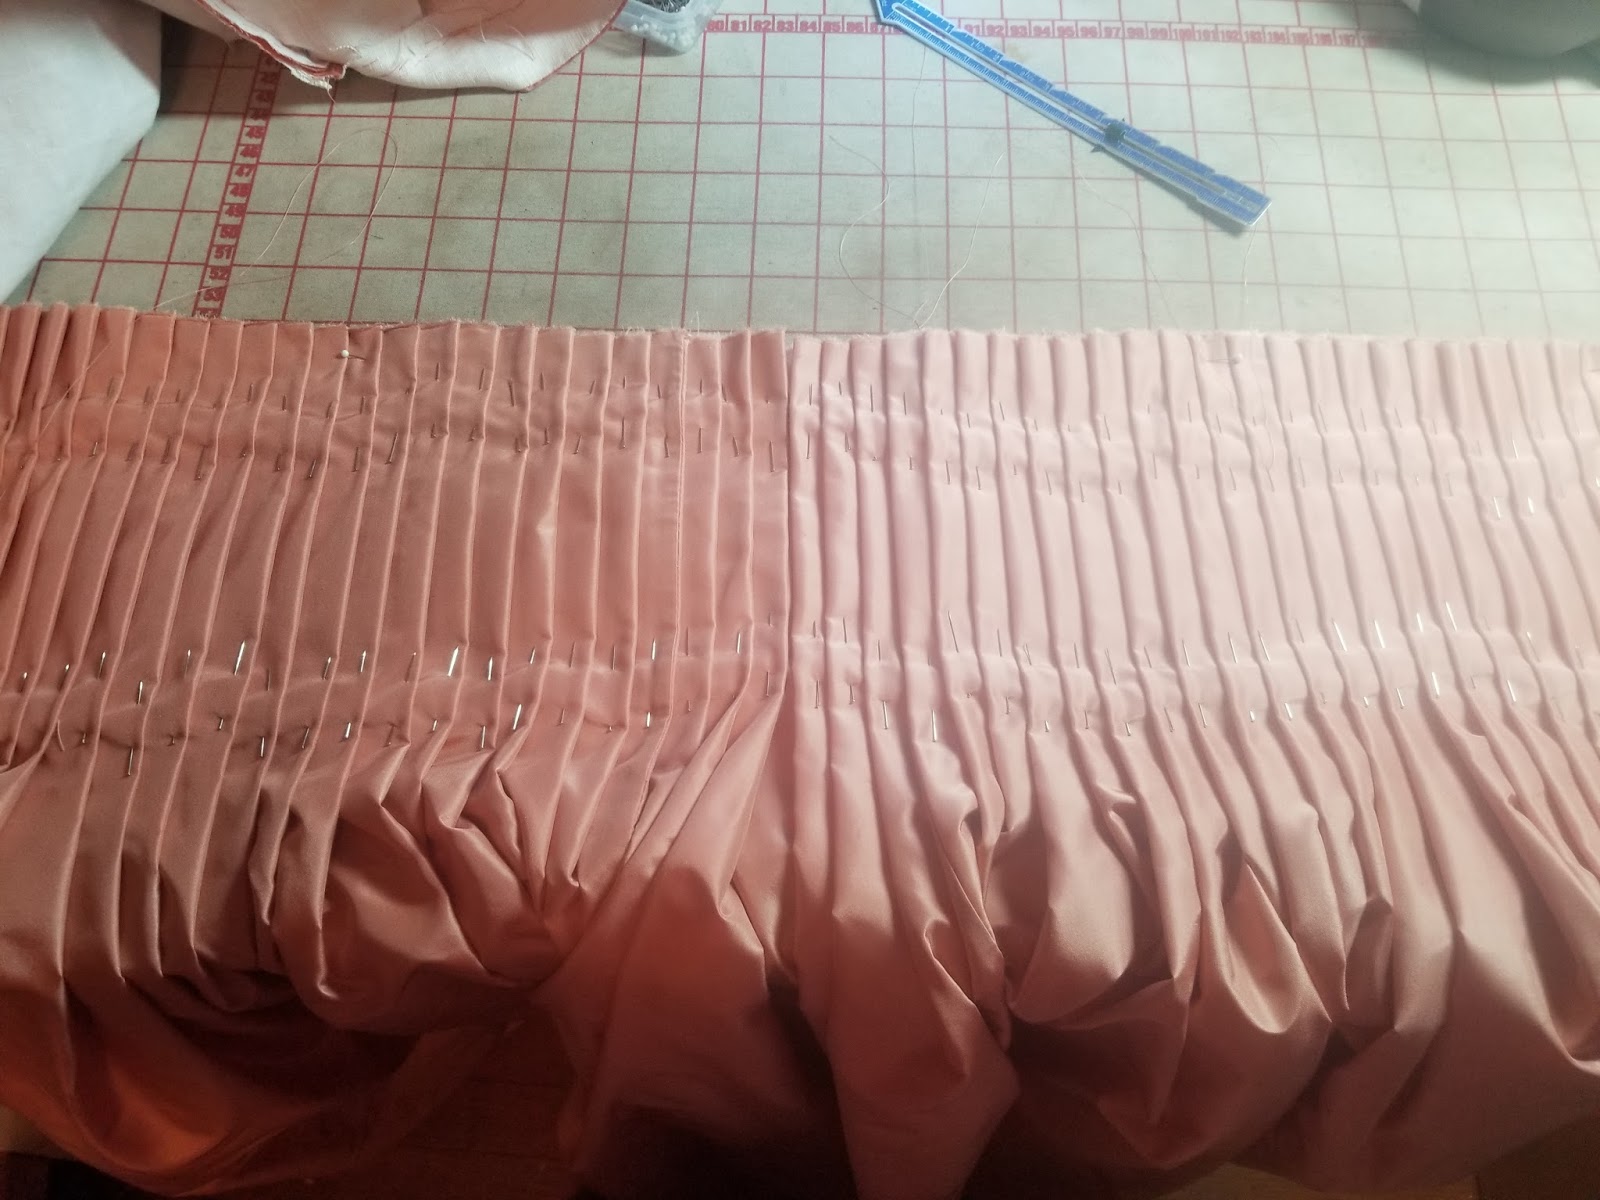
I basted up the bodice waist seam allowance then laid the bodice over the skirt, placing a pin on the center back pleat where the bodice point reaches.  I then cut a slit in the center back skirt to about a half inch above that pin.  The slit allowed me to angle the back pleats outward a bit.

I stitched the bodice to the skirt using applique stitches.  The front part of the lining was pinned out of the way for stitching.  The skirt seam allowances were folded out of the way and the remaining bodice lining was turned in and stitched in place using the Point a Rabbetre Sous la Main stitch.

Here is the gown so far:


I tried the gown on to determine the hem.  The entire gown drags as in the fashion plate.  The center back was cut a little longer to form a train.  The hem was stitched in place with a running stitch.

Now onto the trim.  Using the same silk organza as the sleeve trim, I cut 3 - 8 1/2 inch wide strips across the width of fabric.  I used 1.5 fabric widths for each trim piece.  The fashion plate trim is narrower at the top so I angle the top 30 inches of trim down to 4 1/2 inches.  This gives a 2:1 ratio for the gathering/pleating.  I roll hemmed each strip on all 4 edges and I stitched two parallel lines of gathering stitches down the middle of each strip.

I started to gather the first strip and immediately knew that it would not have the look I wanted due to the crispness of the organza.  So I flattened the gathers out then marked the trim strip at the quarter points.  I also marked the gown skirt fronts at the quarter points.  The trim strips were pinned onto the gown at the quarter points then I started just freehand pleating the centers of the strip and pinning them in place.  The edge of the trim extended beyond the skirt edge by 1/2 inch.  Once the trim was pleated, I stitched it in place along the lines, making sure to catch each pleat.


For the puffing strips, I played around with the organza to determine the size of puff I wanted.  3 inches seemed to have the right proportions.  I cut two strips 10 inches wide and the full fabric width.  I folded the long edge of each strip over the center pinning in place.  I did not press this in place because I didn't want a fold along the edge.


I marked a line across the strip using tailor's chalk at 4 inch intervals. The end was gathered and stitched to the waist seam on the gown in the center of the pleated ruffle.
I placed pins on the pleated ruffle at 3 inch intervals to mark where the puffs would be stitched to the ruffle.  Each line on the puffing strip was gathered tightly then stitched in place.  The bottom of the trim was turned to the inside of the gown and stitched in place.  The gown was basically finished but I still wasn't happy with the way the ruffle lay. You can see in the photo above how it has lose gathers which are very puffy.  I steamed it to flatten out the ruffle and that did the trick.  I made an organza tucker following the directions in the American Duchess book and whip stitched it to the gown lining.


I still need to trim the petticoat and I will write a separate post when I get around to doing so.   I wore this gown with an Italian organdy cap,  collet necklaces and earrings from Dames a la Mode and white satin Dunsmore shoes.  It was worn over a medium weight white linen petticoat and a matching silk petticoat.


Over all, I'm quite pleased with this gown.  I still have about 2 1/2 yards of silk left which I will use to line a black velvet mantel.

Friday, November 3, 2017

1760s Chintz Gown

As a person who still relies heavily on patterns for making gowns, I've found that I need to do more draping and enlarging scale patterns from books.  The commercial 18th century patterns seem to be limited to the years of the Revolutionary War.  I decided that I wanted to have some 1760's garments to use at a local living history site so I set about looking for extants.  I found 2 gowns that are very similar to my favorite gown pattern with a few small details.  The most obvious difference is the cuff, which is larger than a 1770's cuff and is attached at the end of the sleeve.  The hip shaping is also different--being wider with hip pads or panniers.  The first extant below is a wool damask with double robings and the second one is an Indian cotton block print.  The robings on that gown look to be of the folded variety.


I made my gown following the regular instructions on the pattern, making sure to add a little length to the skirt to accommodate the small panniers I planned on wearing with it.


Then I had to decide on a cuff.  I studied examples in several books:  Janet Arnold's Patterns of Fashion showed a 1760's jacket cuff and it indicated that the cuff was backstitched onto the end of the sleeve with the back hanging free.  There were several examples of cuffs in Costume in Detail as well.  What was interesting to me was that all of those examples had little pockets in the cuff interior for small lead weights to make sure the cuff hung correctly.  Lastly, I found a cuff in Fitting and Proper for a printed linen gown dated 1740 - 1760.  This cuff was self lined which I like.  Some others were linen lined.  I enlarged the scale pattern and cut it out of Swedish tracing clot, pinning the pleats in and pinning it on my completed sleeve.  It fit the sleeve perfectly with the right amount of "wing" in the back.  Plus the side seam in the cuff lined up perfectly with the sleeve seam.

Since I like to learn new things with each project, I decided to use a new stitch to put the cuff lining into the cuff.  Point a rabattre sous la main is a stitch used to stitch a lining to an outer piece.  It resembles a whip stitch on the inside and a running stitch on the outside.  I used this to stitch the sleeve lining to the bottom of the sleeve as well.  It's a very simple stitch and you can find a small diagram in Costume CloseUp by Linda Baumgarten on page 8.  Here are some close up pictures --I'm not sure you can see the stitches as there isn't much contrast.


Here are the lined cuffs.

I decided to the pleats in for the front of the sleeve for about 6 inches.  I just folded the top down and did a large running stitch.

Then I folded the bottom up and did the same.

Here is the finished cuff.

I pinned the top edge of the cuff to the bottom edge of the sleeve--allowing the cuff edge to curve upward naturally.  I pinned the cuff in place.  The blue marks are where the stitching stops, allowing the back of the cuff to hang free.


I was happy with the way the cuff looked so I stitched it to the sleeve using a spaced back stitch.

Inside of sleeve/cuff.

I had purchased some drapery weights (left) at Joanns to put in the cuff but they seemed a little heavy.  I found smaller ones at G-Street Fabrics and they seemed better--weighing about what a quarter would weigh.  I removed the weights from the outer sleeves.

I cut two squares of fabric on the fold, turned in the edges and stitched them closed.

Finished weights.

The weights were loosely stitched in the bottom of the cuff.

Finished!  I made a red petticoat and both the petticoat and the gown skirt had to be hemmed to fit over small pocket hoops.  The adjustment was made at the waist of the petticoat.   

Photos taken at Montpellier Mansion in Laurel, Maryland.


Tuesday, October 10, 2017

The Devil is in the Details: A skill building, sewing weekend--REGISTRATION


The Devil is in the Details:  A skill building, sewing weekend 
Friday Feb. 23, 2018 - Sunday Feb. 25, 2018

Join us for a winter weekend of learning about and sewing some 18th century fine fashion details in historic Savage Maryland's Carroll-Baldwin Hall. We will learn that the last quarter of the 18th century saw a number of fashion changes by focusing on the years 1774 and 1784. We will explore some of the differences between these years in garments, millinery, footwear, accessories and hair styles. We will learn to reproduce some of the details that distinguish these two decades in fashion.

Following a survey presentation on this topic, three consecutive workshops will be offered so participants can learn the basics of whitework embroidery as they design and begin to stitch a neck handkerchief; explore the types of garments that have stroke gathers and stitch an apron panel with stroke gathers; and learn how to make 18th century fabric covered buttons.

Plan on dressing out during the weekend and enjoying some 18th century punch and much much more. For those arriving Friday evening, we'll enjoy a tavern night with food, wine and 18th century punch.   You will meet the staff and you may wish to bring any projects you might want advice on or help with. There will be tavern games or you can feel free to just socialize. You can also get your registration materials and avoid the rush on Saturday morning.   


A special bonus will be a Dames a la Mode trunk show on Friday evening!  

Saturday, we'll be learning and sewing all day.

The fee of $160 includes the Friday night get together, full day of workshops / presentations on Saturday as well as continental breakfast, lunch, snacks, beverages and dinner on Saturday. Also included are all of the materials for the whitework and button workshops. You will be given a "what to bring" list upon registration.

We plan on having an extra workshop at 10 am on Sunday (for an additional $30 fee) with brunch and a hairstyling workshop. This will be at the Howard County Historical Society Museum in Ellicott City, MD.

Just like last year, we'll have our swap and shop table!


Regular updates will be shared on our Facebook event page.

Registration is now closed but we will take names for the waiting list.  I will leave the payment link up for those who still need to pay.  Please note that your payment or first payment (if using the 2 payment plan) is due by November 14.

Workshop fees:
Saturday only -- $145
Friday/Saturday workshop -- $160
Friday/Saturday + Sunday workshop -- $190

We will once again, offer a 2 payment plan to those paying by check with one half of your payment due at registration and the second half of your payment due by January 10, 2018.


If you are paying by check, make the check out to Vicki Embrey and mail to:

Vicki Embrey
P.O. Box 415
Savage, MD  20763

If you wish to pay by Paypal, please use the following button:


Fee options

Information you will need:

Weekend Schedule

Materials List

Hotel List

Still have question:  Contact Us

Cancellation policy:  We will only cancel due to insufficient sign up or an extreme weather event in which cases a full refund will be given.  Our venue is easily accessible in winter weather due to its close proximity to US Route 1 and Interstate 95.  Individual cancellations are allowed prior to Jan. 31.  After Feb. 5 you will receive an 85% refund as we will have purchased materials for you--which you will still receive should you need to cancel at the last minute.  Special circumstances will be considered on an individual basis.

Wednesday, September 13, 2017

Drawstring Block Print Regency Gown and Spencer.

A little diversion from the 18th century--

I decided that I needed a more common gown for Regency events and I didn't want to invest a lot of money.  I found a small Indian block print on Ebay that I liked and got 5 yards of it.  The width was only 42 inches wide so it took all 5 yards to make a simple drawstring gown.  I used the Sense & Sensibility Elegant Lady's Closet pattern with a few easy changes:  I added 4 inches to the width of the front so that I would have more gathers on the bodice and I lowered the neckline by 2 inches.  I also made the lower drawstring so that it tied at the center front inside the gown and made the sleeve band narrower.  The gown was entirely stitched by hand using tiny French seams on the skirt and flat felled seams on the lined bodice.  This is a really comfy gown for a hot day.  Here is the fitting:


The Spencer was a little more challenging.  I love the sketch of the spotted muslin Spencer in the book Costume in Detail.  I decided that I would make a similar one out of olive green cotton to go with my gown.  Here is what I had to work with.


The bodice front looks just like the bodice of my gown.  I thought it would be easy enough to adapt the same dress pattern for this project. The original is unlined so I decided mine would be as well.  I cut the back pieces the same as the gown.  I used the front lining pieces and raised the neckline so the finished bodice would be 5 inches high.  I also widened the shoulder pieces slightly.   I lengthened the short sleeve to a finished length of 7 inches as indicated in the drawing and cut the long sleeve included in the pattern.  I left the long sleeve plain instead of making one with the gathered cuff described in the book as my fabric is heavier than the sheer muslin the original was made of.  I also made a very narrow band for the short sleeve as the original has a drawstring and I didn't want a white cord with the green fabric.  I drafted a piece with 3 points --the center being 4 1/2 inches long, the side points being 4 inches long.  The width of the piece with the points was 9 inches wide.  I roll hemmed the pointed piece.  

I stitched the bodice together with felled seams then I stitched the sleeve seams. I cut away 1/4 inch of the lower armscye to make it a little roomier.  I had to baste in each layer of the sleeve separately. The pointed piece was first and I eased it to 8 inches.  Then I basted the short sleeve in which you can see below.


I pinned the long sleeve in and backstitched through all the layers.

The neck edge and the bottom edge had the hems pressed in --1/4 inch turned in then 3/8 inch turned in.  The left front edge was turned in half inch before pressing the neck and bottom edges.  The right front was turned in half in twice AFTER pressing the hems.  An eyelet was made on the right front in the hem at the neck and bottom edges.  This created a flap that covered the ties when the Spencer was closed as in the original.  I used 1/4 inch cotton twill tape and threaded it through both casings.  I stitched the tape in place at the side seams on the bottom edge and at the shoulder seam at the top edge so that the gathers would only be in the front.


The final outfit consisted of my chemise and stays with a strapped white petticoat, chemisette, the new gown and the Spencer.  I wore my Regency cap with no bonnet as I hadn't finished it in time.  I was so glad to have the Spencer as it was cool that day and it added just the right amount of warmth for the day.


I was pleased with the way this turned out.  I really love Costume in Detail.  The sketches are really detailed enough that you can reproduce the outfits with patterns you may have or by draping.  I've found a couple of gowns that are on my list to make at some point.  It's a great book to have in your costuming library.