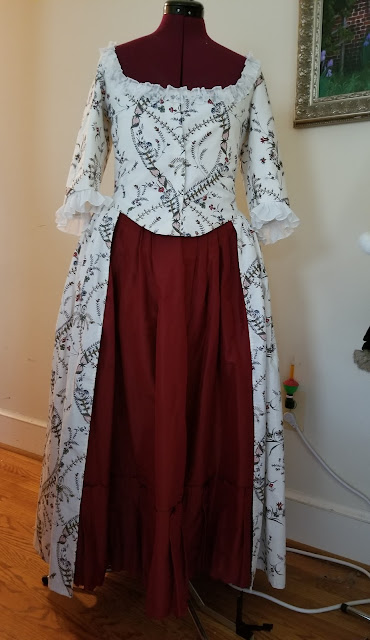
I've been working on using the fabrics in my stash so I finally got around to making a gown using this one in the Colonial Williamsburg Collection:
The style is pretty basic: Center front closing English gown with a sheer ruched neckline trim.
The back pleats are different than a traditional English gown in that they face toward the center and are quite small on the face--much smaller than traditional back pleats. The skirt pleats are also smaller and all face toward the center back.
The first challenge is the print matching. Note that the vining motifs are all parallel:
I analyzed the print and found that splitting the fabric between the vines and shifting one side up approximately 10 inches would get a decent match. The vines aren't mirror images but the contours are the same:
I cut my center back piece with a seam in the middle to be able to do the matching. The pleats are not quite as small as the original but they are about 3/8 inches wide on the face. They are deeper underneath however. I played with the pleats until I liked how they looked, measured to make sure they were even, then stitched them down.
Everything else was completed as normal with the skirt pleats being smaller and all going toward the center back.
The neck trim was made as follows:
I measured the neckline which totaled about 40 inches. I cut 2 strips of Swiss organdy 2 1/4 inches wide by about 32-34 inches long, seaming them together with a tiny felled seam to get a strip about 65 inches long. This didn't need to be exact but I was following the rule for making ruffles about 1.5 times the fullness of the surface they are applied to..
The strip was roll hemmed around all edges then it was folded in the center along the length, right sides together. The folded edge was whip gathered then the strip was pinned to the neckline. After checking the fit of the ruched strip, it was attached by using a large spaced backstitch down the center.
Here is the trim as pinned on the bodice:
Here's the full length:
I had originally planned to make a matching petticoat but after using extra fabric to match the print, I ended up with a bit over 2 yards fabric left. This textile is 42 inches wide and I need 3 lengths to make a petticoat so I'll safe this for a bedgown or jacket. Fortunately, I had the red silk petticoat already and it worked out well. I didn't have time to make elbow ruffles so I pulled them out of another gown..
Here's a hotel selfie in the gown. It is worn with a bum pad, linen under petticoat, red silk petticoat, tambour work apron and half handkerchief:
Here it is on the right, with another gown made from the same fabric--worn by Esther HL Her print is situated more like the original gown.


gorgeous and inspiring to make one!
ReplyDelete