I love millinery. Every gown needs a perfect hat to go with it. While convenient, buying ready made hat blanks can be costly if you wish to have a large hat collection. Repurposing quality straw hats is really quite simple. First of all--straw, like other natural fibers, has the ability to be reshaped and sized with the addition of heat, steam, starch and molds.
I've been very fortunate to find decent straw hats literally every time I enter my favorite thrift store. The trick is knowing what to look for. First of all, make sure the hat is actually natural straw. Typically there will be a tag indicating that it is straw. Another consideration is the construction of the hat. Most of them seem to be made from braided straw which is more desirable than woven straw. Woven straw blanks are fine if you are just going to reblock and completely cover the hat, but braided straw is so much more versatile and it is what you see in period hats. How do you tell?
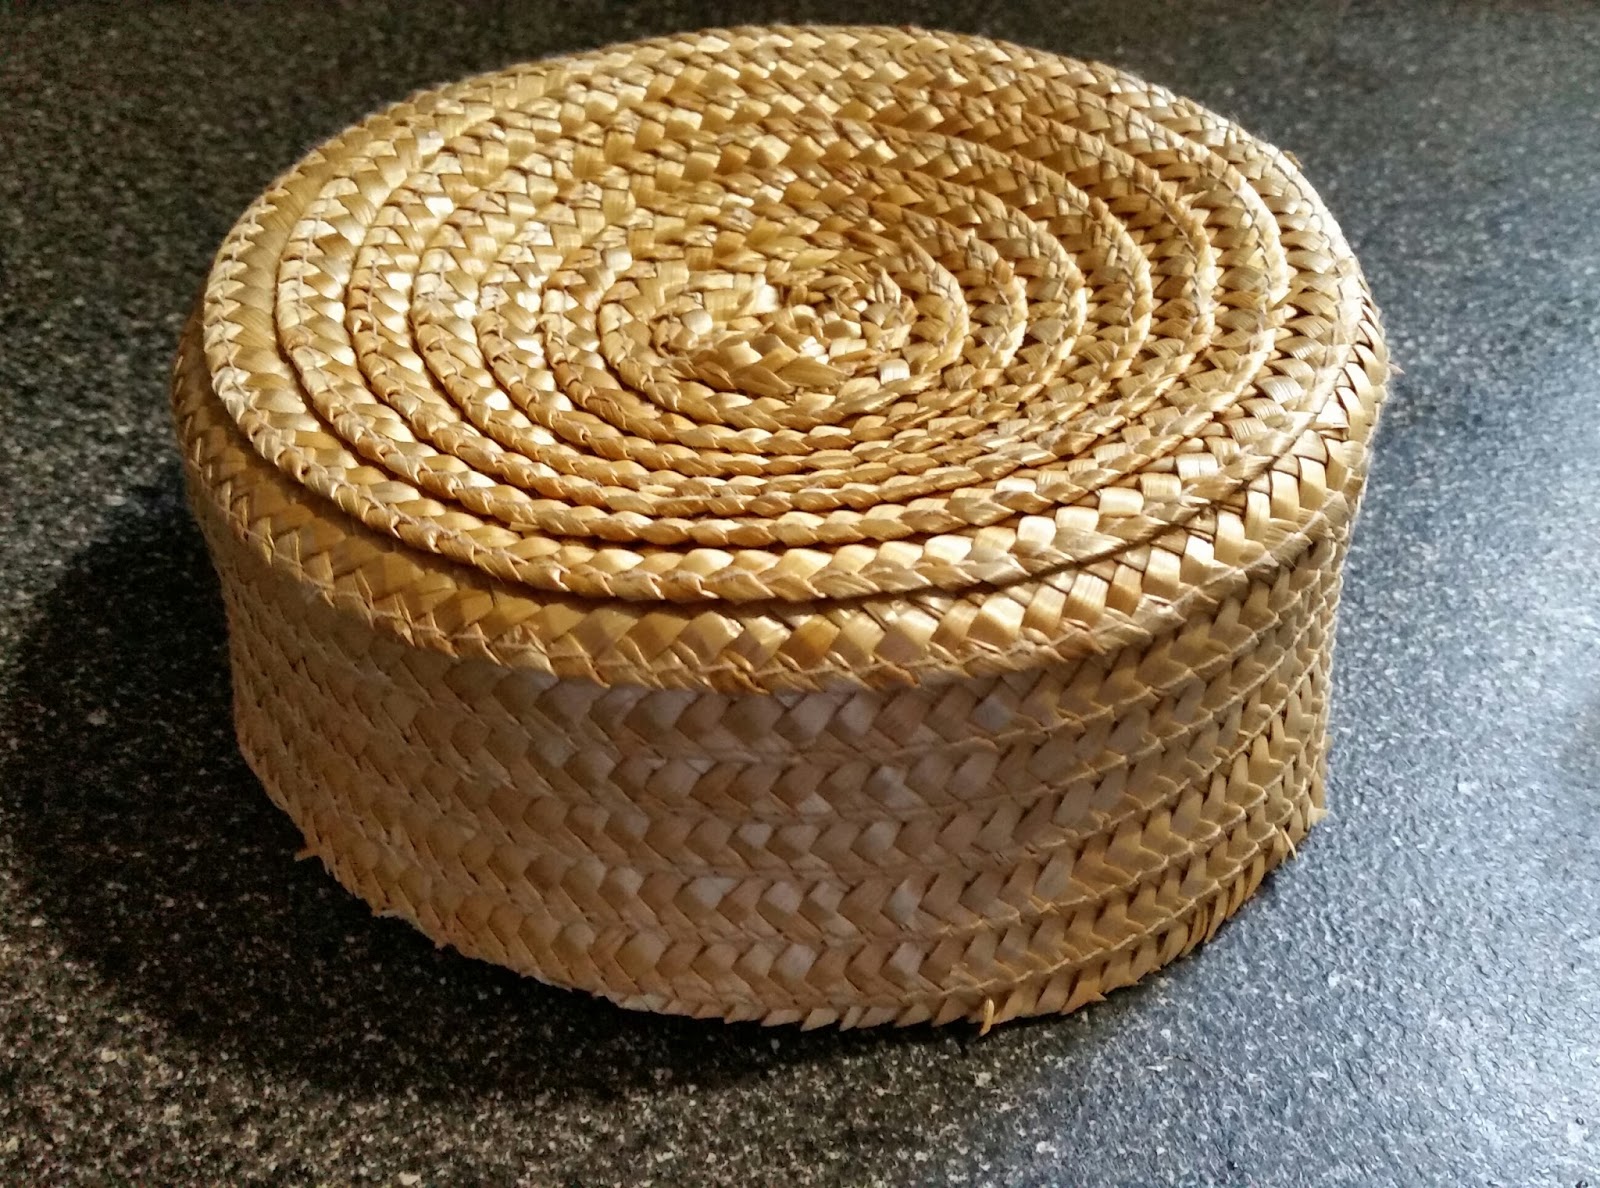
Woven straw looks exactly like what its name implies:
Braided straw is made from a long braid of straw that is spiraled and sewn to create the hat form--much like a braided rug. You can see the machine stitches which secure the braid. You will see different grades of braid--the better ones being narrower.
Another consideration is whether or not the hat has a double braid at the edge of the brim. You can usually see if there is only one or 2 layers at the edge. This isn't terribly important unless the particular style you wish to create requires it--as you can see in
this post.
Last, consider the overall shape of the hat and the changes you want to make to it. Sometimes, no amount of blocking can do what you need to do.
Let's consider the above picture. All of the hats above except the one in the center front, can be remade into flat hats with some simple techniques and blocking. The one in the center front cannot. My plan for that hat is to flip the brim down and reblock it into a 1920's cloche shape. The large hat at the left in back will be blocked to be a large Gainsborough style hat. The one at the left in front is small and almost a flat hat. That one will be made into an 18th century hat for my granddaughter. The other two have yet to be determined!
So--how do you repurpose a hat? First you need forms to block the straw over. I have a 3 pound coffee can for a straight crown with a flat top. I have a large plastic container that is slightly sloped (at the post linked above) and I have a stainless steel mixing bowl that works great for cloche style hats. You also need a stiffener--I use spray starch or you can use Knox gelatin in water. Steam and a good iron help. I actually iron directly on my flat hats. Sewing machine, thread.
My 2-part tutorial will show you how I made a floofy French hat. I've always been enamored by these somewhat silly hats:
The first hat is the one I wish to make. It's not quite so over-the-top as the others. Analyzing the picture, I see that it is a braided straw hat with a fairly large brim. It could be a flat crown but I believe there is a crown under the ruffle that supports the flowers. I like the daintiness of this one even though it is quite fancy. I've decided to remake a thrift store hat to have a 2 inch tall flat crown, a white silk taffeta ruffle that lays on the brim and one that sticks up around the crown, both ruffles being scalloped and pinked. Mulberry paper flowers will fill the crown and there is a twisted 2-color ribbon trim at the crown.
Here's my hat:
$2 at the thrift store! Just the size I need. The brim is stapled up so I removed the staple first. Unfortunately the flower was both stapled and hot glued on. I discovered that a few blasts of steam from the iron softened the glue enough to easily pull it off.
Next, I starched and ironed the brim
Obviously, I will need to change the shape of the crown and reduce its height. I also need to shrink it a bit. Since this hat was going to be covered with ruffles, I simply cut the crown off. I figured any stitching I need to do to reattach it will not be seen. You can also snip stitches and unravel it but I only do that when I need to reduce the width of a wide brim. Notice that I left a little lip of the crown to have something to stitch the new reshaped crown to.
Next, I wet the crown and placed it on my mold. Here I'm using a 3 pound coffee can with a piece of foil on it.
The crown is quite loose on the mold so bent the top around the edge of the can and wrapped the sides of the crown with some old bias and twill tape to hold it tightly to the mold. Basically, this will shrink the crown to fit the mold.
I left it to dry for a day then took the crown off the mold. You will notice that the crown it uneven due to the spiral construction.
I laid the crown top down on a flat surface and measured 2 inches up all the way around to even it out.
After trimming the crown, I pinned it into the brim with the brim overlapping about a half inch. In retrospect, I probably should have blocked it before cutting off the brim because the opening in the brim was bigger due to the shrinking of the crown. I pinned it in 4 places (12 o'clock, 3 o'clock, 6 o'clock and 9 o'clock) and steamed the brim to shrink it a bit. Then I placed it on the free arm of the sewing machine and stitched it using the widest zig zag stitch, I used white thread since the braided straw is also stitched with white thread.
The stitching barely shows and this could be used with just a ribbon trim.
The top of the crown is a bit sunken so I sprayed it with starch, steamed it then turned it upside down and weighted it down to dry.
Perfect! You can see how easy it would be to have made this a flat hat by making the crown about an inch high instead of 2 inches. I'm really happy with the result. The brim will undergo some additional blocking in the next phase.
Now for the fun part! Decorating the hat! Stay tuned for Part 2.