Showing posts with label embroidery. Show all posts

Thursday, October 6, 2022

Adventures in Home Sewing --18th Century Edition Pt. 2: Rose Blanket

 This was an unexpected addition to my miniature bed project.  My friend Joan suggested that I "sharpen my embroidery skills and make a rose blanket."  I was intrigued by that comment because, quite honestly, I had never heard of a rose blanket. Naturally, I had to do a cursory Google search.  I found a number of pictures of extant rose blankets--wool blankets that had a wool embroidered circular motive resembling a compass rose in each corner.  The "roses" appeared to be stitched mostly with herringbone stitch in wool thread.  They also had blanket stitching on both ends along with a woven stripe parallel to the end.  Joan told me about one she bought at an antiques market for a very reasonable price.  She ended up donating it to a museum after learning that it was indeed an 18th century blanket.  Hers was in incredible shape.  It has some places that were darned but the embroidered corners were all completely intact.   Here are a couple of pics of Joan's blanket.


 Researcher John Rees has an article about blankets issued to the Continental Soldiers entitled: "To Colonel Morgan, for the use of the Light Infantry, twenty four Dutch Blankets & four pair of Rose Blankets." Examples of Bed Coverings Issued to Continental Troops that had a lot of wonderful information.  There are links within the article.  I enjoyed this article as it showed examples of different types of blankets.  I had never really studied them before, just purchasing one from a friend who had some 3 point (?) blankets woven to 18th century specs for use in living history.  There are helpful links in this article, including one to the blankets page on the 18th Century Material Culture website.

Wm. Booth, Draper also had a nice facebook post from a few years ago with pics of the rose designs along with some information.

I decided to see if these were commonly sold to the public so I did a search for rose blankets in the newspaper database from 1770 to 1780 for blankets.  This brought up legislative acts and merchant ads.  The legislative acts weren't specific as to the type of blankets but they simply referred to supplying the troops with blankets.  The ads were very specific.  One thing that surprised me was that all of the ads were from Pennsylvania and New York.  There was one from Boston and one from Baltimore.  Here are some examples of ads.  Some are complete because I find these types of ads interesting and informative.

Two ads from 1771, both from the New York Gazette:


New York Journal 1772

Two ads from the Pennsylvania Journal 1772

Boston 1773

Pennsylvania Packet 1773

Pennsylvania Packet 1775

New York Gazette 1777

Pennsylvania Evening Post 1778

Pennsylvania Ledger 1778

I hope you find these ads as interesting as I do.  I find that when looking for something specific, I tend to find a lot of other very specific items that I wasn't even thinking of!  This is how I get lost in that rabbit hole for hours. LOL

Here are some detailed images from a late 17th century rose blanket.  The lighter embroidery gets lost a bit in the image but you can see it if you look carefully!


An image from the late 18th century: The Death of Voltaire.  Note the rose blanket on the bed!

Making the miniature rose blanket:

Materials:
blanket material
wool thread/floss

It appears that all of these blankets were white or cream.  I happen to have a piece of the 3/4 yard remnant of white wool flannel that I recently purchased.  I measured the bed and determined that 22 X 27 inches seemed to be the optimum size for my little bed.

I had a bag of Paternayan wool crewel thread.  It seems to be a bit "fluffy" for this and larger than it should be at this scale but I decided to use it.  I also had another brand of wool floss that was thinner but I didn't have the colors I needed for this project.  That particular thread was purchased for a specific project anyway.  You can see the differences between the two (Paternayan on the right):


I decided to stick with the most common colors I noticed in the extants:  dark red, blue, gold

The extants I've seen had a blue or brown stripe woven into the blanket at each end.  I couldn't really accomplish that so I decided to do a line of blue running stitch.  Blanket stitches were done at each end.

Here is the motif and the edge:

You'll note that you can see my pencil marks!  I've learned not to care so much about that.  Sometimes it's easy to impose 21st century standards on 18th century sewing but I've learned to let go of that.  After researching quilted petticoats and whitework and finding that there were extants with original pencil markings still there, I figured if it was good enough for them, it was good enough for me. LOL

Here is the blanket on the little bed:


And here it is draped over the bed as in Joan's picture!  I've come full circle from when I first saw a rose blanket!


I have to say--this was a really rewarding project.  As noted in the first bedding post, this type of "practical" sewing is not what I typically enjoy doing.  The research involved really is what drew me in. The rose blanket also had embroidery which I love doing.  I was able to make it completely from stash.

I think this pretty much buttons up the bedding project though I've had people suggest that I should make a quilted coverlet.  I've resigned myself not to do anything quilted until my quilted petticoat is completed so that may be a future project.

I have a few more "home sewing" items to share in a future post!


Friday, December 17, 2021

18th Century Trifles

My friend Ruth and I like to refer to small projects as trifles.  I guess only one of these really fits that term as three of the four were fairly involved.  They're small accessories so I thought I'd include them.

First--Sleeve links!  I had lost one of my fancy ones at an event so I decided to just make my own.  I picked up several sets of fancy silver buttons at Joanns along with some heavy craft wire.  I bent the wire, two pieces at a time, into S shapes and joined pairs of buttons.  The ones on the right are very similar to the one I lost!


Next up is a workbag I've been eyeing--an extant from the National Trust dated 1803.  


The flower petals are made from marquis shaped spangles which are difficult to find so I decided to embroider them with silk then add tiny metal spangles to the centers.  The embroidery was done on white silk duchess satin which I prewashed and ironed.


Finished embroidery

I lined the bag with burgundy taffeta.  I wanted white ribbon for the handles but didn't have any white satin ribbon in my stash so I used burgundy.  The original looks like it has bobbinette or lace netting as the ruffle trim--perhaps in a tarnished metallic. Since I had white French cotton bobbinette on hand, I decided to use that.  

Here is the finished workbag:


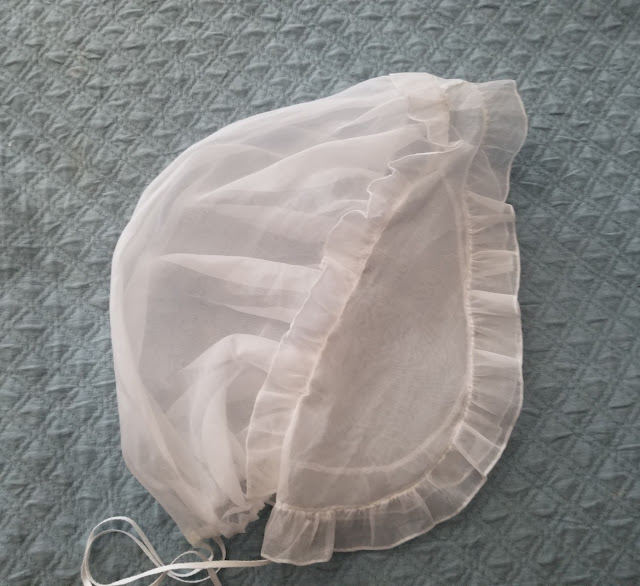
The next "trifle" is a lovely "big hair" cap that I made as a pattern tester for Virgil's Fine Goods.  It's different than any other I have in that the "ear" part is much larger.  I really like it!


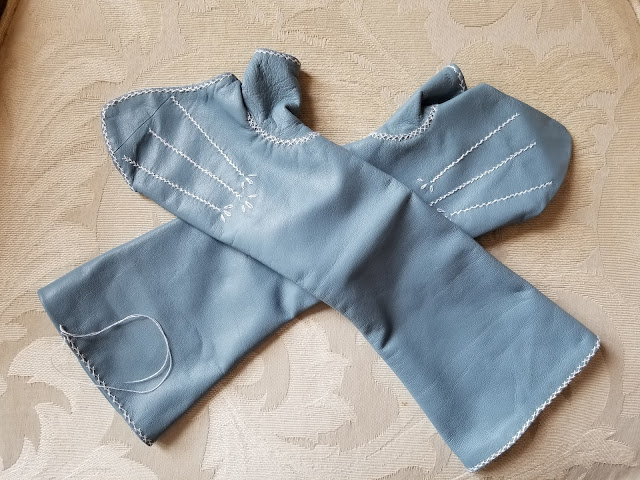
The last of the trifles is another pair of leather mitts in French blue lined with white silk taffeta.  I made them according to this post with slightly different stitching on the hems.  They are my 5th pair of leather mitts.  I love them!

Finishing up the 2nd mitt but want to get a pic in before the end of the year!


I will have a separate post on my masquerade masks which could also be considered "trifles."

I love small projects because they bring such a sense of accomplishment.  They're also great for practicing one's skills without a major commitment.


Saturday, September 4, 2021

"Women's plain and flowered sattin mitts"

 Mitts, mitts and more mitts.  I've been on a roll and have way too many pairs but I continue enjoying the research and construction of them.  What's a body to do?


I finally decided to make satin mitts out of some Duchess satin I had.  I made a pair of fancy unlined ones as a sample for a workshop I taught but this post is about another pair.  I finally decided to tackle the embroidery on my favorite extant pair of mitts in the Museum of Fine Arts, Boston.

These are constructed of silk satin and they are fully lined.  There are just so many interesting details but I particularly like the piecing on these mitts.  I can just imagine an 18th century seamstress pulling together her scraps to construct these.  I decided not to piece mine but really wanted to focus on the embroidery in particular.  Let's take a closer look.


Note that there is no herringbone stitching which is the most common embroidery you see on mitts.  The straight lines and the stitching around the thumb are double feather stitch.  While I've stitched feather stitch before, I've never stitched double feather and never done either in this tiny scale.   The wavy line in the middle is stitched with single feather stitches with straight stitches forming the floral motifs.   I also noted that the seams appear to be whip stitched on the outside which is interesting.

So how did I copy the embroidery?  First I resized the above cropped image to the size I wanted my finished embroidery to be.  Then I put it on a light tablet and traced it.


Because the image isn't exactly symmetrical, I mirror imaged it and printed both side by side.


Once again, I used my light table to trace this design on my mitts.  Note--when tracing the double feather stitch, I only traced the zig zag and not the individual stitches.  Likewise with the wavy line--I only traced the line itself knowing to change the direction of the feather stitches with each wave after studying the original photograph for some time.  I use a regular fine lead mechanical pencil for tracing embroidery on 18th century designs.  My quilted petticoat research noted that pencil markings could often be seen on extants.


The embroidery was stitched with 1 strand of Soie d'Alger silk floss.  


The mitts were constructed in my usual manner for lined mitts.  I'm quite pleased with the way they turned out.


The two layers of silk will be quite warm for the winter as well!

Also--Two other pairs of mitts, created as workshop samples for teaching:

Satin unlined mitts.  Embroidery worked with 1 strand of Soie d'Alger silk floss.  Faggoting stitch worked with 4 strands.  Tips are lined with taffeta.


Taffeta mitts, unlined, embroidery worked with 1 strand of Soie d'Alger silk floss.  The embroidery for these was copied from a pair in the Amsterdam Museum.

Next mitts on the menu will be French blue lambskin which will be made for teaching purposes.


Sunday, June 12, 2016

18th Century Pinball -- A Tutorial

I've always loved antique sewing tools.  Over the years I've collected a few.  There's just something special about using beautiful tools when creating.  Years ago, when I was making Heirloom sewn dresses for my daughter, I made myself a Victorian chatelaine to use.  It held my scissors, thimble, needle case and it had a pocket to hold embroidery floss or thread.

The needle case and thimble holders were hand crocheted.  The chatelaine is made of scraps of silk, ribbon and velvet and it is embroidered with silk floss and glass beads with silk ribbon trim.  It is trimmed with vintage glass and mother of pearl buttons.  It has always been one of my favorite things.

A few months ago, I discovered an 18th century pin cushion online that was called a pinball.  It was made of silk, embroidered with a cross stitched monogram and trimmed in silk ribbon.  It was made to hang from an equipage.  I've always loved pin cushions because the sky is really the limit as to what they can look like.  Further research found that pinballs were often made with needlepoint or knit.   They were made of linen, wool, or silk.  Some were banded with silk ribbon and some were banded with sterling silver bands.

Here are some 18th century examples:
Red silk banded with silk ribbon

 Linen, embroidered and banded with silk ribbon

 Knit from silk

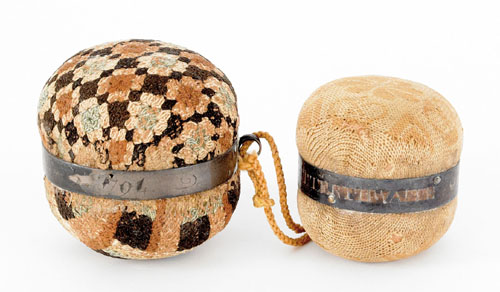
Knit and embroidered, banded with inscribed silver

Knitted and banded in silver

Queenstitch, banded in silver

There are many more of these to be found showing examples of flame stitch, crewel embroidery, cross stitch or simple forms of embroidery.  I decided that I wanted to make one of these banded in silver.  I found that Colonial Williamsburg sells the silver rings but they are quite expensive so I started looking at Ebay.  I found dozens of Christening bracelets made from sterling silver for a very reasonable cost.  I purchased one from someone in the UK for around $30 including shipping.  

Christening bracelets are adjustable and they are tiny.  This one has an inside diameter of approximately 1 3/4 inches.  After measuring the bracelet I had to decide on an embroidery design.  I thought I'd do cross stitch with my initials.  Typically I would use linen and do counted thread embroidery but I didn't think my eyes could handle it so I went with aida cloth.  I found an old cross stitch book of letters and I found a new one of coasters which had some blue snowflake like designs reminiscent of the blue patterned china of old.   


 I settled on navy blue cloth and white, gray and light blue cotton floss.  The diameter of the embroidered patterns was about 2 inches.  Here are my finished designs.


You will need to cut cardboard circles to use for each design.  These should be a little smaller than the inside diameter of the bracelet.  My bracelet was about 1 3/4 inches so I cut circles that were 1 5/8 inches. My bracelet was measured with it expanded as far as it could go.


When the embroidery was finished, I had to determine how large to cut the final circles.  Upon measuring and playing around by putting the embroidery through the silver bracelet to see how it looked, I decided that three inches would be a good size.  This is one of those things you just have to experiment with.

I drew a 3 inch diameter circle around each design and trimmed off the extra fabric 1/2 inch beyond the circle.  Next I used a very long doubled piece of upholstery thread and ran a gathering stitch on the drawn circle.

Here is the fiddly part.  As you draw up the gathers, begin stuffing the circle with filling--either fiberfill or wool batting.  Stuff it as full as you can--literally until you can't get any more filling in it.  Place your cardboard disk over the stuffing and pull the gathers, knotting the thread firmly.  You will then need to take stitches across the cardboard all around the circle, catching as many of the gathers as you can.

Place the two cushions together, making sure the designs are lined up and stitch them together using matching thread.  I used a doubled strand of navy blue silk. Make sure you pull your stitching tightly and knot it securely when finished.

Before putting the finished cushion in my ring, I needed to add a hanging loop.  You could use a purchased jump ring but I chose to make my own.  I had some 17 ga. twisted silver wire so I bent a short piece into a half circle, bending under the ends.

I put the ring around the bracelet between the two little slider bars.

You're almost finished!  Now you need to push your pin cushion through the bracelet.  It should be very tight keep pushing until the ring is around the center covering the stitching.  It should be a good tight fit!   You are finished!

Here is my finished pinball:


Attach your pinball to a chain, ribbon or equipage.  I attached mine to an equipage along with several other necessities.  Equipage is by Kimberly Walters (At the Sign of the Gray Horse).


This was such an enjoyable little project.  I think I'll make a silk one next!