Thursday, April 29, 2021

Book Review: Vintage Details: A Fashion Sourcebook by Jeffrey Mayer and Basia Szkutnicka

 Every so often I stumble on a book when looking at another on Amazon--you know the part of the page that says "people buying this book also looked at . . ."   This book was one such book that I purchased fall of 2019 and never took the time to look at.  I picked it up today and found it to be a handy sourcebook.  It focuses on women's garments from 1916 up to 1995, most of which are in the collection of the Syracuse University Costume Collection as well as a few pieces from private collections.  There are some interesting pieces, to say the least. 

This is a book entirely of photographs.   It's organized by type of detail as is indicated in the contents:

The visual index shows thumbnails with the front and back of each garment in full then it lists the page in each section where you can find that specific detail for the garment you are looking at.


Let's see how that works using the blue Robe de Style.  Note the abbreviations for each book section and the page number.

The neckline photo appears on page 38.


The fastening and buttonhole section on page 189:

The hems, darts, stitching and fitting devices section on page 230

The pleats, frills and flounces section on page 270

The embellishment section on page 303

And the construction section on page 369

There are other sections which didn't apply to this particular dress such as collars, sleeves, cuffs, pockets, and surface.

It's nice to have photos of all of these details.  I'm still not sure about the layout.  I think having the sections as they are may be helpful for someone who wants to study specific garment parts of a lot of garments.  I tend to study a specific garment and look at all the details in that garment so I prefer the pics to be all together.  I'd also love a full page pic of the entire garment.  Since this book is a book devoted to details, it definitely does its job.  It's a beautiful book.  The price has gone up substantially since I bought it though there appears to be used copies for sale.  

I would recommend this book for anyone who likes to study vintage clothing and who particularly enjoys seeing all the interesting details up close.

Wednesday, April 21, 2021

Achieving a 1920s Silhouette: 1920s Underpinnings

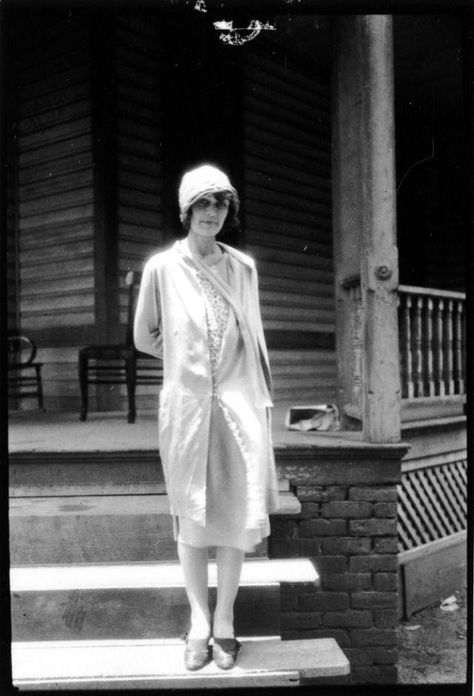
 I've always loved the fashions of the 1920s.  I've never thought I could wear them.  Why?  Let's look at pics of real people and determine the silhouette.  All of these pics appear to be mid-late 1920s.

Dresses:


Coats:

Beach Pyjamas:


What do you notice?  I see a lot of straight, boyish shapes.  Even older women who would be 
considered "stout" are straight.  I see no boobs and no hips.  This is completely opposite of my curvy shape.

Let's look at this book from 1924 and see some of the advice given in regard to obtaining the proper silhouette:


One passage talked about reducing the bust and hips up to 6 inches.  LOL.  I'm trying to imagine the corsetry that can do that.  This book is actually pretty interesting.  It goes into detail on choosing dress styles and adding trim details and such to lengthen the figure.

I'm a firm believer that all vintage/historical clothing requires the correct underpinnings to look authentic.  This means making a bunch of under garments before I can get to the fun part of making the frocks!

What will this involve?

Let's look at the different layers:  
If you are young with a "boyish"" figure then you can wear tap pants and camisole or a teddy and and a slip. Of course you'll need some kind of garters to hold up your stockings.  

Those of us with curves will need an entirely different arsenal of underwear.

First the chemise goes next to the skin if you will be wearing a corset or other "shapewear."

I have a 1922 catalog from a NYC department store which has a lot of options.  These little envelope chemises have a piece that goes between the legs from the back and buttons to the front so it's not entirely open.  One has potty access by unbuttoning 2 buttons at the lower front.

1924 Butterick Pattern


Next is the corset.

1922 corsets--similar to open bottom girdles in many cases.  These are clearly boned undergarments with a lot of structure.  Many have inserts of "rubber" elastic and they have suspenders to hold up one's hosiery. Note that most of them are under the bust.  If one has a smaller bust than it is contained by the chemise.  Otherwise a brassiere will be needed to reduce a full bust.

Corsets for "stout" women, which the book above describes as those with a size 28 inch waist of larger.

Brassieres:  These are garments with no stretch.  Note that they are basically flat with little shaping other than easing at the side seam or bottom.  They also have a suspender to hook to the tap pants or garter belt.


Corset brassieres--basically brassieres with suspenders for one's hosiery. They offer no shaping for the hips. There is also a corset belt--what I remember as a garter belt back in the 1960s. These are made of coutil with some having elastic insets.  They seem to close with hooks and eyes.

Elastic underpinnings.  Note the rows of elastic as apparently the heavy rubber elastic was not made in wide widths.  There is also an elastic brassiere to reduce the bust.  Because this catalog is from 1922, it appears to have some shaping accessories to appeal to older women who still want to wear their 19teens styles.  I assume the bust pads are for this purpose.

Corselettes:  These are unboned.  They seem to mostly be made of coutil with some having elastic inserts and they are designed to give a straight shape.
1924-25


1928-29 Corset brassieres

1924 brassiere

1928-1929 elastic brassiere

Slips:  Slips were straight.  Some had slight gathers or pleats at the side, much like a 1 hour dress pattern has (more on that in a later post)  These are from the 1924 book above.

Vintage 1920s slip pattern found on Etsy

Stockings:  Stockings came in a large variety--silk stockings with seams, cotton stockings, wool stockings, clocked and lace stockings.  Here are a few from my 1922 catalog.

I see achieving this silhouette to be a major challenge but I'm going to give it a try! 
I will post my progress in another post!


Sunday, April 18, 2021

18th Century Beaded Silk Muff Cover and other trifles

It's nice to do some small projects --though I have a way of making them into longer projects.  We took our winter workshop series online in February 2021 and our projects were a muff cover with Ruth taught, and quilted pockets which I taught.  I figured I'd do another muff cover since I had some nice silk remnants.  I've always loved these beaded ones pictured below:


The on on top is my favorite so I decided to try to replicate it.  I found a similar turban wearing woman image and printed it on silk using the method described in this post.   After fusing it to the fabric, I decided to look for the appropriate beads before tracing the embroidery.  This was more challenging than I first thought.  I could find them but the weren't necessarily the correct size.  My choice would be to use different beads that were smaller or more similar beads that were larger.  The milky faceted glass beads were the ones that determined this.  I could only find them in size 8.  Size 11 would've been better.  They're glass.  I also found vintage metal flat spangles.  
 
Let's look closely at the original:  It clearly has metal embroidery and spangles which have tarnished.  The stems are couched metal thread.  The bow figure has spangles sewn flat and covered by the white beads.  The "frame" around the portrait, however, appears to be a row of beads with couched metal thread along both sides.

This motif is clearly 3 beads with one spangle.

The ruffle has the spangles stitched flat covered with white beads like the bow at the top.


Here's my reference photo:

I played around with the size of the embroidery image to get the right size for the beads I bought,  converted the image to black and white and used my light tablet to trace the exact image right onto the silk.

I started with the embroidery. I didn't not have the right type of metal thread and used a modern thread that was the right color.  Because it was stranded, I chose to do outline stitch.  Then I stitched the sequins on.


Next came the white beads.  It's amazing how much weight they add to such a small piece!

I decided to not add the ruffles.  I think the proportions would've been off and it would've been too crowded looking as the image and embroidery were larger than the original.

I also added a "strap" of 2 inch wide blue ribbon to use as a "handle" of sorts.  There is an extant muff with this treatment which also has bows at each end of the strap to make it more decorative.

I'm quite pleased with how this one turned out.  The blue matches my quilted petticoat!

The quilted pocket workshop which I taught resulted in my having 2 more pairs of pockets.  The first one is linen bound with linen tape.  I studied the extants I found and they were bound.  I raided my remnant/scrap box and found the yellow linen and decided to use a contrasting thread for the quilting.  I had found an extant quilted bodice that had yellow thread on white fabric so I figured the contrast would show up nicely.  The hippogryph image is from a mid 18th century quilted petticoat from Rhode Island.


The second pair of pockets were based on an extant pair I found for sale in an antiques shop in MI. The seller had posted very detailed pictures of the construction of these pockets.  Unlike the other extants, they were not bound.  I used the same blue silk as the muff cover.


I enjoyed making these projects as they were diversions from the quilted petticoat I need to finish.  I really need to get back on that so I have it to wear this coming winter!