Showing posts with label pockets. Show all posts

Friday, December 31, 2021

2021 Costuming Year in Review


Another year done, another group of additions to my costuming wardrobe.  For some reason, I feel like I didn't accomplish as much this year.  I think that is because I seemed to make more accessories than large garments this year.  Needless to say, some accessories are every bit as time consuming as an 18th century gown and some are even more so.  I also spend a good portion of the year researching a new era--the 1920s.  So without further ado, here are my costuming accomplishments:

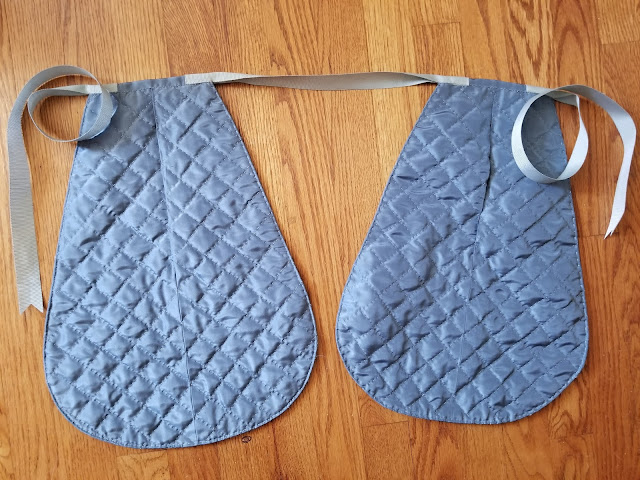
The first projects were samples for our February workshop which had to be moved online.  We had a quilted pockets class.  After studying a number of extants, I decided on 2 techniques for the pocket construction.  Both were quilted.

1.  Quilted linen pockets, bound with linen tape.  The hippogryphs were taken from from a 1740s quilted petticoat.

2.  Quilted silk pockets based on an extant pair.  These pockets are not bound but have the edges turned in and stitched with running stitch.

3. Another sample for our Feb. workshop which was on making muff covers.  The beading /embroidery design was copied from an extant muff in the Boston Museum of Fine Arts.  The image is printed on      silk.   Detailed post of the muff and pockets here.


4.  1920s underpinnings were a big part of this year. As is typical for me, I worked from the skin out--starting with an envelope chemise from a reprinted antique pattern from Silk and Thimbles on Etsy.

5.  1920's Corselette.  I used a pattern as a foundation for this but ended up totally redesigning it.  I don't like how this one works on me.

6.  1920s silk crepe de chine slip.  I used an image from an antique pattern.  The pieces looked like a 1 hour dress so I just drafted my own pattern for this.

7.  1920s Brassiere.  I started with the Wearing History pattern and changed it to match a brassiere in a 1922 store catalog.   Detailed post of these 4 undergarments here.

8.  One hour dress--self drafted.  This was made as a toile.  I will probably not wear it but I'm glad I made it.  It was enough to show me that this particular 20s shape doesn't work on me.  Detailed post here.

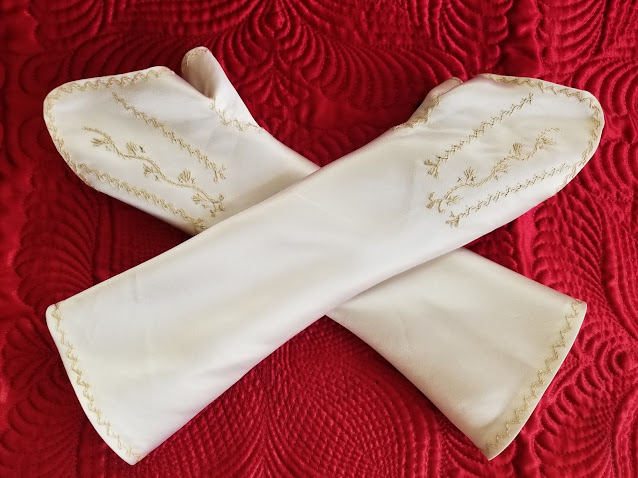
9. 18th century lined silk satin mitts.  These were a copy of a pair in the Bostom Museum of Fine Arts.    Detailed post here.

10.  18th century unlined silk taffeta mitts.  The embroidery was copied from a pair in the Amsterdam Museum.  These were one of 2 pairs I made as class samples for the summer mitts class I taught.

11.  Unlined silk satin fancy mitts.  This was my 2nd sample for the summer mitts class.  

12. 1778 silk taffeta English gown with pleated and ruched trim. Detailed post here.

Here's the gown as worn at the French Occupation at Newport, RI.

13.  2 Masquerades masks for our 18th century masquerade gift swap--paper mache covered with silk velvet, lined with linen and silk taffeta ruffle.

14. Silk mantelette based on Garsault pattern.  Silk taffeta, self lined, interlined with wool, trimmed with rabbit fur.  Detailed post here.

Here's the matelette as worn.

15.   1920s French corset based on several extants.  Detailed post here.

16.  1803 silk workbag with silk embroidery and spangles, copy of extant in the National Trust.  Detailed post here.

17. Annabelle cap: Pattern test for Virgil's Fine Goods new cap pattern!  Be sure to check it out!

19.  French blue lambskin mitts--class sample for leather mitts class.  

I was hoping to have one more outfit to show but it won't be finished today so it will have to be my first completed project for 2022!

It's easy for me to discount my accomplishment because so many of them are small.  Some of the small projects require the same time commitment as a full sized garment though.

Anyway--here's to a productive 2022!  Happy New Year!


Sunday, April 18, 2021

18th Century Beaded Silk Muff Cover and other trifles

It's nice to do some small projects --though I have a way of making them into longer projects.  We took our winter workshop series online in February 2021 and our projects were a muff cover with Ruth taught, and quilted pockets which I taught.  I figured I'd do another muff cover since I had some nice silk remnants.  I've always loved these beaded ones pictured below:


The on on top is my favorite so I decided to try to replicate it.  I found a similar turban wearing woman image and printed it on silk using the method described in this post.   After fusing it to the fabric, I decided to look for the appropriate beads before tracing the embroidery.  This was more challenging than I first thought.  I could find them but the weren't necessarily the correct size.  My choice would be to use different beads that were smaller or more similar beads that were larger.  The milky faceted glass beads were the ones that determined this.  I could only find them in size 8.  Size 11 would've been better.  They're glass.  I also found vintage metal flat spangles.  
 
Let's look closely at the original:  It clearly has metal embroidery and spangles which have tarnished.  The stems are couched metal thread.  The bow figure has spangles sewn flat and covered by the white beads.  The "frame" around the portrait, however, appears to be a row of beads with couched metal thread along both sides.

This motif is clearly 3 beads with one spangle.

The ruffle has the spangles stitched flat covered with white beads like the bow at the top.


Here's my reference photo:

I played around with the size of the embroidery image to get the right size for the beads I bought,  converted the image to black and white and used my light tablet to trace the exact image right onto the silk.

I started with the embroidery. I didn't not have the right type of metal thread and used a modern thread that was the right color.  Because it was stranded, I chose to do outline stitch.  Then I stitched the sequins on.


Next came the white beads.  It's amazing how much weight they add to such a small piece!

I decided to not add the ruffles.  I think the proportions would've been off and it would've been too crowded looking as the image and embroidery were larger than the original.

I also added a "strap" of 2 inch wide blue ribbon to use as a "handle" of sorts.  There is an extant muff with this treatment which also has bows at each end of the strap to make it more decorative.

I'm quite pleased with how this one turned out.  The blue matches my quilted petticoat!

The quilted pocket workshop which I taught resulted in my having 2 more pairs of pockets.  The first one is linen bound with linen tape.  I studied the extants I found and they were bound.  I raided my remnant/scrap box and found the yellow linen and decided to use a contrasting thread for the quilting.  I had found an extant quilted bodice that had yellow thread on white fabric so I figured the contrast would show up nicely.  The hippogryph image is from a mid 18th century quilted petticoat from Rhode Island.


The second pair of pockets were based on an extant pair I found for sale in an antiques shop in MI. The seller had posted very detailed pictures of the construction of these pockets.  Unlike the other extants, they were not bound.  I used the same blue silk as the muff cover.


I enjoyed making these projects as they were diversions from the quilted petticoat I need to finish.  I really need to get back on that so I have it to wear this coming winter!

Monday, May 16, 2016

Remnants

Fabric remnants are wonderful things.  When I first started 18th century sewing, I thought that there wouldn't be many occasions where I could use small remnants since most garments require so much fabric.  I'm finding out that I was wrong!  One can always use more kerchiefs or aprons but I'm finding other uses for them as well.

I've used remnants for my last 3 projects.  The first was a pair of pockets.  I had been wearing some children's pockets I had bought to keep at school to show the kids.  I can't believe how much larger adult pockets are!  I can fit everything I need in them.  I really wanted some crewelwork ones and one of these days I'll get around to making some.  In the meantime, I found a half yard remnant of some crewel embroidered linen blend in the home dec section at Joann's.  That along with some leftover osnaburg linen and some linen tape that I keep on hand was just what I needed.  

I used the Kannik's Korner pattern which has a number of different styles.  The last two views are from the last quarter of the 18th century in the United States.  I chose the ones with the wide opening and made them according to the pattern directions.  The opening is faced on the inside with wide linen tape which you can see above. The one place where I cheated was that I machine sewed the seam attaching the front and back pieces.  Once that is turned right side out, it is top stitched by hand so I figured it didn't matter as the seam stitches were encased.  Time was of the essence so this was quicker.  All other stitching is by hand.  I was pleased with the result.

The next project was another jacket from the J.P. Ryan pattern.  The first one I made had an overlapping front that pinned closed. I decided to do one with a stomacher this time as I purchased two remnants from Renaissance Fabrics:  1.5 yards of striped linen and 1 yard of plan buttery yellow linen.  I ended up using the striped linen for the jacket and the yellow for the stomacher.  The jacket was lined with plain white shift weight linen and made entirely by hand. 

My 21st century self told me that I had to balance the uneven stripes which I did.

The stomacher is boned and the tabs are made from cotton tape.

The eyelets were stitched by hand with silk buttonhole twist.  I marked the eyelets as indicated on the pattern but I think I need an additional one at the top as the top edges didn't lay flat when I wore it so I'll be adding those before I wear it again.


I wore this with my blue petticoat and a fancy new kerchief at Mt. Vernon for the Call of Arms event.


With my new friends in the garden at the greenhouse!  What a lovely day for a stroll!

My last project was a new kerchief.  This one is pretty generously sized--about 38 inches square.  I had a little over a yard of the my woven checked handkerchief linen that I made the apron in the picture out of so I decided to use it.  I love checked fabrics because it's so easy to cut a nice even square.  All I needed to do was a rolled hem all the way around.  Voila!  Another project done!


I love having these small projects as the big ones take sooooo long and it's nice to complete something in a night or two!  

Next up will be a big project!