Showing posts with label leather. Show all posts

Friday, December 17, 2021

18th Century Trifles

My friend Ruth and I like to refer to small projects as trifles.  I guess only one of these really fits that term as three of the four were fairly involved.  They're small accessories so I thought I'd include them.

First--Sleeve links!  I had lost one of my fancy ones at an event so I decided to just make my own.  I picked up several sets of fancy silver buttons at Joanns along with some heavy craft wire.  I bent the wire, two pieces at a time, into S shapes and joined pairs of buttons.  The ones on the right are very similar to the one I lost!


Next up is a workbag I've been eyeing--an extant from the National Trust dated 1803.  


The flower petals are made from marquis shaped spangles which are difficult to find so I decided to embroider them with silk then add tiny metal spangles to the centers.  The embroidery was done on white silk duchess satin which I prewashed and ironed.


Finished embroidery

I lined the bag with burgundy taffeta.  I wanted white ribbon for the handles but didn't have any white satin ribbon in my stash so I used burgundy.  The original looks like it has bobbinette or lace netting as the ruffle trim--perhaps in a tarnished metallic. Since I had white French cotton bobbinette on hand, I decided to use that.  

Here is the finished workbag:


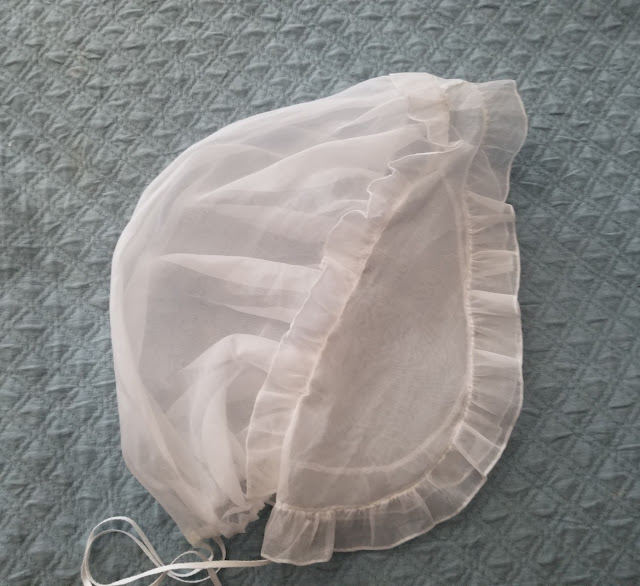
The next "trifle" is a lovely "big hair" cap that I made as a pattern tester for Virgil's Fine Goods.  It's different than any other I have in that the "ear" part is much larger.  I really like it!


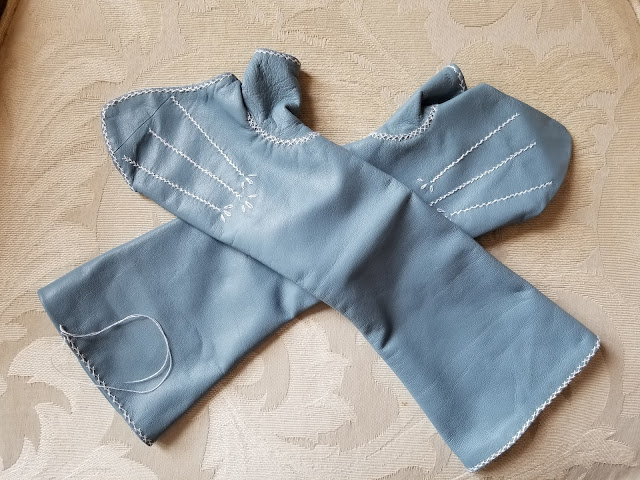
The last of the trifles is another pair of leather mitts in French blue lined with white silk taffeta.  I made them according to this post with slightly different stitching on the hems.  They are my 5th pair of leather mitts.  I love them!

Finishing up the 2nd mitt but want to get a pic in before the end of the year!


I will have a separate post on my masquerade masks which could also be considered "trifles."

I love small projects because they bring such a sense of accomplishment.  They're also great for practicing one's skills without a major commitment.


Saturday, July 25, 2020

Sewing during a Pandemic: "Women's purple and claret coloured lamb mitts"

I love making mitts and I've already made 2 pairs of lamb leather mitts.  This post is a tutorial of making mitts from leather.  I will be building on that tutorial below so you may wish to refer to both.

Milliners' ads in period newspapers show that mitts were available in many colors and materials.  There were several different types of leather listed as well:  kid, lamb and shammy for example.

Boston, MA 1762

New York,NY1768

New York, NY 1771

Portsmouth, NH  1768

Philadelphia, PA 1767

I had already made some straightforward traditional lamb mitts.  This pair was used in the leather tutorial post linked above.


I decided to make black lined with gray to wear with my wool mourning gown which I wear a lot in the winter.  Leather lined with silk is incredibly warm.  I kept these a bit plainer by not adding embroidery to the hemmed edges.


I was intrigued with the ad that mentions purple and claret lamb mitts.  I'm finding purple leather mitts to be fairly common in ads so why not reproduce those?  I wanted to make these a little fancier so I decided to base the embroidery on the extants below:

Linen Mitts

Black Leather Mitts

Color choices made:  Purple lamb with white silk and embroidery.  I normally use silk thread but this was during the pandemic lockdown so I had to work with the thread I had on hand.  I was lucky to find just what I needed.  Embroidery will be done with 1 strand of the Soie d''Alger silk floss.

For the claret mitts:  claret lamb plus pastel muted pink silk and silk floss.

Some helpful items:
The rubber thimbles on the thumb and forefinger make pulling a needle through leather sooooo much easier.  Size 12 glovers needles pierce the leather easier and make smaller holes.  They also bend easily so be prepared to go through a few of them.

One thing I did not go into detail with in the previous tutorial post was cutting the mitts out.  Mitts are cut on the bias when cutting from fabric so the lining will need to be cut that way.  For the lamb/leather however, you must go in the direction of the stretch which is perpendicular to the spine of the skin.  Inspect your leather for weak spots too because sometimes there are areas where the leather is much thinner.  The purple skin is 1 oz. lamb leather and the claret is  1 1/2 oz. lamb leather, both about 8 square feet which is enough for 2 pairs of mitts.  I will note that there is a significant difference when working on the two different weights.  If this is your first pair of leather mitts, you will find 1 oz. to be easier to work with.

I laid the pattern on the skin and traced it using a sharpie.  You cannot pin the leather.  You can scotch tape it in place if you are worried about the pattern slipping.  I just poked pins straight into the edge of the pattern piece by the edge to keep it from slipping. Cut a single layer at a time and remember to flip the pattern for the 2nd mitt!  Try to conserve the leather, fitting the pattern as tightly as possible on the skin.  Save your scraps!  They come in handy!


First I completed the embroidery on the hand using 1 strand of Soie d'Alger silk floss which matches the lining on both pairs of mitts (pink for the garnet mitts and white for the purple mitts).  I marked the lines using one of those blue water removable marking pens.  Note--and this is really important--this silk floss has a nap.  You need to thread the end you pulled from the skein into the needle.  If you thread the other end through--you will have knotting as you stitch.  Since you are only using one strand at a time, be sure to mark the starting end of your unused strands/


Once the embroidery was done, I made the thumbs as outlined in the tutorial and glued the seam allowances on the thumb seam, the hems on both edges of the thumb and the hem around the thumb opening on the mitts.  The previous tutorial contains information about what type of glue to use.

Using matching thread, whip stitch the thumbs in place on both the leather and silk mitts.  It's always helpful to have an assistant!


Cover the whip stitches with herringbone stitches using 1 strand of silk floss.  You will only be stitching through the top layers of the leather.

 Sew the side seams in both the silk and the leather mitts. This is literally the only place I use my sewing machine in 18th century sewing.  This leather is thin enough that you can use a universal needle though leather needles are preferable.  You will need to glue the seam allowances flat in the leather mitts.  I use a toothpick to apply my glue to about 2 inches of seam allowance at a time and immediately finger press the seam allowances in place.  This is contact cement so it grabs immediately on contact.


Roll the seam flat with the seam roller.

Next you need to glue the hems at the top and bottom of the leather mitts.  I do this the same way I do the seam allowance.  I just turn up a 1/4 inch hem and glue an inch or so at a time.  The tricky part is the point at the top of the mitts since it's a tight curve.  I do that by applying 3 dots of glue.

Then I just turn under the hem at those points and complete the rest of the hem.  I flatten out those "bumps" after the rest of the hem is done.

Take your toothpick with glue, stick some glue in those little bumps and flatten them out.

Turn the mitts to the right side and check the hems.

Use the seam roller to flatten the hems from both the right and wrong side.

Press under the hems on the silk mitts (lining).  With the wrong side of the silk lining out, drop the lining in the leather mitts and clip in place, making sure that the lining is not twisted.  I like using Wonder Clips but binder clips, paper clips, scotch tape--just about anything will work.

The lining gets whip stitched in place using tiny stitches that blend in.  You can use thread either the color of the leather or the lining.   I used size 100 silk kimono thread in white to stitch the lining in on both pairs.  While it didn't match the pale pink, the thread is so fine it blended it nicely.


Once the linings were all stitched in, I decided that the red mitts looked best without additional embroidery so they were compete.


I stitched a narrow embroidered edge on the edges of the purple mitts using one strand of white silk floss.


Final thoughts--I think I'm done with leather mitts for awhile.  This makes 4 pairs.  I do love them though.  I did learn that 1 oz. leather really is easier to work with.  1 1/2 oz. is significantly heavier.  The red mitts, being made out of the heavier weight should prove to be quite warm.   Now I get to rest my fingers before the net project!


Sunday, September 22, 2019

18th century leather and silk mitts

I love making accessories.  I needed some mitts or gloves for an upper class impression in the coming week and so I decided to knock out a pair of mitts.

Let's look at some extants:

Leather with herringbone embroidery

Leather with embroidery

Let's look at what was available in the colonies:

New York 1771:  Lamb and kid gloves and mitts in black, white and purple


Philadelphia 1776:  worsted, thread, cotton, kid, beaver Italian lamb and silk mitts.

These ads are consistent with all the others I looked at from 1771 - 1785 in Boston, Connecticut, Philadelphia, New York and Baltimore.

Let's look at a some portraits:

1766 (Copley)  Plain white silk or leather mitts

1770s--Princess Maria Luisa of Spain--white silk or leather mitts lined with gray silk

1784 (Ralph Earl)  Gray mitts lined with silk

Let this be a word to the wise--do NOT choose leather when time if of the essence.  Working with leather is time intensive and really hard on the fingers--as anyone who has ever bound stays with leather can attest.

I had made a fairly fancy pair of linen mitts a while back that you can see here.

I decided to make these a little plainer by sewing a side seam instead of having the faggotting open work.

First of all--to work with leather you need:  1 oz. glove weight kid, goat or lamb skin,  silk thread, leather hand sewing needles size 10 - 12 (I like 12 but they do bend easily), leather machine sewing needles if needed,  leather contact cement, seam roller, needle grippers/pullers

Things to know--You do NOT pin leather.  This can make things a little tricky.  I've used a number of methods to secure seams when sewing:  paper clips, quilting clips, scotch tape.

Hems are glued and seam allowances are glued flat.

I decided to line my mitts of white sheepskin with yellow silk taffeta to go with a hat I had just finished.

First I made my lining. I basically just made a pair of yellow taffeta mitts but left the edges raw.


Next, I cut the leather mitts.The stretch of the leather skin runs perpendicular to the spine so keep that in mind when placing your pattern on the leather and remember that you cut one mitt at a time, flipping the pattern for the second mitt.  I worked the herringbone embroidery using 1 strand of Soie d'Alger stranded silk embroidery floss.  It has 7 strands that you separate.  This was a time consuming process--taking me probably 3 times longer than fabric mitts would've.  First of all--it's easiest to NOT stitch all the way through the leather.  I took the first and last stitches all the way through so that the knots could be secured on the wrong side.  I made the herringbone stitches through the top layer of the leather skin.  This was a little easier on my hands.  I used a needle grip pad to push the needle into the leather and pull it out.

Once the embroidery was complete, I turned under the seam allowance on the thumb opening.  This is where your seam roller and contact cement come in handy.  I had run out of my usual leather cement which is similar to rubber cement.  I found this one, called Tear Mender, on Amazon.  It remains flexible after drying,  Rather than use the squirt bottle, I squirted a tiny puddle of the glue on a piece of foil and dabbed it in the seam allowances with a tooth pick then folded the allowance over.  Care must be taken because this is contact cement.  It grips on contact so there's no repositioning.  I found it helpful to fold and crease the allowance before applying the glue


Next I made the thumbs.  I decided to stitch the straight seams on the machine using Schmetz Size 10 leather needles.  Then I turned under the top and bottom seam allowance, creased and glued them,

There's really no way to secure the thumb piece to the mitt when stitching.  You can't pin it and it's too small to clamp.  I used super fine silk thread and whip stitched the thumbs to the mitts continuing to check the fit as I went along.

Next I covered the thumb seam with herringbone embroidery--just going through the top layers of the leather as before.

I machine stitched the side seams of the mitts, used the seam roller to press the seam open and dabbed contact cement on the seam allowances to keep them flat.  Then I inserted the lining into the leather mitts, folded the lining thumb hem in and the top edge hem in, finger pressed them and secured them with clips.

Using super fine silk thread, I whip stitched the silk in place just catching the outer layer of the leather.

I finished the bottom edge of the mitts the same way.

Here's what they look like at this point:


One strand of silk floss was used for the herringbone edge stitching on both the top and bottom edges of the mitts.


I'm still undecided as to whether or not to add herringbone edge stitching to the thumb hems.

Here are the competed mitts:


I'm pleased as punch with these but my fingers are SORE!  Next pair of leather mitts will be made over time way in advance of when they are needed!  I could've completed silk ones with faggotted seams in the same amount or less time.

I'm glad I made these though.  Silk lined leather will be warm but still dressy in the winter.

Edit:  I did go back and embroider those thumbs!