Embroidered Silk Mid 1770's
English Embroidered Silk 1735 - 1750
Silk brocade from 1760
English Embroidered Silk 1780 - 1785
Embroidered Silk and Leather
Martha Washington's Wedding shoes 1750's
I have some lovely striped silk that is predominantly yellow and pink with some green in it so I decided that I wanted my shoes to be pale yellow with flowers. I also decided to purchase the new Charlotte buckles that Kimberly Walters at the Sign of the Gray Horse was selling in her Etsy shop. These buckles look just like the ones in the 4th picture above. Kimberly has an antique pair that she had reproduced to the exact dimensions. I wasn't sure which color to get until I got my appliques for the shoes. I ended up with the Rose colored buckles.
I wasn't sure how I wanted to proceed with the shoe dying. I looked at this tutorial which uses fabric dyes. I have quite a stash of Procion MX fiber reactive dye for cotton so I decided to use what I had. I purchased iron on appliques at Joann Fabrics. Kimberly Walters had used the same ones on a pair of shoes and she recommended that they be glued on. I normally wouldn't shy away from ironing them on but there is no way they can be pressed on from the wrong side as suggested.
I assembled everything.
The instructions for mixing dyes for immersion dyeing make 3 gallons of dye. I had to compute how to make a much smaller amount. I had lemon yellow but I wanted to make it a little less yellow. I mixed 2 parts yellow and 1 part ecru which seemed to soften the color a bit. I made a very week dye solution, figuring I could build color with additional coats.
American Duchess includes a leather backed swatch with their dyeable shoes. I brushed one coat of dye on a section of the swatch and blew it dry. I did this two more times. I found three coats to be the right amount. You can see all three levels of dye on this swatch.
I liked the way that swatch went with the applique.
I made sure to make notes in my dye notebook for future projects.
Following the instructions on the linked blog above, I brushed the dye on the shoes using long strokes. I made sure to stuff the shoes with paper towels first.
One thing about fabric dyes is that they are watery. Your shoes will literally get soaked. I noticed some weird pinkish brown marks that began showing up on my shoes. I was baffled as to what they were but given that I used 3 coats of dye and the shoes were soaked through, I realized that these marks were from the leather dye of the shoe lining which was coming through. This became evident when I took the paper towels out after the second coat.
Once dry, the marks were less obvious. I figured they wouldn't be as noticeable once the flowers were applied.
I've never used regular shoe dye. American Duchess does sell it on her site and I may try that next time as I suspect it would require fewer coats. However I was pleased with this color. It was the exact color I was looking for and I've used Procion MX dyes for well over 20 years so I know how they work.
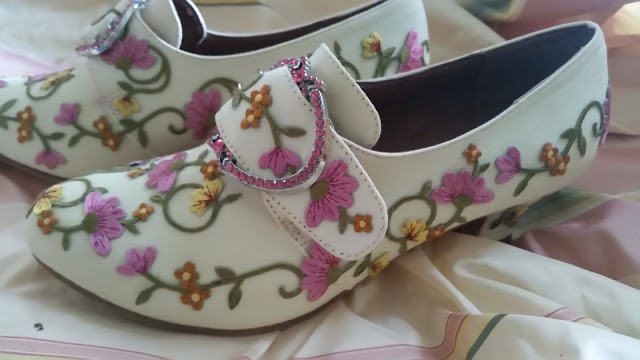
I laid the appliques on the shoes to see how they looked. Because I could not get appliques with mirror images, I had to play around with them to give them a balanced look. I used E6000 glue and worked in sections.
First I glued the appliques on the toe area. It was hard to keep them flat due to the shape of the shoes so I wrapped the shoes in plastic wrap and secured it with shipping tape to dry. I finished the remaining sections of the shoes this way.
I decided that the entire shoes needed flowers so I purchased more appliques and pieced them to fit the heels and the top strap.
Once dry, I checked the appliques for places that may need more glue and I touched those up. Time for Kim's gorgeous buckles!
I'm really pleased with the outcome of this project. I was cautious due to the price of the shoes but I won't think twice next time! Here is the finished project. The color is a little washed out in these photos. The shoes are definitely a pale yellow.


Squeeee! They look amazing! Bravo!
ReplyDeleteGood job on the dyeing the shoes. It's not as easy as it seems, with non-shoe-specific dye. Yes, we do sell the dyes specifically for shoes, in 1 oz. pots, and it takes only one coat to apply and doesn't soak the shoes through. It might be an option for next time. :-)
Thanks so much. I think I was afraid the shoe dye would be too intense for this project. Next time that's what I'll do though. I do need to get some of your waterproofing spray before I wear them! It was a fun project!
ReplyDeleteHeavens and stars!!! They are incredible!!!
ReplyDeleteHeavens and stars!!! They are incredible!!!
ReplyDeleteGorgeous!!! What lovely work.
ReplyDeleteI LOVE EVERYTHING ABOUT THIS! Seriously it makes me want to go out and buy some appliques immediately to try this out.
ReplyDeleteExcellent collection i love them bit i have also a good collection of sandals if you want to buy a stylish sandals then visit bodofashion.in
ReplyDelete