Tuesday, July 26, 2016

American Duchess Shoes Upgrade. A tutorial

I've always loved fancy shoes as I described a while back in this post.  Why should my 18th century self be any different?   Since the American Duchess was having her annual Bastille Day sale, I decided to get some cotton dyeable Kensingtons to play with.  I really want to make some shoes that are reminiscent of the lovely 18th century embroidered silk shoes I've seen.  Here are some extant examples of embroidered shoes from the 18th century:

Embroidered Silk Mid 1770's

English Embroidered Silk 1735 - 1750

Silk brocade from 1760

English Embroidered Silk 1780 - 1785


Embroidered Silk and Leather

Martha Washington's Wedding shoes  1750's

I have some lovely striped silk that is predominantly yellow and pink with some green in it so I decided that I wanted my shoes to be pale yellow with flowers.  I also decided to purchase the new Charlotte buckles that Kimberly Walters at the Sign of the Gray Horse was selling in her Etsy shop. These buckles look just like the ones in the 4th picture above.  Kimberly has an antique pair that she had reproduced to the exact dimensions.  I wasn't sure which color to get until I got my appliques for the shoes.  I ended up with the Rose colored buckles.

I wasn't sure how I wanted to proceed with the shoe dying.  I looked at this tutorial which uses fabric dyes.  I have quite a stash of Procion MX fiber reactive dye for cotton so I decided to use what I had. I purchased iron on appliques at Joann Fabrics.  Kimberly Walters had used the same ones on a pair of shoes and she recommended that they be glued on.  I normally wouldn't shy away from ironing them on but there is no way they can be pressed on from the wrong side as suggested.  

I assembled everything.

The instructions for mixing dyes for immersion dyeing make 3 gallons of dye.  I had to compute how to make a much smaller amount.  I had lemon yellow but I wanted to make it a little less yellow.  I mixed 2 parts yellow and 1 part ecru which seemed to soften the color a bit.  I made a very week dye solution, figuring I could build color with additional coats.


American Duchess includes a leather backed swatch with their dyeable shoes.  I brushed one coat of dye on a section of the swatch and blew it dry.  I did this two more times.  I found three coats to be the right amount.  You can see all three levels of dye on this swatch.


I liked the way that swatch went with the applique.

I made sure to make notes in my dye notebook for future projects.

Following the instructions on the linked blog above, I brushed the dye on the shoes using long strokes.  I made sure to stuff the shoes with paper towels first.


One thing about fabric dyes is that they are watery.  Your shoes will literally get soaked.  I noticed some weird pinkish brown marks that began showing up on my shoes.  I was baffled as to what they were but given that I used 3 coats of dye and the shoes were soaked through, I realized that these marks were from the leather dye of the shoe lining which was coming through.  This became evident when I took the paper towels out after the second coat.  


Once dry, the marks were less obvious.  I figured they wouldn't be as noticeable once the flowers were applied.

I've never used regular shoe dye.  American Duchess does sell it on her site and I may try that next time as I suspect it would require fewer coats.  However I was pleased with this color.  It was the exact color I was looking for and I've used Procion MX dyes for well over 20 years so I know how they work.

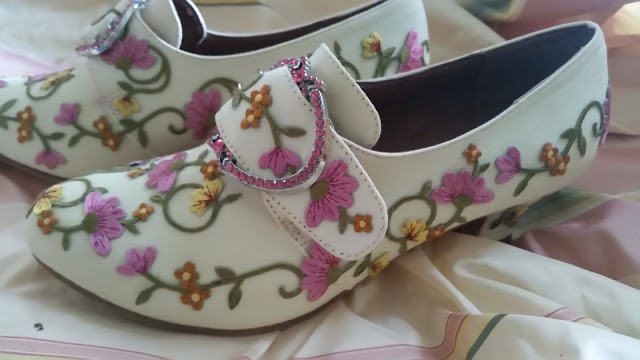
I laid the appliques on the shoes to see how they looked.  Because I could not get appliques with mirror images, I had to play around with them to give them a balanced look.  I used E6000 glue and worked in sections. 


First I glued the appliques on the toe area.  It was hard to keep them flat due to the shape of the shoes so I wrapped the shoes in plastic wrap and secured it with shipping tape to dry.  I finished the remaining sections of the shoes this way.


I decided that the entire shoes needed flowers so I purchased more appliques and pieced them to fit the heels and the top strap.


Once dry, I checked the appliques for places that may need more glue and I touched those up.  Time for Kim's gorgeous buckles!

I'm really pleased with the outcome of this project.  I was cautious due to the price of the shoes but I won't think twice next time!  Here is the finished project.  The color is a little washed out in these photos.  The shoes are definitely a pale yellow.


Sunday, July 17, 2016

English Gown upgrade #2

You might remember when I upgraded my English Gown in this post.  After more research I've learned that cotton trimming on gowns was not pinked.  Pinking was reserved for silk so I decided to redo the sleeve ruffles and trim on my gown.  I ripped off the flounces and trim on the gown and made new ones.

I decided to use the sleeve ruffles from the Larkin & Smith English Gown pattern.  I cut the ruffles a little longer as indicated in the pattern and narrow hemmed them, stitching them on the gown using the techniques described in the pattern.

I cut crosswise strips 2 inches wide for the trim and roll hemmed the long edges.  I pinned the strips over the ruffle stitching in box pleats approximately 1 inch wide.  I didn't measure, just pinning the pleats and adjusting them so they looked even.  I used a prick stitch to stitch the pleats down about 1/4 inch from each edge.


I made the same trimming for the neckline.  I used two full widths of fabric and started at the center front, pleating around to the back.


I was very happy with the outcome of this upgrade--particularly since I know it is now historically accurate!  I wore my gown with my new mitts and tambour embroidered apron to Mt. Vernon on July 4th.


We interrupt our sewing to bring you . . . fresh tortillas!

I love almost any food that comes in a tortilla.  Always have, always will.  I've always purchased ready made tortillas and chips.  When Gloria joined the family, I had to rethink a few things.  For those readers who may not know--Gloria is a 30 year old Blue Front Amazon parrot who was being rehomed.

One way to bond with parrots is to share one's food with them.  It's how they bond with their young.  Gloria, it turns out, loves tortillas and nachos in particular.  The problem is that she should not have oil or salt.  So I decided to try making tortillas.  

I was surprised to find that the only ingredients in corn tortillas are corn masa, water and sometimes salt.  No special equipment is really necessary though a tortilla press certainly speeds up the process and gives you more uniform tortillas.  I ordered an 8 inch press from Amazon.

I bought some corn masa at the local grocery store.  The recipe on the bag calls for 2 cups of masa and 1 1/4 cups of water.  That's it.  Having made the recipe several times I found that it doesn't make as many as I want so I use 3 cups of masa and approximately 2 cups of water.

Place the masa in a bowl.


Add your water and mix with a wooden spoon until a dough begins to form.  Turn mixture out to the counter or a board and knead until a dry dough forms.  You may need to add more water.  You want a stiff dough.  Wrap the dough in a towel to keep from drying out.


Cut open a gallon zip loc bag and place it on the open tortilla press.  Break off some dough about the size of a golf ball and place it in the middle of the press.


Cover with the rest of the plastic, close the press and push.


Open the press and carefully peel the tortilla off of the plastic.


Place the tortilla on a hot cast iron griddle, preheated to about 450 degrees.  I put mine on a burner set on medium for about 5 minutes before starting.  The tortilla will puff up a little.  Cook for about a minute then flip over.


Flip over again and cook a few more seconds on each side.


Place the tortilla on a tea towel lightly spritzed with water and cover it so it doesn't dry out.  
Continue this process until you have used all of the dough.


This batch made a dozen 7 - 8 inch tortillas with dough for 2 more left over.  I decided to use that dough to make some tortilla chips for Gloria.  I placed it on the counter and poured some amaranth, hulled millet and flax seeds.


I kneaded the seeds into the dough and made two more tortillas.


After cooking the tortillas, I brushed them lightly with coconut oil then cut them in small pieces for Gloria.  You can also cut them in wedges for humans!


Place your chips on a non stick baking sheet and bake at 350 degrees for 10 minutes.  Turn over and bake another 5 minutes.  Allow them to cool on the sheet then package in an airtight bag or container.


Here is Miss Gloria enjoying her chips.


I used our tortillas for vegetarian enchiladas.

Enchiladas
  • 8 - 12 fresh corn tortillas 
  • 1 bag shredded Mexican cheese
  • 1 medium sweet onion diced
  • 1 can large pitted black olives, sliced
  • 12-ounce bottle enchilada sauce (I like Trader Joe's)
  • canola oil
Pour about 1/2 inch of canola oil into one large skillet and the entire contents of the enchilada sauce into another large skillet.  Heat both on low.  Assemble the other ingredients near by.  Heat one tortilla in the oil for about 5 seconds then in the enchilada sauce, turning to coat.  

Place the tortilla on a plate and place some of the onion, olives and cheese in the middle.  wrap both sides over to make a roll.  Place in a baking pan.  Repeat until you have enough.  I was able to place 8 enchiladas in a 9 X 13 baking dish.  If you make smaller tortillas then you will be able to use more of them.  Pour the remaining sauce over the enchiladas and bake at 350 degrees for 10 - 15 minutes.

Allow the enchiladas to set for about 5 minutes after removing from the oven.  Serve them with grated hard Mexican cheese (or you can use Asiago or Parmesan in a pinch) and a dollop of sour cream.

These enchiladas can easily be made vegan by using vegan cheese.  You can also bypass the canola oil but they are more tender when it is used.

Yum!