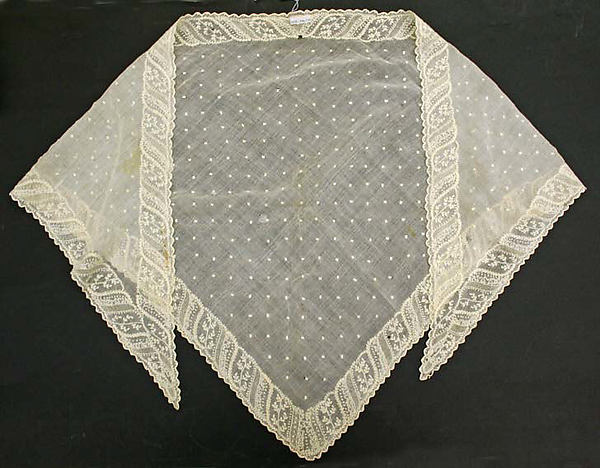
I'd like to offer some do's and don'ts about using vintage linens to create accessories.
1. Familiarize yourself with the styles of lace and embroidery that were used in the 18th century. Lace was obviously handmade at that time and it was typically bobbin or fine needle lace. There are some fine French Valenciennes laces available today, usually from heirloom sewing suppliers, that while machine made, are somewhat similar to those of the 18th century. You will need to find which motifs are appropriate. This link is an academic article about lace that is appropriate for Revolutionary War reenactors. It is also helpful to study extant garments to see the types of laces and embroidery they are decorated with. This link will take you to a list of links to photos of extant garments to look at.
Here are some extant accessories that are representative of pieces that may be reproduced using vintage linens:
Aprons
Kerchiefs
Sleeve Ruffles
Most of these are tambour embroidery or whitework on muslin or linen. There is also some Brussels lace on a net ground. You will find these styles of embroidery to be fairly common on vintage curtains in particular.
2. Consider the size of the garment you are making and the placement of the embroidery on the curtain or household item. I have found that some curtains have the embroidery just across the bottom whereas others have it at the bottom and up one side. You will need to take this into consideration when planning your project. Here is an example. I have a pair of 24" X 36" curtains with tambour embroidery. Their small size is somewhat limiting in what I can make. I can cut a 24" square handkerchief with the embroidery on one side. I've shaded the area that would create a handkerchief. I could also just cut that into a triangle. Since I have another curtain like this which is a mirror image, I could also seam the two curtains together in the center to make an apron with embroidery down the sides and across the bottom. It is helpful to consider this before purchasing your linens.
3. Condition of the linens. Look at the condition and determine how much restoration must be done. It's easy to whiten linens if that is the only problem. Years ago, I took a restoration class at the Smithsonian and they used a solution of Sodium Perborate as a whitener. This is the main ingredient in Clorox 2 powder so I've always made a fairly strong solution of Clorox 2 powder and room temperature water. I soak the linens in it until white, rinse thoroughly and hang or lay flat to dry. One thing to be careful of--when you are lifting wet linens from soaking, be sure to support the weight of them from underneath as the weight can cause tearing.
Another thing when considering the condition is to look for repairs. Many repairs aren't readily visible and others are. Look to see if the repairs are done by hand or machine. If machine repaired, can it be restitched by hand? Remember that you are making a period piece and you don't want machine stitching to show.
Here are a few projects that I've made from vintage linens.
1. Muslin/organdy apron with tambour embroidery:
I was fortunate enough to come across a pair of vintage curtains that were 89 inches wide by 91 inches long with tambour embroidery along the bottom edge. I cut a portion of one curtain about 48 inches wide and 30 inches long. I gathered the top with stroke gathers and bound the top with antique silk grosgrain ribbon. Here is what the curtain looked like:
I only used a section of one curtain and I believe I have enough left of that plus the unused curtain to make a Regency dress with an embroidered hemline and possibly embroidered sleeves!
2. Fancy tambour kerchief:
This piece needed more restoration. It was new old store stock that was extremely discolored. Here is what the curtain looked like before cutting:
Close up of the embroidery
As you can see, most of the embroidery is concentrated in one corner so I chose to make a half handkerchief using the fancy corner of the curtain. It is quite generously sized: half of a 38 inch square. I've decided to use the opposite corner for a smaller, simpler half kerchief. It's waiting to be roll hemmed.
3. Fancy lace apron:
This one required a bit more work. Here is what the original curtain panel looked like:
It was about 70 inches long. First I had to whiten it, remove the fringe and I had to find some narrow appropriate French lace for an edging.
Nice and white!
I had to choose a good place to cut the curtain--looking at the design on the lace and keeping the apron an appropriate length. I decided to gather the lace in 5 places because it was fairly narrow--only 32 inches wide--and I didn't think it was wide enough to gather it all the way across. Fortunately the extant piece that inspired me was gathered this way. I made a waistband out of organdy and I will insert silk ribbon ties in the ends of the waistband which were left open.
Here is the extant apron that inspired this piece:
This piece is on muslin and mine is lace. Some of the motifs are similar and this apron is edged with narrow bobbin lace similar to the modern lace I used.
Repurposing linens is fun and it's like a treasure hunt combing through them in thrift stores, yard sales and online auction sites.
It's always rewarding to be able to use someone else's cast offs to make a new treasure!


No comments:
Post a Comment