Wednesday, June 29, 2016

18th Century Summer Mitts

I've been dying to make some mitts for a while.  They seem like such a practical thing to have--wool or leather for the winter and linen for the summer.  I love the simplicity of the mitts of that era yet they make such an ideal canvas to show off one's embroidery prowess.
Here are some examples of extant mitts:

Yellow Silk

 Red Silk

Linen

Leather

Fancy Embroidered Linen

Fancy Embroidered Leather

I started out looking at the pattern and examples in Costume Close Up.  The pattern is a 1/2 inch scale so I copied it at 200% and pieced it together.  I wasn't sure about doing it that way so I ended up getting the Larkin & Smith pattern which is basically the exact same style.


I'm glad I did!  The pattern has a bound booklet with instructions, photographs of all the construction steps along with photos of the extant pair of mitts the pattern is modeled after.  It also contains in depth stitch guides.   The instructions are very well written.

I traced the medium sized mitt piece to make a muslin.  I didn't bother making the thumb pieces for the muslin.  All three sizes of mitts use the same thumb piece.  I then just machine stitched a 1/4 inch seam to check the fit. I ended up shortening the pattern 1 inch.  Also, these mitts are cut on the bias which gives them a little bit of stretch.


I decided that I would make summer mitts from a piece of handkerchief linen leftover from a cap.  I also decided to do the embroidery but to omit the wrist slit.  The first thing I had to do was practice my embroidery stitches as it had been over 20 years since I last did this sort of thing. Fortunately there's a local shop called the Stitching Post that specializes in cross stitch and they had several brands of stranded silk floss.  I settled on Soie d'alger  6 strand floss which they carry in over 100 colors.  Since I like itty bitty needles, I bought some size 10 beading needles which are very thin with a larger eye to make threading easier.  Using 1 strand of floss I practiced my herringbone and edge herringbone stitches.

I cut out the mitts and pressed the hem all the way around the edges.  The directions say to press under 1/4 inch then turn under the hem allowance to make a 1/8 inch hem.   I had trouble doing that with the fabric being cut on the bias so I just pressed under the 1/4 inch and left the edge raw.  I used matching (white) silk sewing thread and stitched a running stitch all the way around to secure the hem.  I made my running stitch about 1/8 inch from the folded edge.  Making the running stitches an even distance from the fold helps in making you herringbone stitches even.  Then, using one strand of floss, I stitched the three lines on the glove front and did the edge herringbone stitches around the edges as indicated in the pattern instructions.  Because the gloves are cut on the bias, some stretching occurred during the stitching.  I steamed them to flatten them back out before proceeding.


Finished stitching

Inside of glove edge stitching


I decided that I would do the double 1/8 inch hem on the thumb pieces as I thought they would get more wear.  I pressed that hem under and then pressed under 1/4 inch on the curved edge that gets stitched to the glove body.  I thought that pressing those first would make it easier.  I then stitched a 1/4 inch side seam in the thumb piece.  The instructions said to whip stitch the allowance but I did a felled seam that ended up being about 1/8 inch wide.

I used running stitch to secure the thumb hem and the seam allowance on the curved piece.  The thumb hole was the trickiest part.  I slightly snipped into the seam allowance and finger pressed it under about 1/4 inch, being careful to maintain the heart shape.

The thumb pieces butt to the glove piece.  They do not over lap.  I just whipped them together using tiny whipped stitches.  The pattern is so well made that I did not have to pin.  The pieces fit together perfectly.


Thumbs stitched on


Then the thumb seam is covered with herringbone stitches, being careful to cover the white running stitches.


Finished thumbs

According to the pattern, the point linings are stitched on using the edge herringbone stitch after pressing the hem allowance under.  I decided not to do it quite that way as I didn't want to mess up the other side which also had herringbone.  I did the edge herringbone stitches on the point lining piece, then laid it on the glove piece, wrong sides together.  I used white silk thread and tiny whip stitches to stitch them together on the very edge.   I secured the straight edge of the point lining to the glove with whip stitches --not the running stitches as indicated in the pattern.


All that is left to do is the ladder stitch which connects the side seam.  I used 4 strands of floss for this and I spaced the stitches about 3/8 inch apart, based on the spacing of the edge stitches. I think next time I will make these stitches closer together.


Close up of stitching on back of hand

Close up of palm

Finished mitts


I'm so glad I decided to undertake this project.  These will be perfect sun protection from the hot July 4 sun at Mt. Vernon!


Thursday, June 23, 2016

Raiding the linen closet . . . 18th century edition! A tutorial.

I love vintage and antique lace and linens.  I have quite a collection of vintage linens which I use in my home.  Most of them are printed or embroidered scarves, tablecloths, doilies etc. from the early 20th century.  Some are family pieces.  I've been purchasing vintage linens again -- only with the intent of repurposing them into 18th century accessories.  This started after I saw some extant examples of aprons and kerchiefs that had fancy embroidery and, quite frankly, I just don't have the time to do the embroidery.  Most of the examples I've seen have some sort of whitework:  Tambour, Dresden, pulled or drawn thread embroidery.  Sometimes they have a combination of these techniques.

I'd like to offer some do's and don'ts about using vintage linens to create accessories.

1.  Familiarize yourself with the styles of lace and embroidery that were used in the 18th century.  Lace was obviously handmade at that time and it was typically bobbin or fine needle lace.  There are some fine French Valenciennes laces available today, usually from heirloom sewing suppliers, that while machine made, are somewhat similar to those of the 18th century.  You will need to find which motifs are appropriate. This link is an academic article about lace that is appropriate for Revolutionary War reenactors.   It is also helpful to study extant garments to see the types of laces and embroidery they are decorated with. This link will take you to a list of links to photos of extant garments to look at.

Here are some extant accessories that are representative of pieces that may be reproduced using vintage linens:

Aprons


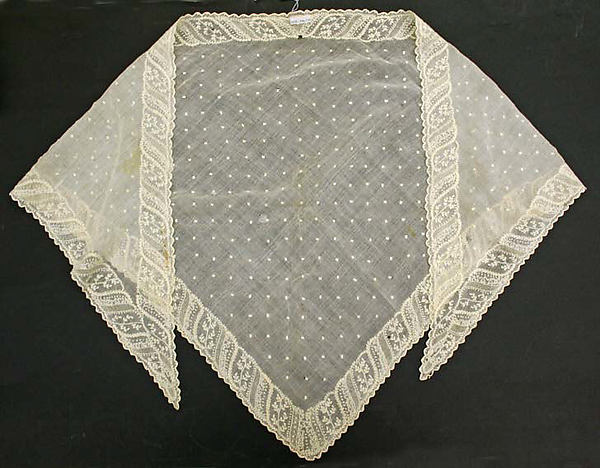
Kerchiefs


Sleeve Ruffles


Most of these are tambour embroidery or whitework on muslin or linen.  There is also some Brussels lace on a net ground.  You will find these styles of embroidery to be fairly common on vintage curtains in particular.

2.  Consider the size of the garment you are making and the placement of the embroidery on the curtain or household item.  I have found that some curtains have the embroidery just across the bottom whereas others have it at the bottom and up one side.  You will need to take this into consideration when planning your project.  Here is an example.  I have a pair of 24" X 36" curtains with tambour embroidery.  Their small size is somewhat limiting in what I can make.  I can cut a 24" square handkerchief with the embroidery on one side.  I've shaded the area that would create a handkerchief.  I could also just cut that into a triangle.  Since I have another curtain like this which is a mirror image, I could also seam the two curtains together in the center to make an apron with embroidery down the sides and across the bottom.  It is helpful to consider this before purchasing your linens.

3. Condition of the linens.  Look at the condition and determine how much restoration must be done. It's easy to whiten linens if that is the only problem.  Years ago, I took a restoration class at the Smithsonian and they used a solution of Sodium Perborate as a whitener.  This is the main ingredient in Clorox 2 powder so I've always made a fairly strong solution of Clorox 2 powder and room temperature water.  I soak the linens in it until white, rinse thoroughly and hang or lay flat to dry. One thing to be careful of--when you are lifting wet linens from soaking, be sure to support the weight of them from underneath as the weight can cause tearing.  

Another thing when considering the condition is to look for repairs.  Many repairs aren't readily visible and others are.  Look to see if the repairs are done by hand or machine.  If machine repaired, can it be restitched by hand?  Remember that you are making a period piece and you don't want machine stitching to show.

Here are a few projects that I've made from vintage linens.  

1.  Muslin/organdy apron with tambour embroidery:


I was fortunate enough to come across a pair of vintage curtains that were 89 inches wide by 91 inches long with tambour embroidery along the bottom edge.  I cut a portion of one curtain about 48 inches wide and 30 inches long.  I gathered the top with stroke gathers and bound the top with antique silk grosgrain ribbon.  Here is what the curtain looked like:

I only used a section of one curtain and I believe I have enough left of that plus the unused curtain to make a Regency dress with an embroidered hemline and possibly embroidered sleeves!

2.  Fancy tambour kerchief:

This piece needed more restoration.  It was new old store stock that was extremely discolored.  Here is what the curtain looked like before cutting:
Close up of the embroidery

As you can see, most of the embroidery is concentrated in one corner so I chose to make a half handkerchief using the fancy corner of the curtain.  It is quite generously sized:  half of a 38 inch square.  I've decided to use the opposite corner for a smaller, simpler half kerchief.  It's waiting to be roll hemmed.

3.  Fancy lace apron:


This one required a bit more work.  Here is what the original curtain panel looked like:

It was about 70 inches long.  First I had to whiten it, remove the fringe and I had to find some narrow appropriate French lace for an edging.


The lace was soaked as described above.  I wrapped it around a glass to keep it flat and to keep it from tangling then I immersed the glass in the solution.  I rinsed and dried it on the glass as well--putting the glass out on my deck table to dry in the sun.

Nice and white!

I had to choose a good place to cut the curtain--looking at the design on the lace and keeping the apron an appropriate length.  I decided to gather the lace in 5 places because it was fairly narrow--only 32 inches wide--and I didn't think it was wide enough to gather it all the way across.  Fortunately the extant piece that inspired me was gathered this way.  I made a waistband out of organdy and I will insert silk ribbon ties in the ends of the waistband which were left open.

Here is the extant apron that inspired this piece:
This piece is on muslin and mine is lace.  Some of the motifs are similar and this apron is edged with narrow bobbin lace similar to the modern lace I used.

Repurposing linens is fun and it's like a treasure hunt combing through them in thrift stores, yard sales and online auction sites.

It's always rewarding to be able to use someone else's cast offs to make a new treasure!

Sunday, June 12, 2016

18th Century Pinball -- A Tutorial

I've always loved antique sewing tools.  Over the years I've collected a few.  There's just something special about using beautiful tools when creating.  Years ago, when I was making Heirloom sewn dresses for my daughter, I made myself a Victorian chatelaine to use.  It held my scissors, thimble, needle case and it had a pocket to hold embroidery floss or thread.

The needle case and thimble holders were hand crocheted.  The chatelaine is made of scraps of silk, ribbon and velvet and it is embroidered with silk floss and glass beads with silk ribbon trim.  It is trimmed with vintage glass and mother of pearl buttons.  It has always been one of my favorite things.

A few months ago, I discovered an 18th century pin cushion online that was called a pinball.  It was made of silk, embroidered with a cross stitched monogram and trimmed in silk ribbon.  It was made to hang from an equipage.  I've always loved pin cushions because the sky is really the limit as to what they can look like.  Further research found that pinballs were often made with needlepoint or knit.   They were made of linen, wool, or silk.  Some were banded with silk ribbon and some were banded with sterling silver bands.

Here are some 18th century examples:
Red silk banded with silk ribbon

 Linen, embroidered and banded with silk ribbon

 Knit from silk

Knit and embroidered, banded with inscribed silver

Knitted and banded in silver

Queenstitch, banded in silver

There are many more of these to be found showing examples of flame stitch, crewel embroidery, cross stitch or simple forms of embroidery.  I decided that I wanted to make one of these banded in silver.  I found that Colonial Williamsburg sells the silver rings but they are quite expensive so I started looking at Ebay.  I found dozens of Christening bracelets made from sterling silver for a very reasonable cost.  I purchased one from someone in the UK for around $30 including shipping.  

Christening bracelets are adjustable and they are tiny.  This one has an inside diameter of approximately 1 3/4 inches.  After measuring the bracelet I had to decide on an embroidery design.  I thought I'd do cross stitch with my initials.  Typically I would use linen and do counted thread embroidery but I didn't think my eyes could handle it so I went with aida cloth.  I found an old cross stitch book of letters and I found a new one of coasters which had some blue snowflake like designs reminiscent of the blue patterned china of old.   


 I settled on navy blue cloth and white, gray and light blue cotton floss.  The diameter of the embroidered patterns was about 2 inches.  Here are my finished designs.


You will need to cut cardboard circles to use for each design.  These should be a little smaller than the inside diameter of the bracelet.  My bracelet was about 1 3/4 inches so I cut circles that were 1 5/8 inches. My bracelet was measured with it expanded as far as it could go.


When the embroidery was finished, I had to determine how large to cut the final circles.  Upon measuring and playing around by putting the embroidery through the silver bracelet to see how it looked, I decided that three inches would be a good size.  This is one of those things you just have to experiment with.

I drew a 3 inch diameter circle around each design and trimmed off the extra fabric 1/2 inch beyond the circle.  Next I used a very long doubled piece of upholstery thread and ran a gathering stitch on the drawn circle.

Here is the fiddly part.  As you draw up the gathers, begin stuffing the circle with filling--either fiberfill or wool batting.  Stuff it as full as you can--literally until you can't get any more filling in it.  Place your cardboard disk over the stuffing and pull the gathers, knotting the thread firmly.  You will then need to take stitches across the cardboard all around the circle, catching as many of the gathers as you can.

Place the two cushions together, making sure the designs are lined up and stitch them together using matching thread.  I used a doubled strand of navy blue silk. Make sure you pull your stitching tightly and knot it securely when finished.

Before putting the finished cushion in my ring, I needed to add a hanging loop.  You could use a purchased jump ring but I chose to make my own.  I had some 17 ga. twisted silver wire so I bent a short piece into a half circle, bending under the ends.

I put the ring around the bracelet between the two little slider bars.

You're almost finished!  Now you need to push your pin cushion through the bracelet.  It should be very tight keep pushing until the ring is around the center covering the stitching.  It should be a good tight fit!   You are finished!

Here is my finished pinball:


Attach your pinball to a chain, ribbon or equipage.  I attached mine to an equipage along with several other necessities.  Equipage is by Kimberly Walters (At the Sign of the Gray Horse).


This was such an enjoyable little project.  I think I'll make a silk one next!