I followed this article for setting in the sleeves and constructing the bodice. Basically, I constructed the bodice without the shoulder straps and sleeves and the lining the same way. I stitched them together at the center front then I stitched the lining shoulder strap in. The sleeves are lined and put in at this point with the bottom of the sleeve attached seam inside. Then the seam is shifted to the outside and stitched on top of the shoulder strap. Three pleats are put in the back of the sleeve cap to make the sleeve fit. After the sleeve is attached, the fashion fabric shoulder strap is attached.
Bodice seams were sewn with a combination stitch comprised of running stitches with an occasional backstitch. The sleeves were attached with backstitches for strength. Long skirt seams were sewn with running stitches. The skirt and shoulder straps were attached with lapped seams with whip stitches. The skirt pleats were formed freehand--something I've gotten quite good at doing. I'm pleased with the final result. Due to time constraints I chose to use hook and eye tape which takes away from the authenticity of this gown. Otherwise, it's dead on correct. I also regret not putting boning at the center back.
The materials used were: Williamsburg cotton print from Renaissance Fabrics, white linen for lining from Burnley and Trowbridge, silk thread, steel boning, hook & eye tape. Petticoat materials: cotton matelasses from Renaissance Fabrics, linen tape from Burnley and Trowbridge.
Front shoulder strap
back shoulder strap showing sleeve pleats
front facing with hook & eye tape
lining sewn to skirt
back bodice showing skirt pleats
sleeve lining
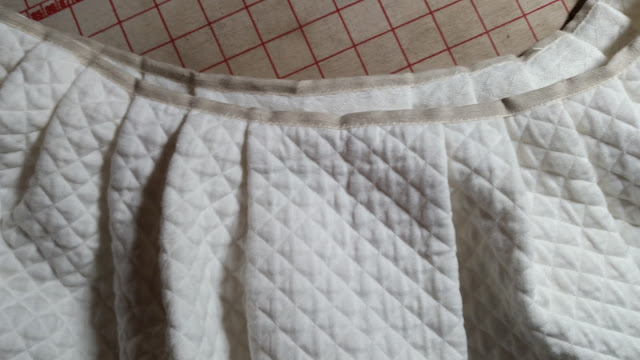
I wore the gown over a matelasse petticoat which was worn for warmth. It had enough body to not need a hip roll. The matelasse was 60 inches wide so I used two lengths, sewed the side seams with a running stitch and tacked down the pocket openings. I pleated the top using fewer but larger pleats than normal--a 4 inch box pleat in the center front and a 4 inch inverted box pleat at the center back. Typically I would have about 26 pleats in the front but I had about 10. The top was bound with 1 inch wide linen tape whip stitched to the outside and inside of the petticoat.
front pleats
back pleats
Here are the pics of the gown:
At the Carlyle House in Old Town Alexandria VA
With my soldier


Lovely and thank you for including details about where you got your fabrics.
ReplyDeleteLovely and thank you for including details about where you got your fabrics.
ReplyDelete