Ah the twenties! I'm not talking about flapper dresses but rather the early 20s frocks which still retain many of the features of the 19teens. Those I can wear! Flapper styles? Not so much. The early 20s frocks had waistlines and slightly gathered skirts. Often the waist was at the natural waist or just slightly below. It was not fitted and the silhouette was that of a flat bust. Let's look at a few in the 1922 spring catalog from the Charles William Stores in New York City:


All of these frocks share certain style features--most notably the slightly dropped waistline and a gathered skirt that isn't too full. Some have sleeve seams and are slightly more fitted in the shoulders and others have kimono style sleeves cut as one with the bodice. Many, actually most of these, have a center vestee type feature. This gives us a bit of a clue to the construction. While these frocks look fairly simple, when you look at the instructions included in period patterns, a modern sewist will be left with more questions than answers--particularly where closures are concerned.
This was my experience when I started planning to make this pattern from the Vintage Pattern Lending Library (view C):


If you are unfamiliar with this pattern source and enjoy making authentic vintage/historic garments, I highly recommend checking them out. Their patterns are reprints of historic patterns with some annotation on the instructions. They come in whatever size the original pattern was in so some knowledge of pattern grading is helpful.
With this pattern there are pattern pieces for internal waist bands and a lining that is separate from the dress itself--probably serves as a substitute for a corset cover. The instructions say to have the bodice closure along one side of the vestee and the skirt closure at the left side with a placket. The pieces attach to an internal waist band. The illustrations were a bit confusing to me.
Enter Janet Arnold to save the day. This 19teens frock pretty much shows how the pattern works:
Edwardian frocks have raised waist seams with an internal waistband --the skirt being "hung" from the top of the waistband. The frock above clearly has a side placket on the skirt but a center closure on the bodice so the left half of the bodice snaps to the skirt internal waistband. My frock has a side front closure on the bodice, a left side closure on the skirt and a center front closure on the bodice lining. This I can figure out! This concept wasn't totally foreign to me given that I have a 1930s frock with a bodice lining that snaps, while the outer bodice has a different closure.
Before beginning, I needed to grade the pattern a bit. This pattern was for a 38 bust so I decided to reduce the bodice 2 inches. I traced the pattern pieces for the bodice lining and the bodice onto pattern tracing cloth and made 1/4 inch tucks on each front piece between the neck and shoulder and in the back in the same place. Each tuck reduced it by 1/2 inch. I like using pattern tracing cloth because I can pin or baste it together for fitting. I cut 2 fronts and cut the back piece on the fold to be able to do this then I can use the altered pieces for the pattern itself. Both bodices were perfect!
I constructed the lining and used hook and eye tape in the front. The neck edge of the lining is finished by turning in the 3/8 inch seam allowance and securing with rayon seam binding--something else not specified in the instructions. I used 1 inch wide petersham for the internal waist band, stitching it over the bottom seam allowance and turning it in then tacking it at the side seams. The lining is constructed so the seam allowances are out--facing the bodice--so they can't be seen from the inside of the frock. The seams are French seams. I didn't photograph this. It is constructed so that the finished, or right side, of the lining is toward the body.
I referred to both my 1916 sewing book and my 1927 sewing book to see what seam treatments to use. Simple pinked seams and seams bound with seam tape were common for "tailored" garments in both books. Since this frock is worsted, I figured it would apply. My vintage 1930s wool crepe dress has both seam finishes as well.
The view I was doing calls for lace for the collar and cuffs. I found a suitable lace that was synthetic--not my fave but finding 6 inch wide black vintage lace was more of a challenge than expected. The lace really didn't have much body so I decided to back it with black silk organza. I cut the pattern pieces out of the organza first and turned the outer long edge in 1/4 inch, laying the lace on top so the scallops hang off of the organza. I stitched the layers together by hand on the outer edge and by machine along the neck edge, trimming the lace along the organza edge (which was cut to the pattern piece.)
Upper cuff shown from right side, lower cuff from wrong side
Cuffs and collars were applied to the bodice/sleeves as per pattern instructions with raw edges covered with rayon seam tape and stitched in place. Seam tape seems to be pretty standard for facings during this era.
The top edge of the vestee was hemmed with seam tape then was covered with 3 overlapping pieces of the same lace, stitched in place by hand. The sides and bottom were turned under 3/8 inch and hemmed with seam binding.
After the bodice pieces were stitched together, the challenge began. I decided not to use the internal waistband pattern pieces because the worsted fashion fabric and the China silk lining just didn't seem to be suitable materials. I had some 1 3/8 inch black Petersham ribbon on hand so I figured I'd use that. The waist measurement of the altered pattern was too small but since the bodice is "blousy" with a gathered bottom edge, I didn't worry about that. However the waistband did need to fit. The bodice hits at the top of my hip bone so I took my measurement there, computing a comfortable fit. I decided that 39 inches at the high hip would be comfortable--a little loose--and it could be adjusted with the sash.
Looking at the Janet Arnold image, it looks as if the skirt and bodice were constructed almost as separate pieces so I decided to do that. First, I cut a length of ribbon 44 inches long and marked the center front, center back and side seams. I cut extra for overlap of the placket.
Next, I cut the skirt pieces, sewed the side seams and made a placket in the side seam allowance. If you look at the Arnold illustration, the placket overlap is back over front due to the bodice construction. The skirt was gathered to the edge of the petersham ribbon. The raw edge of the fabric was bound with 3/4 inch china silk ribbon.
Inside showing internal petersham belt.
Outside showing placket and binding
The inside of the placket will be stitched down by hand.
Next, the bodice has to be fitted to the same low waist measurement. I added gathering stitches to the bottom of the bodice, breaking them at the side seams.
Next, the vestee was pinned in place and checked for fit then the vestee was stitched in place on the right side under the collar.
A binding for the bottom of the bodice was cut out of 1 inch china silk ribbon. In my examination of early 20th century frocks, I notice that seam binding is commonly used and the 5/8 inch seam binging I had was a bit too narrow. I marked the ribbon to match the internal belt of the skirt and pinned it on the bottom of the bodice at the side seams, and center front and back, making sure that the left front was pinned over the vestee.

Once the binding was done on the bodice, I pinned it to the skirt, right sides together. The seam edges were offset a bit to make sure that the bodice binding would be fully in the seam allowance. I decided to stitch this seam by hand using a small back stitch.

Next I added hooks and eyes to the waist band. I also decided to add some narrower petersham to the bodice seam allowance where I would be applying snap fasteners as it seemed to need a bit more structure. I stitched the narrower petersham to the left front waist seam allowance if the bodice and turned it to the inside, topstitching the fold with prick stitches. This held it in place better since the bodice was gathered.
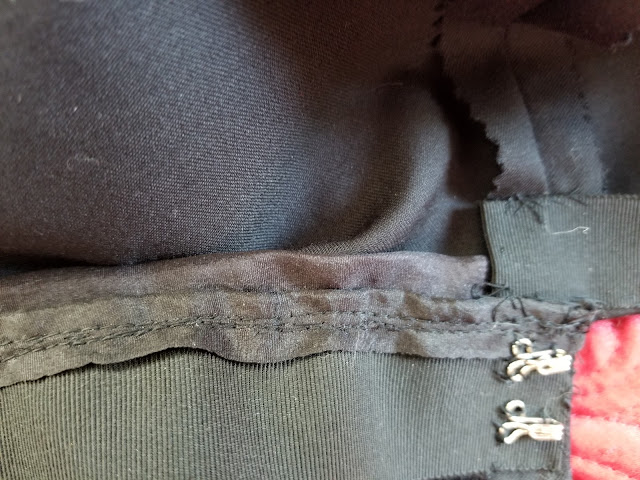
Then I spent two nights sewing in snap fasteners. These closures are fascinating to me. Here's the closure completely open. Note that it is open at the left side of the vestee, along the left waist and at the left side of the skirt,

Step 1: Hook the waist, snap the skirt placket and snap the vestee to the skirt.

Step 2: Snap the bodice to the skirt.

Step 3: Snap the vestee closed.

Finishing details for the frock: tack the cuffs in place and hem. Then stitch the lining in. The lining is stitched to the bodice around the neck edge and tacked at the side and shoulder seams.

The sash is the last thing I need to do. I had purchased some vintage silk/rayon taffeta ribbon that was 5 inches wide. It seemed too crisp and was a bit too wide. I decided to use black taffeta to make a sash. I figured 4 inches wide would be about right. I tore 2 crosswise strips of black silk taffeta 9 inches wide by the 56 inch width of the fabric. After stitching the strips together at the short end, I folded them in half lengthwise and stitched a half inch seem. I wasn't sure what I wanted the finished length to be so I figured I'd take care of the ends later. With the dress on, I played around with the sash to see where I wanted to tie it and how long it was. I pinned it at the right side seam (bottom edge of the sash about an inch below the waist seam), at the center back and at the left side seam. I decided to cut the ends at an angle and take off about an inch in length from each end, turning the edges in on themselves and closing with a whip stitch. I tacked the sash at the right side seam (at the top and bottom edge of the sash), at the center back (bottom edge of sash) and at the left side (bottom edge of the sash. I'm quite pleased with the way it looks.
I've also decided that since this has the separate bodice lining, I really do not need to wear a full slip so I will make a black taffeta petticoat which will be discussed in a separate post.
Here is the finished frock on my dress form.
Cuff detail

Sash detail

Bodice

Side with closure

Back

Front

Here are the accessories I wore with the frock: American Duchess Bellatrix shoes, black silk clocked stockings, antique 20s camphor glass necklace and bracelet, new earrings made with vintage camphor glass, and 14k 20s watch that belonged to my husband's grandmother.

Getting dressed: First the envelope chemise, French corset and stockings

Add the 20s brassiere and the taffeta petticoat


I'm very happy with the way this frock turned out and I'm excited to find a style from the 20s that works for me. My research revealed that there are some others including the Robe de Style which I will also explore. Flapper style dresses just don't work on my body. I was surprised at the amount of time it took to get this right. This can be blamed on my desire to make it historically accurate. I can make an 18th century gown by hand in less time. The next time I use the pattern will be much easier because the grunt work has all been done. Another thing about this one--the lining really isn't necessary. I decided to include it since this was a research project of sorts but it's possible I will omit it if I use this pattern again, depending on the fabric.